- Huge Pages
- OS specific setup
- 1GB huge pages Linux only
- Включение параметра «Блокировка страниц в памяти» (Windows) Enable the Lock Pages in Memory Option (Windows)
- Включение параметра «Блокировка страниц в памяти» To enable the lock pages in memory option
- huge pages windows 10 включить
- Включение параметра «Блокировка страниц в памяти» To enable the lock pages in memory option
- Вики IT-KB
- Инструменты пользователя
- Инструменты сайта
- Боковая панель
- Право блокировки страниц в памяти (Lock pages in memory)
Huge Pages
Huge Pages, also known as Large Pages (on Windows) and Super Pages (on BSD or macOS) is very important thing for almost all supported CPU mineable algorithms, typical hashrate increase is 20-30% when huge pages used, for RandomX it can increase performance up to 50%. XMRig use term huge pages on all platforms, please don’t confusing.
If XMRig use huge pages you will see lines with text like bellow in miner log.
OS specific setup
On Windows you need special privilege called as SeLockMemoryPrivilege to use huge pages.
First check miner output if you see line below you already have this privilege and no additional actions required.
If not, you have 2 options to obtain it, both are require admin rights.
- Easiest way: run the miner as Administrator once and reboot.
- Manual configuration
On Windows 10 once you obtain the privilege, admin rights no longer required to use huge pages, but on Windows 7 admin rights always required. Please note on Windows no way to reserve huge pages for future use and the miner still can fail to allocate all required huge pages, because other applications use memory, if you got less than 100% of huge pages best option is reboot. If you heavy use algorithm switching and like to prevent loose huge pages you can use option «memory-pool»: true, in «cpu» object.
For manual configuration you must know how many huge pages you need, general recommendations is 1280 pages per NUMA node for RandomX algorithms and 128 per system for other algorithms. Please note 1280 pages means 2560 MB of memory will be reserved for huge pages and become not available for other usage, in automatic mode the miner reserve precise count of huge pages.
Temporary (until next reboot) reserve huge pages:
Permanent huge pages reservation
1GB huge pages Linux only
For RandomX dataset since version 5.2.0 the miner support 1GB huge pages (regular huge pages size is 2MB), this feature available only on Linux. It increases the hashrate by 1-3% (depends of CPU) and increases memory requirements to 3GB (3 pages) per NUMA node.
By default this feature disabled, to enable use option «1gb-pages»: true, in «randomx» object.
Включение параметра «Блокировка страниц в памяти» (Windows) Enable the Lock Pages in Memory Option (Windows)
Применимо к: Applies to: SQL Server SQL Server (все поддерживаемые версии) SQL Server SQL Server (all supported versions) Применимо к: Applies to: SQL Server SQL Server (все поддерживаемые версии) SQL Server SQL Server (all supported versions)
Эта политика Windows определяет, какие учетные записи могут использовать процесс для сохранения данных в физической памяти, чтобы система не отправляла страницы данных в виртуальную память на диске. This Windows policy determines which accounts can use a process to keep data in physical memory, preventing the system from paging the data to virtual memory on disk.
Блокировка страниц в памяти может повысить производительность, если требуется подкачка памяти на диск. Locking pages in memory may boost performance when paging memory to disk is expected.
Для включения этой политики для учетной записи, используемой SQL Server SQL Server , воспользуйтесь средством «Групповая политика Windows» (gpedit.msc). Use the Windows Group Policy tool (gpedit.msc) to enable this policy for the account used by SQL Server SQL Server . Чтобы изменить эту политику, необходимо быть системным администратором. You must be a system administrator to change this policy.
Включение параметра «Блокировка страниц в памяти» To enable the lock pages in memory option
В меню Пуск выберите команду Выполнить. On the Start menu, click Run. В окне Открыть введите gpedit.msc. In the Open box, type gpedit.msc.
В консоли Редактор локальных групповых политик разверните узел Конфигурация компьютера, затем узел Конфигурация Windows. On the Local Group Policy Editor console, expand Computer Configuration, and then expand Windows Settings.
Разверните узлы Настройки безопасностии Локальные политики. Expand Security Settings, and then expand Local Policies.
Выберите папку Назначение прав пользователя . Select the User Rights Assignment folder.
Политики будут показаны на панели подробностей. The policies will be displayed in the details pane.
На этой панели дважды щелкните параметр Блокировка страниц в памяти. In the pane, double-click Lock pages in memory.
В диалоговом окне Параметр локальной безопасности — блокировка страниц в памяти щелкните Добавить пользователя или группу. In the Local Security Setting — Lock pages in memory dialog box, click Add User or Group.
В диалоговом окне Выбор пользователей, учетных записей служб или групп выберите учетную запись службы SQL Server. In the Select Users, Service Accounts, or Groups dialog box, select the SQL Server Service account.
Чтобы этот параметр вступил в силу, перезапустите службу SQL Server. Restart the SQL Server Service for this setting to take effect.
huge pages windows 10 включить
Under Windows, huge pages (1GB) are not supported — yet!
To use large pages (2-4MB) pages you specifically need to give your user the «lock pages in memory» privilege using Local Security Policy.
Note: at this time, Windows Home, Starter versions do not suppport changing privileges thus this feature cannot be enabled through «official means». We cannot advise you of «alternative means».
For Windows Professional, Enterprise, Ultimate or Server:
- Run StartAll ProgramsAdministrative ToolsLocal Security Policy
- Expand Local PoliciesUser Rights Assignment, scroll down and double-click Lock Pages in Memory. Feel free to read the explanation about the setting.
- Click Add User or Group and find your user — or Administrators group if your user has Admin rights — and add it in.
- You need to Log Off and then Log Back In for the setting to become active.
Please see this article on how large pages and TLBs affect memory latency and memory bandwidth:
COOL RASPBERRY PI PROJECTS WITH NODE.JS SOCKET.IO APPS
Search form is empty!
Xmr stak by default will try to allocate large pages. This means you need to «Run As Administrator» on Windows and you need to edit your system’s group policies to enable locking large pages.
Unfortunately, Windows 10 Home doesn’t have gpedit.msc to enable the Lock Pages in Memory Option.
The solution is to download and install Windows Server 2003 Resource Kit Tools from microsoft website. The Microsoft Windows Server 2003 Resource Kit Tools are a set of tools to help administrators streamline management tasks such as troubleshooting operating system issues, managing Active Directory, configuring networking and security features, and automating application deployment.
Open and run the command prompt as an admin (right click and select from the menu)
In the command line write
C:WINDOWSsystem32>ntrights -u «mywindowsaccountemaillogin» +r SeLockMemoryPrivilege
you must replace mywindowsaccountemaillogin with your current windows username or email.
- You can also search for «Task Manager» in the Start menu.
2. Click on «Task Manager.» 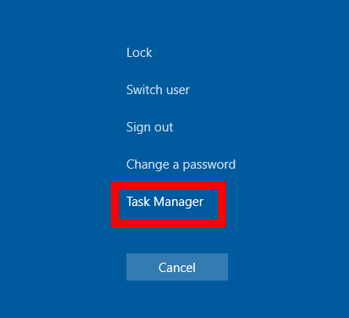
3. In the new menu, select the «Users» tab. Your username will be listed here. 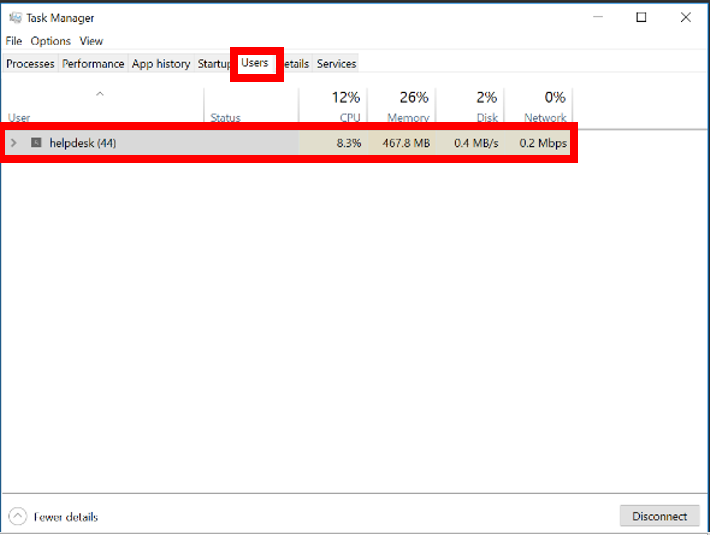
As result if everything is going well, the system will answer with this message:
Granting SeLockMemoryPrivilege to mywindowsaccountemaillogin . successful
Now reboot your PC!
ОБЛАСТЬ ПРИМЕНЕНИЯ:  SQL Server
  База данных SQL Azure Azure Synapse Analytics (хранилище данных SQL) Parallel Data Warehouse APPLIES TO: SQL Server Azure SQL Database Azure Synapse Analytics (SQL DW) Parallel Data Warehouse
Эта политика Windows определяет, какие учетные записи могут использовать процесс для сохранения данных в физической памяти, чтобы система не отправляла страницы данных в виртуальную память на диске. This Windows policy determines which accounts can use a process to keep data in physical memory, preventing the system from paging the data to virtual memory on disk.
Блокировка страниц в памяти может повысить производительность, если требуется подкачка памяти на диск. Locking pages in memory may boost performance when paging memory to disk is expected.
Для включения этой политики для учетной записи, используемой SQL Server SQL Server , воспользуйтесь средством «Групповая политика Windows» (gpedit.msc). Use the Windows Group Policy tool (gpedit.msc) to enable this policy for the account used by SQL Server SQL Server . Чтобы изменить эту политику, необходимо быть системным администратором. You must be a system administrator to change this policy.
Включение параметра «Блокировка страниц в памяти» To enable the lock pages in memory option
В меню Пуск выберите команду Выполнить. On the Start menu, click Run. В окне Открыть введите gpedit.msc. In the Open box, type gpedit.msc.
В консоли Редактор локальных групповых политик разверните узел Конфигурация компьютера, затем узел Конфигурация Windows. On the Local Group Policy Editor console, expand Computer Configuration, and then expand Windows Settings.
Разверните узлы Настройки безопасностии Локальные политики. Expand Security Settings, and then expand Local Policies.
Выберите папку Назначение прав пользователя . Select the User Rights Assignment folder.
Политики будут показаны на панели подробностей. The policies will be displayed in the details pane.
На этой панели дважды щелкните параметр Блокировка страниц в памяти. In the pane, double-click Lock pages in memory.
В диалоговом окне Параметр локальной безопасности — блокировка страниц в памяти щелкните Добавить пользователя или группу. In the Local Security Setting — Lock pages in memory dialog box, click Add User or Group.
В диалоговом окне Выбор пользователей, учетных записей служб или групп выберите учетную запись службы SQL Server. In the Select Users, Service Accounts, or Groups dialog box, select the SQL Server Service account.
Чтобы этот параметр вступил в силу, перезапустите службу SQL Server. Restart the SQL Server Service for this setting to take effect.
Вики IT-KB
Пошаговые руководства, шпаргалки, полезные ссылки.
Инструменты пользователя
Инструменты сайта
Боковая панель
Право блокировки страниц в памяти (Lock pages in memory)
 Для учётной записи, от имени которой будет выполняться служба экземпляра SQL Server, рекомендуется установить разрешение, дающее возможность блокировки страниц в памяти (Lock pages in memory). Это позволит сократить количество обращений к виртуальной памяти на диске в случае нехватки ресурсов, отдавая приоритет работе в закрепленных страницах оперативной памяти.
В консоли Local Security Policy (secpol.msc) перейдём в раздел Local Policies > User Rights Assignment, найдём и настроим политику Lock pages in memory
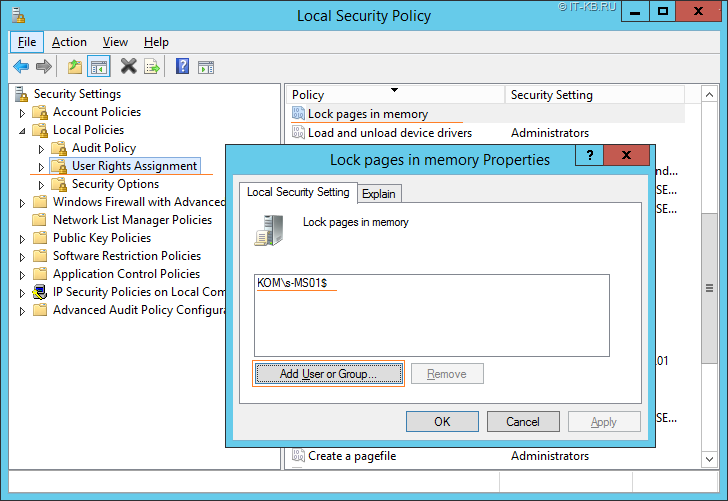
В нашем примере право Lock pages in memory выдано учётной записи gMSA KOM\s-MS01$ , от имени которой будет выполниться основная служба экземпляра SQL Server Database Engine.
Внимание!
Если сервер 1С:Предприятие 8.3 планируется использовать на одной системе с SQL Server, то от данной настройки лучше воздержаться, чтобы SQL Server не отнимал чрезмерное количество ресурсов у системы и не мешал работе сервера 1С:Предприятие.
Дополнительные источники информации:
Проверено на следующих конфигурациях:
| Версия ОС | Версия SQL Server |
|---|---|
| Microsoft Windows Server 2012 R2 Standard EN (6.3.9600) | Microsoft SQL Server 2016 SP2 CU4 (13.0.5233.0) |
 Автор первичной редакции:
Алексей Максимов
Время публикации: 12.02.2019 11:01


