- Ошибка iommu windows 10
- Обновление Windows 10 KB5001330 приносит очередные проблемы, включая BSOD
- реклама
- реклама
- реклама
- реклама
- Fix: HAL_IOMMU_INTERNAL_ERROR BSOD in Windows 10
- HAL_IOMMU_INTERNAL_ERROR Windows 10 Solutions
- 1] Disable Automatic Restart
- 2] Resolve all the Memory problems including poor areas in RAM
- 3] Update Drivers to fix HAL_IOMMU_INTERNAL_ERROR BSOD
- 4] Detect the Malware in Full System and dismiss them using Windows Security
- 5] Load the Basic Programs only by Booting Device in Safe Mode
- 6] Use Windows Blue Screen Troubleshooter to solve HAL_IOMMU_INTERNAL_ERROR
- 7] Delete the temporary and junk files from storage and make more space in it
- 8] Disconnect external Hard drives to fix HAL_IOMMU_INTERNAL_ERROR
- 9] Settle up the bad areas present in Hard Disk
- 10] Install available Update Patches to solve HAL IOMMU INTERNAL ERROR
- 11] Uninstall similar programs to eliminate conflicts
- 12] Undo recent changes by System Restore
- 13] Recover missing DLL files and corrupted resources using System File Checker
- 14] Uninstall the troublesome Windows Update
- 15] Remove all the Third Party Anti-Virus Programs
- 16] Run the DISM tool in Command Prompt for fixing defective Windows image files
Ошибка iommu windows 10
Конфа следующая.
Мама: ASUS ROG Strix Gaming B350-F.
Камень: AMD Ryzen 7 1700, разгон до 3.75 ГГц.
Память: Geil EVO X 16GB, разгон до 3 ГГц.
Охлад камня: Scythe Mugen 5 Rev. B.
Накопители: SSD Samsung EVO 860 Gb, SSD SiliconPower 1Tb на NVMe, HDD 1 Tb Toshiba.
Видеокарта: ASUS Radeon RX 580 AREZ 8 Gb, драйвер последний и свежий.
ОС: Windows 2004, обновился недавно, но на 1909 творилась та же история.
БП: Cougar VTE 600 80 бронза, куплен недавно (март 2020) на смену умирающему старому.
Предыстория. Брал где-то в марте взамен своей старой уже умирающей затычки Radeon HD 6450 (какие-то пропажи изображения и повторное его потом появление) новую — Radeon RX 5500 XT. Поставил, начались регулярные зелёные экраны, чёрные экраны и просто зависы, в журнале значился BSOD 0x0116 (драйвер видяхи), ну и за драйвера серии RX подобное поведение не очень удивительно. По совету, нагугленному в Интернете, вырубил всякие Radeon Anti-Lag и прочие моменты — зависты и экраны смерти прекратились напрочь. Но карточка всё равно очень странно дребезжала каким-то металлическим звуком в нагрузке и наблюдались необъяснимые падения FPS до 15-16, поэтому сдал карту обратно в DNS, взял взамен ASUS Radeon RX 580, окей. Месяц не мог нарадоваться, всё было отлично, и FPS стабильный на ультрах и работа стабильная.
Однако, радость была недолгой. Сейчас примерно раз в 2-3 дня появляется следующее: совершенно рандомно (не зависит от игр, может быть и во время сидения в браузере, и при работе в Кубейсе, а в играх пока за всё это время 1 раз повисло) появляется чёрный экран, звук немного глитчит, потом пропадает, компьютер в перезагрузку НЕ уходит, так и остаётся, пока не сделаешь хард ресет. Сообщения в системном журнале ничего внятного не показывают: БСОДы отсутствуют, т.е. и в журнале их нет, и через BlueScreenView ничего не видно (хотя настройки на сохранение автодампа стоят), в журнале чё-т там время от времени ругается DistributedCOM, но оно было и до начала проблем. После ручного перезапуска появляется в журнале сообщение «Инициализован отчет об ошибке IOMMU.» от источника HAL, но я нагуглить по этому вопросу ничего не смог, да и оно появляется после перезапуска.
Куда дальше копать? Пробовал снижать разгон оперативы и ЦП — разницы не почувствовал. Пока что вместо ультра-свежей версии драйверов на видеокарту установил ту, что предлагает сама Винда (она за сентябрь 2019-ого года), AMD Radeon Software вместе с ней не идёт, поглядим. родной софт там идёт, но тоже старый.
Тестил:
смарт-данные накопителей: без реаллокейтов/пендингов и прочих критических индикаторов;
в Furmark минут 10 — греется, правда, до 80, но без вылетов и бсодов, а так же Doom Eternal на ультрах часа 2 — тоже нормально;
MemTest — нерасширенный тест, пройдено, а ещё и системной утилитой попробовал — пройдено, в системном журнале Memorydiagnostics или как там его написал, что пройдено успешно.
occt, aida64 по минут 20 — пройдено.
UPDATE:
Переделал тест OCCT и Linpack.
В первый раз OCCT показал на 4-ой минуте 157 ошибок, остановил. Максимум: 67 градусов. И хотя на забугорных форумах пишут, что на райзенах первой генерации OCCT регулярно ошибки показывает, всё равно как-то это странно.
Запустил Linpack, 15 минут — чисто. Максимум — 68 градусов.
Второй раз запустил OCCT, 15 минут — чисто. Максимум — 68 градусов.
Power запустил на 6 минут — нагрелась видео до 79 градусов, ЦП примерно до 76, чипсет примерно так же, дальше мучать не стал.
Обновление Windows 10 KB5001330 приносит очередные проблемы, включая BSOD
В некоторых конфигурациях Windows 10 возникают серьезные проблемы из-за недавнего обновления под номером KB5001330. Пользователи сообщают о проблемах с установкой, проблемах с производительностью, временной ошибке профиля пользователя и предупреждении о сбое системы.
реклама
На этой неделе во вторник Microsoft выпустила новые накопительные обновления за апрель 2021 года для поддерживаемых версий ОС. Для версии 20H2/2004 Microsoft выпустила Windows 10 KB5001330, обязательное обновление безопасности, направленное на устранение ряда уязвимостей и проблем, вызванных предыдущим обновлением, включая проблемы с принтерами.
Согласно многочисленным сообщениям на сайтах социальных сетей, растет число пользователей, которые не могут установить последнее обновление Windows на свое оборудование. При попытке это сделать появляются ошибки: 0x800f081f, 0x800f0984.
Об ошибках при загрузке обновления KB5001330 сообщили многие пользователи в Центре отзывов.
реклама
«Я получаю постоянный сбой при установке KP5001330 с кодом ошибки 0x800f0984. Это происходит на Surface Studio 2 и Pro 7. Второй месяц подряд нельзя установить накопительное обновление на моих устройствах. Установка приостанавливается на 20%, затем снова на 73%, потом на 100%, затем происходит сбой», — отметил один из пользователей.
В редких случаях также может повторяться известная ошибка временного профиля пользователя. Последний раз об этой ошибке сообщалось в декабре, она создает новый профиль пользователя при загрузке операционной системы после применения накопительного обновления. В этом случае пользовательские файлы и настройки (например, обои) могут исчезнуть.
«После обновления я больше не могу войти в свой компьютер. В нем говорится, что службе профилей пользователей не удалось войти в систему. Профиль пользователя не может быть загружен», — пожаловался один пользователь.
«После обновления Windows предлагает войти в гостевой профиль», — другой пользователь подтвердил проблему.
реклама
К счастью, есть обходной путь для решения указанной проблемы. Необходимо либо откатить обновление, либо вручную переместить пользовательские файлы.
Кроме того, пользователи сообщают о сбоях в играх: графических артефактах и значительном падении частоты кадров, но проблему можно решить, удалив накопительное обновление вручную. Лишь некоторые пользователи сообщают об этих проблемах на форумах, и, похоже, они не так распространены, как другие ошибки.
Также многие сталкиваются с периодическими появлениями BSOD (синего экрана смерти)/
«Это обновление сломало Windows для меня и других. BSOD при обновлении сообщал, что определенного драйвера больше нет или он не поддерживается. Я восстановил Windows и обновился снова, затем BSOD на моем ПК повторился дважды за несколько часов. Я удалил обновление. Это случилось не только со мной, поэтому я бы посоветовал не устанавливать это обновление», — сообщил один из пользователей.
реклама
Если вы загрузили обновление April 2021 Patch Tuesday и столкнулись с какими-либо проблемами, лучший способ решить проблему — это удалить исправление, выполнив следующие действия:
1. Откройте приложение «Настройки»;
2. Нажмите «Обновление и безопасность»;
3. Нажмите «Центр обновления Windows»;
4. Нажмите «Просмотреть историю обновлений»;
5. Нажмите «Удалить обновления», затем выберите KB5001330, чтобы удалить его;
6. Перезагрузите компьютер.
На данный момент компания Microsoft никак не прокоментировала многочисленные жалобы пользователей.
Fix: HAL_IOMMU_INTERNAL_ERROR BSOD in Windows 10
You will find solutions to HAL_IOMMU_INTERNAL_ERROR Blue Screen of Death error in Windows 10 here. This BSOD issue having bugcheck value 0x000001D9 leads the desktop to freeze and hang. Frequent Reboot of PC also occurs when this stop error appears.
HAL IOMMU INTERNAL ERROR in Windows 10 mostly happens because of corrupt, old and incompatible device drivers. Conflicts between similar applications and malware infection are also the main reasons for this BSOD. Furthermore, if the system runs in memory problems, low disk space, problematic areas in HDD, corrupted Windows Image files even can cause the error. In the below section, we will be discussing some effective and proven workarounds they can potentially help to resolve HAL_IOMMU_INTERNAL_ERROR BSOD in Windows 10. See the list of workarounds first –
HAL_IOMMU_INTERNAL_ERROR Windows 10 Solutions
Here is how to fix HAL_IOMMU_INTERNAL_ERROR BSOD in Windows 10 –
1] Disable Automatic Restart
With a confirmed HAL_IOMMU_INTERNAL_ERROR BSOD, Windows PC will have a tendency to perform Automatic restarting. This will be the most annoying problem you could ever come across. Unless this gets a fix, you cannot deploy other resolutions as well. Therefore, this solution comes at the top of the priority. Disabling the Automatic Restarting is not a complex job and you can proceed in the below steps –
Step-1: Navigate to the Desktop area after saving the running programs. Use Win+D hotkey press together and head to the place immediately.
Step-2: Perform a right click on This PC icon. Choose Properties option from there to allow opening the System window.
Step-3: When it is visible on the screen, select Advanced system settings from the left side of the window.
Step-4: As the System Properties wizard appears, click on Advanced tab.
Step-5: Scroll little down in the tab and reach Startup and Recovery section. When you see the Settings option here, hit straightway.
Step-6: After a new wizard appears, go to its System failure part and uncheck the box for “Automatically restart”
Step-7: Lastly, select the Ok to save these changes.

Now windows will not go for rebooting automatically. Hence, there will be enough opportunity for you to deploy the upcoming resolutions and resolve the issue accordingly.
2] Resolve all the Memory problems including poor areas in RAM
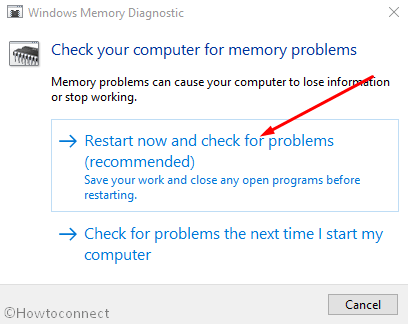
Windows can suffer from memory issue due to wrong allocation of it and the presence of poor segments in the RAM. With these sorts of problems in the Windows, BSOD errors like HAL_IOMMU_INTERNAL_ERROR commonly occur. Luckily, we have the Windows Memory Diagnostic to deal with these troubles and fix the errors. Let’s proceed to the handy utility in the below process –
- Make a together press of Windows and S keys and invoke Taskbar Search.
- In the empty text box located here, type “Memory” and wait for results to load finally.
- Select Windows Memory Diagnostic Desktop app from results to proceed.
- Select the option “Restart now and check for problems (recommended)”.
- Then windows will prepare for the first cycle of rebooting.
- Subsequently, you will find blue screen upfront detecting memory issues with the rate of progress in percentage.
- When the info shows 100%, windows will Restart for the second time.
- Finally, you can check the diagnosis report in the Notification area of the System Tray.
3] Update Drivers to fix HAL_IOMMU_INTERNAL_ERROR BSOD
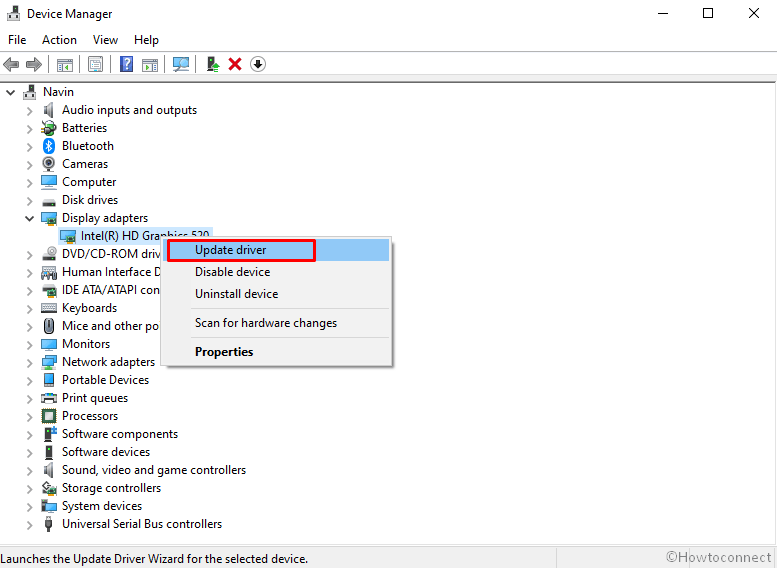
HAL_IOMMU_INTERNAL_ERROR BSOD is the result of outdated and corrupt device drivers mostly. Every time we come across a critical issue, they play a greater role there. We really should not allow such a driver on the computer which is old and defective. The Windows Device Manager is a top-notch app in this regard and it shows them with a yellow accent if needs to be updated. To accomplish the workaround, move with below steps –
- Right click on Start menu and choose Run to invoke the window.
- In the text box provided here, write devmgmt.msc and eventually hit Enter key.
- Device Manager will hit on display and you have to watch closely in the console for any exclamation marks in the device’s list.
- Prior to expanding the device, do a right click on the drivers having Yellow warning icon on it.
- Select Update driver option and follow the other guidelines coming to display until these all get updated.
4] Detect the Malware in Full System and dismiss them using Windows Security
All over the web, Malware is present and often it exists in disguise. You can be easy prey to them after making a visit to a website or clicking link coming in emails. Sometimes inserting a USB can also be risky. Once they get entrance to the system, cause the necessary files to be removed or infected. As a result, many issues come up including HAL_IOMMU_INTERNAL_ERROR. You can avoid this malignant consequence by making regular scanning in Windows security. The default tool can also dismiss all the threats in the most effective way. Follow the below guidelines to complete the task –
- Click on Show hidden icon arrow from the right side of the taskbar.
- Select Shield icon from there and let the system to open Windows Security app.
- Moving on to the App, select Virus & threat protection option.
- Now, perform a click on Scan options link to reveal available methods.
- Check the radio button allocated for Full scan and then select Scan now option.
- After the detection gets over, you will be shown a result. If there is any malware present, hit Clean threats option located here.
- Go to the next page, among three options, select Remove first and then Start actions to dismiss all these viruses.

5] Load the Basic Programs only by Booting Device in Safe Mode
In all critical times, Booting in the Safe Mode came out as savior in Windows 10 including previous versions. In this startup procedure, the device starts with only the basic processes and hence, the problems get resolved immediately. Let’s give this renowned utility an attempt following below instruction –
Step#-1: Invoke Run dialog by pressing Win+R hotkeys together.
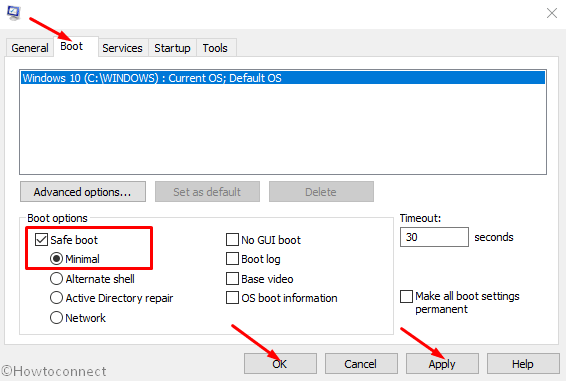
Step#-2: In the provided typing box, write msconfig using the keyboard and select System Configuration Desktop app once visible.
Step#-3: In the App UI, jump to Boot tab and straightway get at its second half.
Step#-4: Here, you can see the Boot options area. Now, check the box before Safe Boot and activate all the grayed out options.
Step#-5: Hit the radio button before Minimal option and proceed forward.
Step#-6: Select Apply button first and then Ok to save these changes.
Step#-7: Get inside of the Safe Mode on the further move.
6] Use Windows Blue Screen Troubleshooter to solve HAL_IOMMU_INTERNAL_ERROR
Since HAL IOMMU INTERNAL ERROR causes serious damages to the system, Microsoft technicians came up with a built-in tool for resolving this issue effectively. The utility named Blue Screen Troubleshooter and it is accessible through the settings app. Proceed with the below instructions to deploy the tool –
- Open Windows Settings app by pressing Win+I hotkeys altogether.
- From the app UI, head to Update & Security tile and eventually make a click on it.
- When the page loads completely, choose Troubleshoot located in the left pane and jump on the adjacent side.
- Reach out to Blue Screen there and expand it by clicking.
- Hit Run the Troubleshooter option from the extended pane.
The utility will now detect and fix all the Stop errors. In the end, there should not be any HAL_IOMMU_INTERNAL_ERROR in the system.
7] Delete the temporary and junk files from storage and make more space in it
Temporary files as stored in the Hard Disk, once grow bigger will occupy huge space in it. The ultimate result is, the storage runs in low space and operation get slow down. In the process, HAL_IOMMU_INTERNAL_ERROR also hitched up. Using Disk Cleanup tool can be thoroughly beneficial to delete the junks in one platform. Here is how to proceed –
- Open Run dialog box.
- In the search box provided, type cleanmgr and press Enter from keyboard.
- A small popup window will float in and ask you to choose preferable Drive to run a cleanup. Select C: by doing a click on dropdown menu and press Enter.
- Disk Cleanup Utility will come ahead slowly after calculating the space it can make free from the drive.
- When the wizard appears, come down to the bottom and do a click on Clean up system files.
- Once again, that small popup window will appear asking for the desired drive. Choose C: like before and press Enter key.
- When Disk Cleanup for C: comes ahead, reach Files to delete area.
- Check all the boxes available here and keep Downloads as it was.
- Hit Ok button and let the Cleanup start.
- Wait until this process ends automatically as this might take several minutes.
![]()
8] Disconnect external Hard drives to fix HAL_IOMMU_INTERNAL_ERROR
Some people come across HAL_IOMMU_INTERNAL_ERROR BSOD when an additional Hard Drive joins the system. Good news folks, Issue resolved easily as well just after disconnecting the external USB or other peripheral only. Follow the below guidelines and give a momentarily pause by disconnecting –
- Isolate all the Hardware accessories including the External HDD.
- Keep them separate and safe location to avoid damage.
- Now, restart the windows in the usual method.
- After completing the rebooting when you can see Desktop, make a check for the error.
- If resolved properly, start connecting them one after another.
- At this moment after connecting all, launch the web browser from windows.
- Perform a visit to Maker’s Webpage for each and Download the Latest drivers.
- Install the drivers in windows to use easily.
9] Settle up the bad areas present in Hard Disk
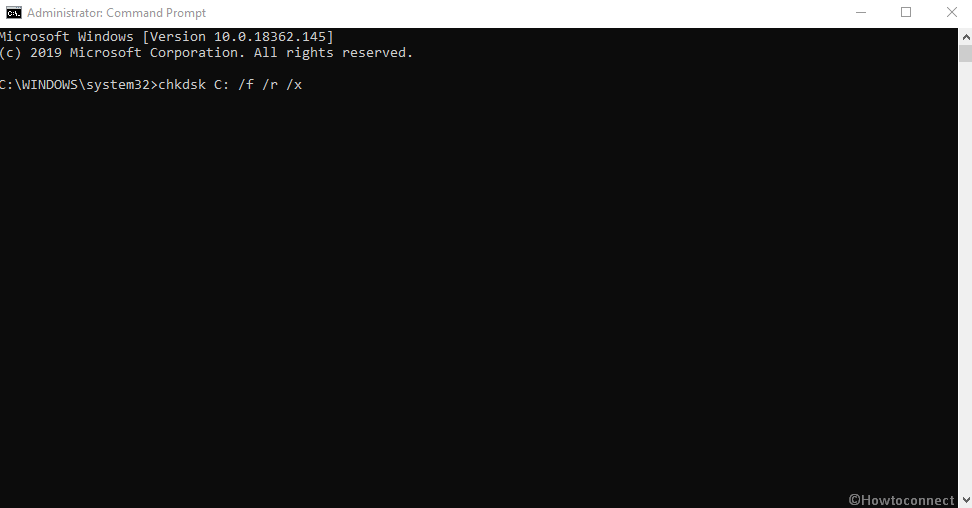
Prolonged use causes to form problematic areas inside a Disk Drive. When this happens, the system runs in various problems including HAL_IOMMU_INTERNAL_ERROR. The Disk Checking Utility comes handy to resolve these sectors automatically. See the method in details –
- Press Win+S to call in Taskbar search and type cmd.exe. When Command Prompt appears in the result, do a right click on it.
- Choose “Run as Administrator” and also select “Yes” Once UAC prompts for your consent.
- In the Black Elevated Prompt, type following syntax and parameters –
Press the Enter button when you have finished typing. This process will take little longer as we have added three more notations instead of chkdsk only which would show disk status only.
After the task is finished, Restart the device and upon coming back to operation, check if there is an error present.
10] Install available Update Patches to solve HAL IOMMU INTERNAL ERROR
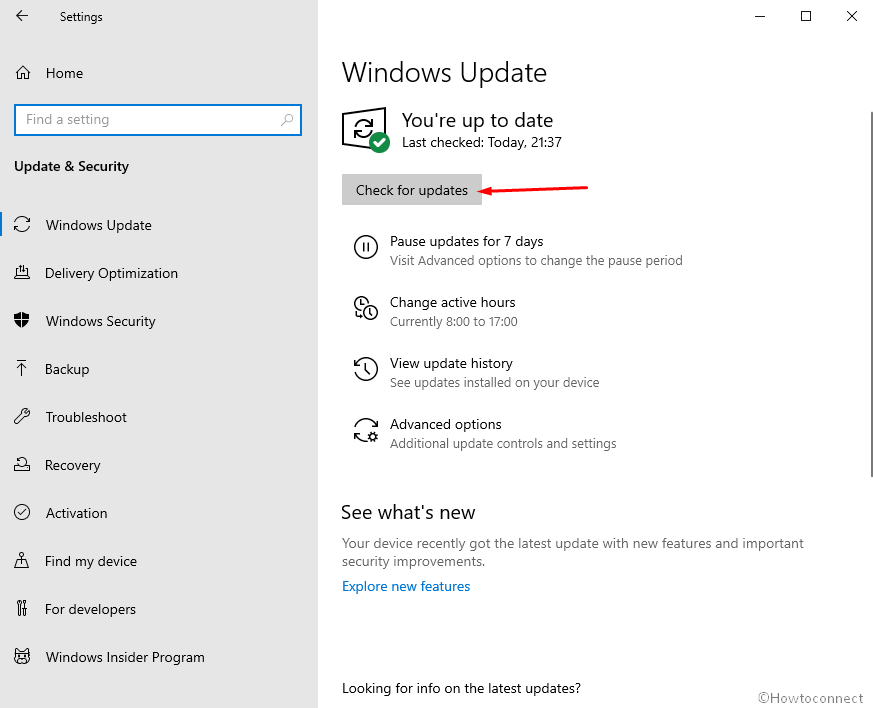
Any update patch contains fixing of existing bugs, quality improvements, the introduction of latest features. Installing these will give the OS a big blow and strength to fight with vulnerabilities like HAL IOMMU INTERNAL ERROR. An Outdated Windows 10 is prone to get affected always. Follow the below guidelines to install them –
- Manage to Load the Settings page of Update & Security as shown in the above workaround.
- Select Windows Update available in the left pane.
- Navigating to the corresponding right, make a click on Check for updates link ignoring “You’re up to date” dialogue.
- Upon finishing the downloading, click on Install.
- Reboot the Windows once asked and update the OS.
11] Uninstall similar programs to eliminate conflicts
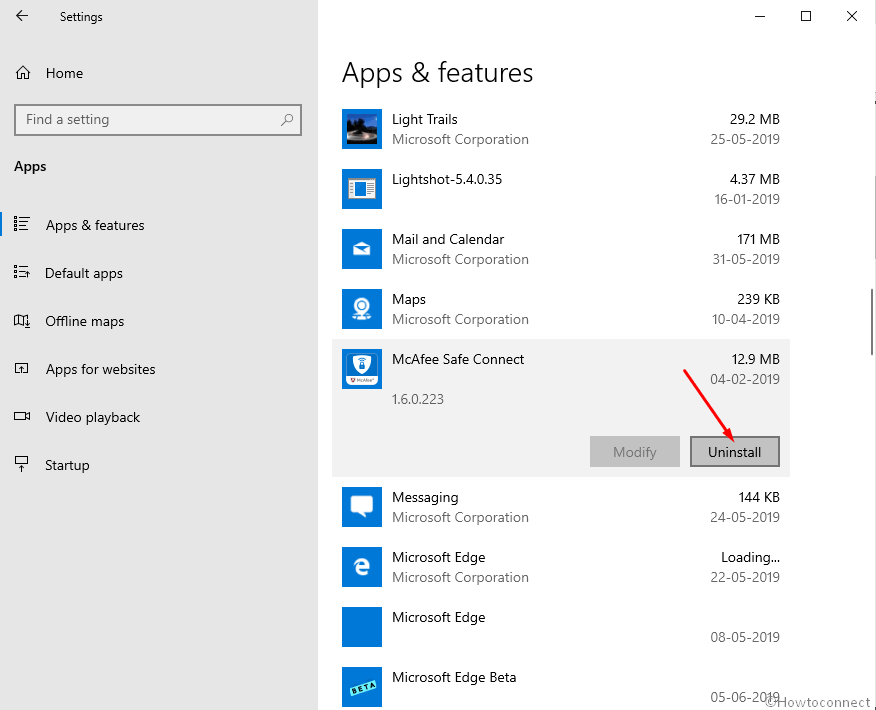
Having the same applications often become risky they tend to collide with one another. Meanwhile, the necessary OS files get eradicated and HAL_IOMMU_INTERNAL_ERROR evolves. In these cases, Uninstalling comes ahead first. When we remove one of these, the action reduces the risk of collision between them. Follow the below guidelines to uninstall an App –
- Manage Access to Windows Settings app using any convenient method stated above.
- When in the Home page, roll the cursor to Apps and make a click on it eventually.
- On the next page after appears, choose Apps & features on the left wing and shift to the right.
- Once all the Apps be visible, reach out to applications colliding with each other.
- Select each and hit Uninstall option from the expanded pane.
- If User Account Control prompts for authentication, select Yes to proceed.
- Follow the on-screen guidelines until finally removed.
- Restart the device and once powers up next, do check for the error in the system.
- If resolved, you can Launch Microsoft Store and Download the deleted app again.
12] Undo recent changes by System Restore
Performing a System Restore directs you back to the state where you were. We often install an app or uninstall some for the necessity of work. These actions leave marks in Windows Registry and when they go wrong, HAL IOMMU INTERNAL ERROR is imminent. Therefore, to Undo these changes, perform the below tasks –
- Open the Taskbar search (commonly Win+S) using any of the above instruction.
- Type rstrui in the text area and hit the Enter button.
- Once the System Restore Wizard appears on the screen, select Next.
- From the consequent page, make a click on Show more restore points and reveal all the points you have created beforehand.
- Choose the last one in the list and make a click on Next.
- After the following page cuts your view, click Finish.
13] Recover missing DLL files and corrupted resources using System File Checker
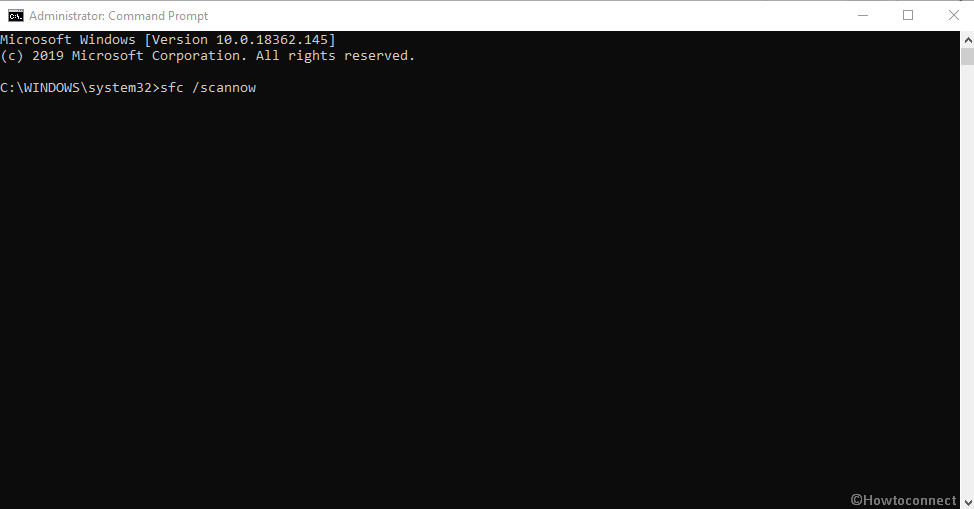
So many vulnerabilities occur in Windows 10 and sometimes in worst extent, system resources are erased. In the same way, DLL files often go missing. When these cases happen, HAL_IOMMU_INTERNAL_ERROR BSOD comes in. System File Checker comes handy to fix these components once executed in the Elevated Command Prompt. To access the utility, follow the below instructions –
- Open the Taskbar search by making together press on Win+S keys.
- In the search box given here, type cmd.exe and select Run as administrator from the right flyout.
- After User Account Control asks for your consent, provide approval by choosing Yes.
- On the Black Elevated Command Prompt window, type underneath code and hit Enter key –
- System File Checker will be activated and start detecting for file corruption and missing DLL ones. Fixing will also start automatically.
- Though this process is little time consuming, do not terminate abnormally and let it end by itself. After all these files are okay, there should not be any.
14] Uninstall the troublesome Windows Update
Sometimes Windows update creates the Blue screen HAL IOMMU INTERNAL ERROR. Uninstalling the files will be enough as to resolve the issue or prevent it. To complete the task, move with the following guidelines –
- Press Windows key.
- Once Start menu becomes visible on display, choose Gear cog.
- From App UI, move ahead to Update & Security and do a click on it.
- From the following page after loaded, select Windows Update and shift to the corresponding side.
- Here, perform a click on View update history link.
- Select Uninstall updates and let a window unroll from Control Panel.
- Reach the last received patch and do a right click on it.
- Select Uninstall and keep and follow on-screen instruction until they get removed completely.

15] Remove all the Third Party Anti-Virus Programs
In virus issues, you might have used a free anti-virus solution as a safeguard. This is okay until Windows Security arrives. Since the tool is the default for Windows 10 and also very effective, there is no need of using a third party program in this regard. Moreover, most of these programs, due to conflict, often cause HAL_IOMMU_INTERNAL_ERROR BSOD. Therefore, if you have such applications, uninstall using the following guidelines –
- Type appwiz.cpl in the Windows search and Enter
- Select Third Party Anti-virus app in the list.
- Hit Uninstall option visible at the top ribbon.
- Next steps will be as shown in the display until it gets uninstalled completely.
16] Run the DISM tool in Command Prompt for fixing defective Windows image files
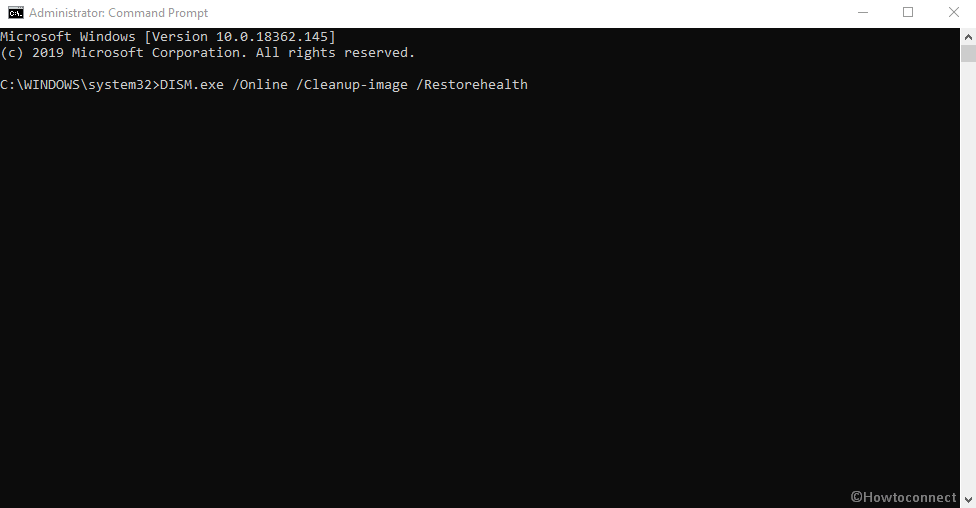
When Windows Image files fall in corruption, it might cause HAL_IOMMU_INTERNAL_ERROR. As a fix, DISM tool will be best suited utility. Here is the procedure –
- Do a right click on Taskbar and select Task Manager from the appearing menu.
- From the app once loaded fully, select File located at the top left corner.
- Choose Run new task when seen and let Run dialog to appear.
- In the empty writing field, cmd and move down later on.
- Mark the checkbox below the Open saying “Create this task with administrative privileges”.
- After Pressing Enter key, you will be straightaway guided to Elevated Command Prompt.
- At the black window, type following command where a cursor winks –
DISM.exe /Online /Cleanup-image /Restorehealth
- Hit Enter key and let the Tool to fix corrupt Windows image files. The process may be lengthy, wait until it gets over automatically.
- When ends, Restart the windows and after coming back to operation, check of the error resolved.
Till this point, we have elaborated almost all the effective resolutions hoping to resolve HAL IOMMU INTERNAL ERROR in Windows 10. Hopefully, the issue is no more prevalent in your system and you are working smoothly. If the issue still persists, we can suggest only last resort – Reinstalling Windows 10. This will be the ultimate solution of all the existing problems and if done accurately, no issue will be evolving next. Follow – How to Clean Install Windows 10 May 2019 Update Version 1903.


