- HAL INITIALIZATION FAILED синий экран на Windows 10
- Как избавиться от ошибки hal initialization failed
- Появление ошибки hal initialization failed при спящем режиме
- Способ третий – очистка временных и нежелательных файлов
- Способ третий – чистка реестра
- Восстановление системы
- Проверка диска на ошибки для избавления от hal initialization failed
- Обновление драйверов
- Мануал по устранению стоп ошибки 0X0000006C REFMON_INITIALIZATION_FAILED
- How to Fix “REFMON_INITIALIZATION_FAILED” (0x0000006C) BSOD Error?
- How to Fix » REFMON_INITIALIZATION_FAILED» ( 0x0000006C) Error
- How to View Information about Errors in Windows 7, 8, 10
- Causes of The Error
- Restore Deleted Files
- Start The Computer in Safe Mode
- How to Boot Windows 10 in Safe Mode
- Update a Driver With The Device Manager
- Use sfc /scannow To Check All System Files
- How to Recover Windows 10 System Files
- Check for Errors The Disk Where Windows Is Installed By Using The Command chkdsk c: /f
- Use The Mode of Compatibility With an Old Version of Windows
- How to Run a Program in Compatibility Mode With Windows 10, 8 and 7
- Disable Unnecessary Programs in Windows Startup Menu
- Consult Microsoft Support Service
- Install Latest System Updates
- Scan The System For Viruses
- Test Your RAM
- Make a Clean Installation of Windows
HAL INITIALIZATION FAILED синий экран на Windows 10
Здравствуйте друзья, в этой статье я хочу рассказать о решении проблемы с синим экраном смерти в десятой версии Windows – Anniversary Update. Конечно, подобная ошибка может встретиться где угодно, но наша цель сделать так, чтобы в будущем она не появлялась. Проблема имеет код ошибки 0x0000005c, а её название HAL INITIALIZATION FAILED, так давайте посмотрим, какие действия можно предпринять.
Для начала хочется сказать о причинах, которые не так сильно влияют на систему, как при ошибке inaccessible boot device, но очень серьезны. Итак, hal initialization failed появляется при запуске программного обеспечения, причем не важно какого, если вы подключаете какое-либо устройство к ноутбуку или компьютеру есть вероятность словить этот же экран смерти. Чаще всего проблема возникает при подключении именно устройств, но есть мнение, что выход из спящего режима тоже создаёт экран BSoD.
Как избавиться от ошибки hal initialization failed
Компании Майкрософт о проблеме известно, скорее всего в обновлениях всё будет исправлено, либо уже исправлено. На самом синем экране никаких точных сведений нет, пишут только о перезагрузке системы, но это вряд ли поможет избавиться от ошибки.

Чтобы анализировать экраны смерти, которые по-другому называются BSoD нужно воспользоваться дампом памяти, об этом вы можете прочитать по ссылке.
Теперь о решении hal initialization failed
Если проблема связана с подключением устройства, то вот, что необходимо сделать: подключите по USB устройство, дождитесь появления синего экрана смерти, перезагрузки ПК, но не отсоединяйте устройство. После загрузки системы делайте то, что задумали.
Дополнительные варианты решения:
- Подсоединить устройство к USB 2.0 или к USB 3.0;
- Удалить установленные драйвера устройства из диспетчера устройств;
- Попробовать подключить устройство из безопасного режима.
Появление ошибки hal initialization failed при спящем режиме
Понятное дело, что BSoD будет появляться из-за разного рода причин, которые выявить очень сложно, но возможно. Проблемой могут быть вирусы, поврежденные системные файлы и драйвера.
На удивление команда bcdedit может сработать, а нужно ввести её в командной строке с повышенными привилегиями.
bcdedit /set useplatformclock true
Чтобы убедиться в работоспособности команды вводим:
Если вы нашли строчку useplatformclock Yes, тогда всё отлично.
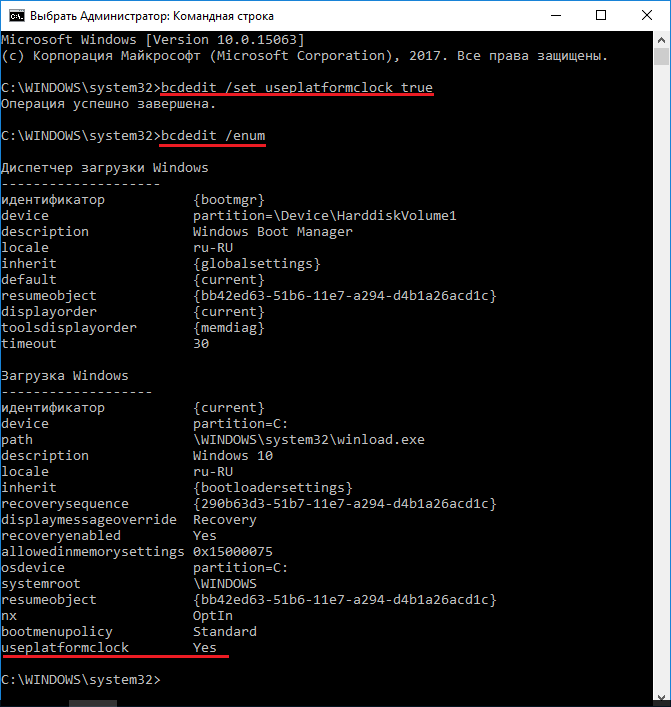
Перезагрузите компьютер, и попробуйте подключить устройство или выйти из спящего режима.
Способ третий – очистка временных и нежелательных файлов
Казалось бы, что этот способ никак не относится к решению проблемы, но кто знает, может и сработает, в данном случае все средства хороши.
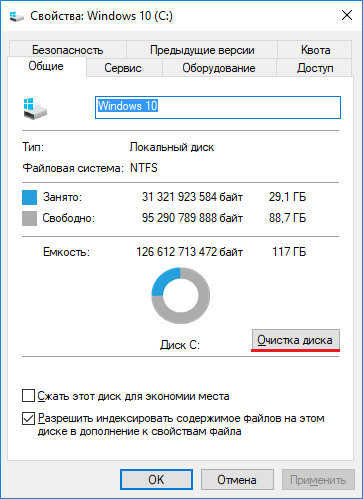
Открываем каталог «Этот компьютер» нажимаем правой кнопкой по системному диску и переходим в «Свойства». Дальше нажимаем кнопку «Очистка диска».
Ждём обработки, а потом галочкой отмечаем пункт «Временные файлы», а вообще, можно удалить вообще всё, система от этого не пострадает.
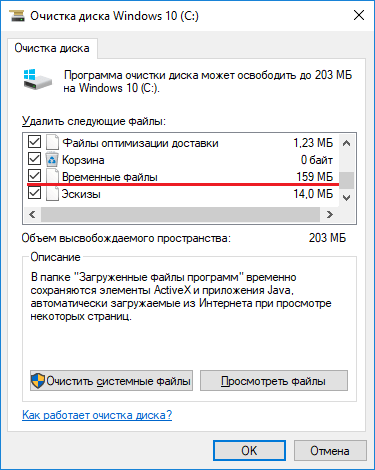
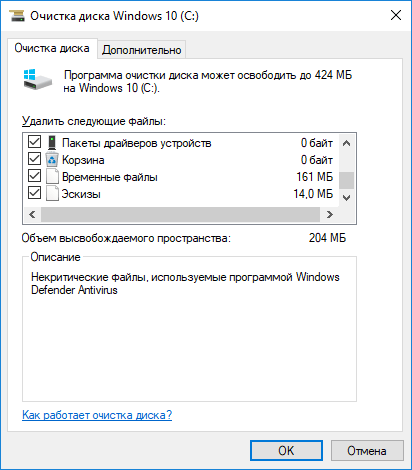
Теперь нажимаем на кнопку «Очистить системные файлы». После обработки Widows выдаст несколько пунктов из которых нам необходимо отметить Файлы журнала обновлений Windows, Временные файлы Интернета, пакеты драйверов устройств.
Способ третий – чистка реестра
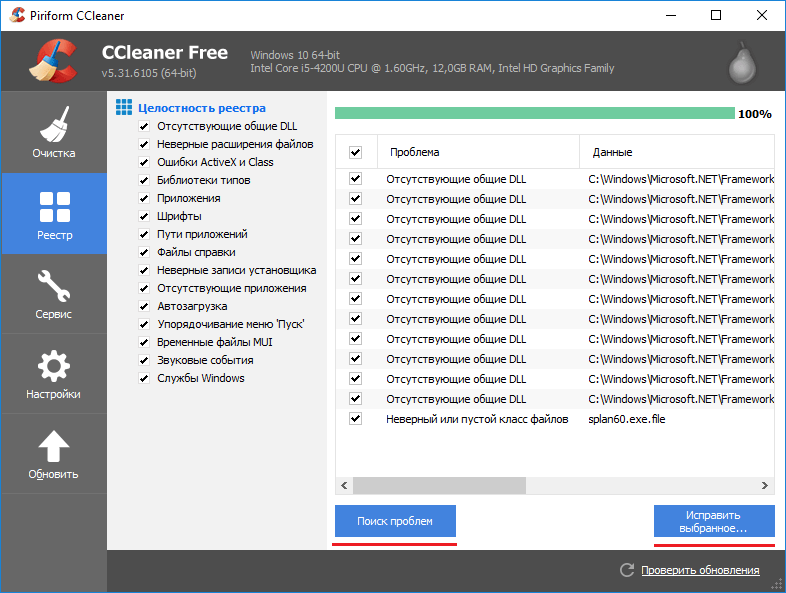
Возможно в реестре есть поврежденные записи, которые мешают нормальной работе системы. Чтобы оптимизировать реестр нам понадобится известная программа CCleaner.
Запускаем утилиты и переходим в раздел «Реестр». Дальше нажимаем кнопку «Поиск проблем», ждём. После завершения проверки нажимаем кнопку «Исправить выбранное».
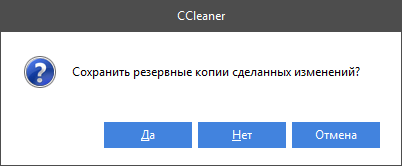
Появится окошко, где нас просят сделать резервную копию удаляемых данных, потому что при следующем загрузке системы вы можете не загрузится, а из безопасного режима файл реестра можно просто восстановить.
Кстати говоря, в этой программе вы можете очистить временные файлы браузеров и разных мест в системе.
Восстановление системы
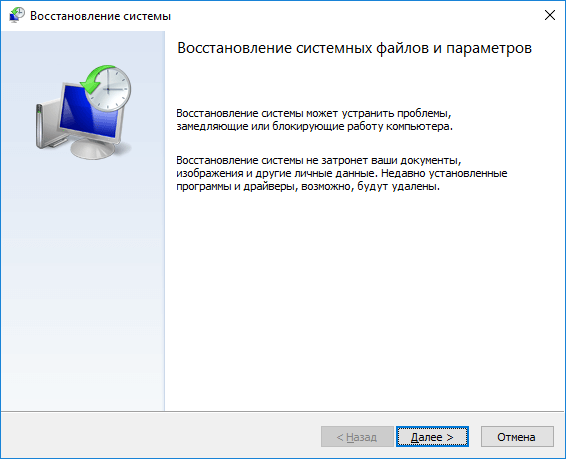
Наконец, вы можете вернуться по точке восстановления к тому моменту, когда система работала нормально.
Чтобы использовать утилиту восстановление системы нужно нажать клавиши Win+R и ввести команду rstrui.exe .
В открывшемся окне нажимаем «Далее».
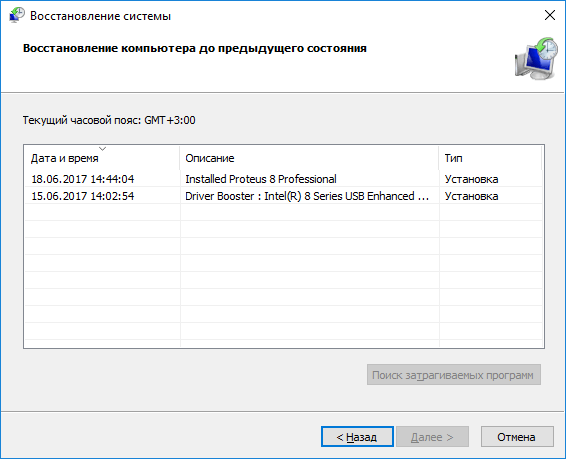
Теперь мы видим список точек восстановления. Если они у вас были созданы давно, то многие файлы, которые были созданы после этой даты, а также прочие изменения – пропадут.
Проверка диска на ошибки для избавления от hal initialization failed
Я говорил, что системные файлы могут быть повреждены, тогда необходимо восстановить их целостность.
Запускаем, как обычно, командную строку от имени администратора и вводим такую команду:
Данная команда перезагрузит компьютер и начнет проверять диск. Для подтверждения операции нажмите Y, а потом перезагрузить компьютер.
Обновление драйверов
Если у вас не хватает каких-то драйверов, либо старые конфликтуют с новыми, то необходимо их обновить и установить.
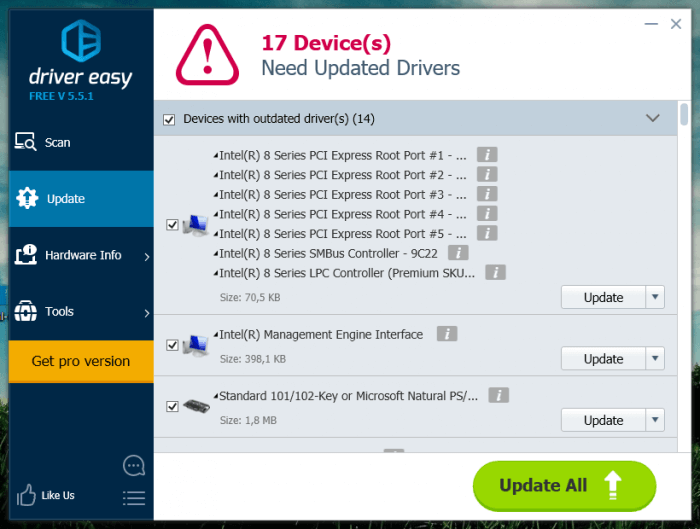
В последнее время я скептически отношусь к автоматическим утилитам для обновления драйверов, но, как показывает практика, они не всегда «косячат». Одна из интересных утилит, которую я хочу предложить – Driver Easy. Инструмент бесплатный и поможет найти и установить недостающие драйвера.
Нажмите в утилите «Сканировать сейчас», а после нахождения недостающих дров по порядку обновляем их. Советую после каждого установленного драйвера перезагружать ПК, убедитесь, что ошибка hal initialization failed исчезла. Некоторые драйвера можно загрузить вручную, например, для видеокарты и звука.
Исчезнет ли ошибка 0x5C после этих манипуляций точно сказать не могу, но я очень надеюсь, что статья вам поможет. Обязательно задавайте вопросы в комментариях и предлагайте свои варианты решений.

Авторизуйтесь для комментария
Рубрики:
- Вирусы (19)
- Вирусная библиотека (1)
- Вопрос – Ответ (3)
- Все существующие ошибки BSOD (136)
- Интренет (1)
- Простые инструкции в помощь (26)
- Реестр Windows (1)
Страницы
Мануал по устранению стоп ошибки 0X0000006C REFMON_INITIALIZATION_FAILED
Мануал по устранению стоп ошибки 0X0000006C REFMON_INITIALIZATION_FAILED
Полный список ошибок | Что такое BSOD синий экран смерти | Задать свой вопрос на форуме| В случае появления стоп ошибки BSOD в первые – перезагрузите компьютер и попробуйте вновь начать работать. Если компьютер вновь показал BSOD синий экран смерти, проделайте следующие дейтвия: С помощью тестера или другими способами, проверьте напряжение в сети. Напряжение должно быть не менее 220В. Если напряжение меньше, то установите стабилизатор напряжения. Откройте и тщательно прочистите […]
Октябрь 14th, 2011
В случае появления стоп ошибки BSOD в первые – перезагрузите компьютер и попробуйте вновь начать работать. Если компьютер вновь показал BSOD синий экран смерти, проделайте следующие дейтвия:
- С помощью тестера или другими способами, проверьте напряжение в сети. Напряжение должно быть не менее 220В. Если напряжение меньше, то установите стабилизатор напряжения.
- Откройте и тщательно прочистите все контакты внутри системного блока. Переткните все имеющиеся контакты (жесткий диск, оперативная память, контакты питания от блока питания), проблема может быть в плохом контакте.
Если до появления BSOD синего экрана смерти, вы устанавливали на компьютер какое то новое оборудование, то проверьте его совместимость с вашей операционной системой. Проверить совместимость можно пройдя по этой ссылке.
- Если оборудование не прошло проверку совместимости, то попробуйте заменитьоборудование на другое.
- Если оборудование совместимо, а BSOD все равно вылетает, то следует обновить драйвера на это оборудование. Скачать драйвер вы всегда можете не сайте производителя. В основном ошибка эта появляется в неправильной работе программы (драйвера)
- Если до появления стоп ошибки вы устанавливали какую либо программу, то удалите ее и попробуйте поработать за компьютером.
- Если при обновленных драйверахстоп ошибка появляется, то попробуйте установить драйвера версией ниже чем были.
- Или обратитесь к продавцу оборудования за советом.
- Обновите ваш Windows. Загрузите последние обновления с сайта Microsoft.
Если ошибка появилась без вашего вмешательства с установкой нового оборудования, следует:
- Проверить работоспособность оперативной памяти. Проверить можно с помощью программы Memtest++ (ищите в Google). При ошибкахпамяти, замените планку. Если планок оперативной памяти несколько, то попробуйте работать с ними по отдельности вытаскивая одну за одной. Чаще всего память не портиться сразу в нескольких планках. И вы найдете неисправную. Не забудьте почистить контакты на модуле и на материнской плате, так как из-за пыли часто встречается эта проблема.
- Проверьте наличие свободного места на жестком диске. при малом объеме памяти, удалите часть данных.
- Проверьте жесткий диск на наличие битых секторов и ошибок (Как проверить диск на ошибки?)
- Попробуйте восстановить систему из точки восстановления.
- Если не удается войти в Windows, то попробуйте загрузиться с последней удачной конфигурации.
- Если до появления этой ошибки вы пытались как то настроить BIOS, то восстановите их в значение по умолчанию.
- Проверьте ваш компьютер на наличие вирусов. Проверить рекомендую бесплатной утилитой от Русского антивируса DrWeb. Скачать можно пройдя по этой ссылке.
- Если ошибка появляется при загрузке системы Windows, то поможет вот эта инструкция.
- В крайнем случае переустановите Windows.
- Если стоп ошибка появляется приустановке Windows, в первую очередь почиститеконтакты оперативной памяти и проверьте ее на ошибки запустив утилиту Memtest++. Попробуйте увеличить оперативную память или почистите ее от пыли.
Что бы избежать подобных проблем в будущем, сделайте резервную копию системы.
Резервную копию системы для восстановления можно сделать:
How to Fix “REFMON_INITIALIZATION_FAILED” (0x0000006C) BSOD Error?

How to Fix » REFMON_INITIALIZATION_FAILED» ( 0x0000006C) Error
Does your Windows-operated laptop or desktop computer show a blue screen? Does it restart after flashing the message » REFMON_INITIALIZATION_FAILED» ( 0x0000006C)? Looking for a way to fix 0x0000006C: » REFMON_INITIALIZATION_FAILED»?
How to View Information about Errors in Windows 7, 8, 10
Causes of The Error
- There is not enough free space in the hard disk of your computer/laptop. For Windows 10 to operate correctly you need to have from 2 to 10 Gb of free space in your system disk.
- An incompatible version of BIOS was installed or the firmware was damaged.
- Device drivers incompatible with the OS were installed.
- Windows registry was damaged or deleted, or cleaning operations accidentally deleted system keys.
- Antivirus software or viruses may block system files or delete important registry keys.
- An error occurred in the work of backup software.
- It can also happen as a result of a Windows update.
Read more how to fix 0x0000006C: » REFMON_INITIALIZATION_FAILED» in Windows 10, Windows 8.1, Windows Server 2012, Windows 8, Windows Home Server 2011, Windows 7 (Seven), Windows Small Business Server, Windows Server 2008, Windows Home Server, Windows Vista, Windows XP, Windows 2000, Windows NT.
Here are some ways of eliminating the problem with » REFMON_INITIALIZATION_FAILED»:
Restore Deleted Files
Often BSoD errors cause loss of important files. Files blocked by computer viruses, backup software errors, damaged or overwritten system files, file system errors or bad hard disk sectors – these are only some of the causes that can make your data lost.
Corrections of the corresponding errors will restore the normal operation of your devices, but it does not always restore damaged or lost files. Also, it is not always possible to eliminate an error without formatting the hard disk or clean installation of the operating system, which can also involve loss of files.
Download for free and scan your device with the help of Hetman Partition Recovery. Learn about the program features and step-by-step guide.

Start The Computer in Safe Mode
If the error «REFMON_INITIALIZATION_FAILED» (0x0000006C) occurs when loading Windows and blocks any attempts to work with the system, try loading the computer in Safe Mode. This mode is meant for operating system (OS) diagnostics, but OS functions are very limited in this mode. Safe Mode should only be used if the system is blocked otherwise.
In order to start Safe Mode you should do the following:
- Go to Start menu and choose Settings.
- In the settings window that appears go to Update & Security menu and choose the Recovery tab.
- In the tab Recovery find Advanced startup and click the button Restart now.
- As your Windows restarts, it will ask you to choose the next step. Choose Troubleshoot.
- In the Troubleshoot menu click on Advanced Options and then on Startup Settings.
- Then Windows will inform you that the computer can be restarted with the use of additional settings one of which is Enable Safe Mode. Press Restart.
- After restarting choose Enable Safe Mode by pressing F4.
How to Boot Windows 10 in Safe Mode
Update a Driver With The Device Manager
Have you installed new hardware to your computer? Are you using a new USB device? These can be the causes for the error «REFMON_INITIALIZATION_FAILED». If you installed your device driver from the disk you have found in the device delivery package or if you are using a driver which was downloaded from a place other than Microsoft official website, this can be the core of the problem. You will have to update the device driver to fix it.
You can do it manually in the Windows device manager by taking the following steps:
- Press Windows button and type device manager on the keyboard.
- Choose Device Manager from the list.
- View the list of device categories and click on the arrow nest to the category in which your new device falls. The driver can be marked with a yellow triangle.
- Right-click on the device name and press Update Driver Software.
- Then a window of Update Driver Software with two options will appear:
- Search automatically for updated driver software. Windows will automatically check availability of the best suitable driver for this device.
- Browse my computer for driver software. Use this option to show the OS where the driver files are kept.
Restart the computer after the driver is installed.
Use sfc /scannow To Check All System Files
Damaged or rewritten system files may cause the error «REFMON_INITIALIZATION_FAILED». The command sfc finds damaged Windows system files and replaces them.
- Press Windows button and enter cmd from the keyboard.
- Right-click on CMD and launch it as administrator.
- In the command prompt window, type in sfc /scannow and press Enter.
This process may take several minutes.
How to Recover Windows 10 System Files
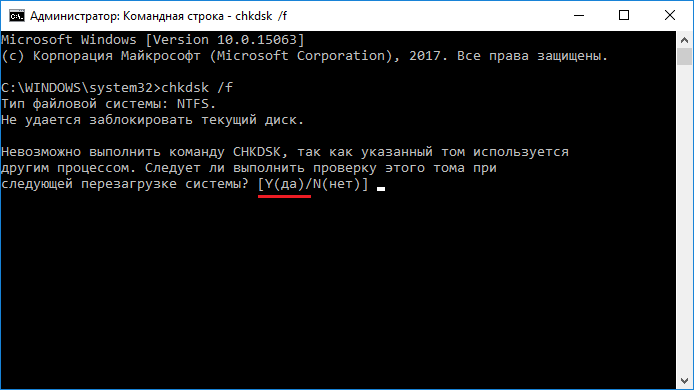
Check for Errors The Disk Where Windows Is Installed By Using The Command chkdsk c: /f
The blue screen with «REFMON_INITIALIZATION_FAILED» may be caused by a file system error or by bad sectors in your disk. The command CHKDSK will check the disk for file system errors and bad sectors. Using the setting /f will make the program to automatically correct the detected errors, and the setting /r allows finding and fixing problem disk sectors. To launch it, follow these steps:
- Press Windows, then enter CMD from the keyboard.
- Right-click on CMD and launch it as administrator.
- In the command prompt window type chkdsk c: /f and press Enter (use the letter of the drive where your OS is installed).
Wait until the process is over and restart your computer.
Use The Mode of Compatibility With an Old Version of Windows
A error with the code REFMON_INITIALIZATION_FAILED» may be caused by outdated software. If this error occurs after launching a program, then using Windows compatibility mode can help you get rid of the problem. To fix it, do the following:
- Find a program executable file (it has .exe extension) and right-click on it.
- In the quick menu, select Troubleshoot compatibility.
- At the next stage, you will see the window Program Compatibility Troubleshooter. You will have two troubleshooting options to choose from:
- Try recommended settings. Select this variant to start a test run of the program using recommended compatibility settings.
- Troubleshoot program. Select this variant to choose compatibility settings based on what problems you have encountered.
- After testing the program under various versions of Windows and startup settings save the suitable settings for your program.
How to Run a Program in Compatibility Mode With Windows 10, 8 and 7
Disable Unnecessary Programs in Windows Startup Menu
The software causing «REFMON_INITIALIZATION_FAILED» (0x0000006C) may be written to Windows Startup list so the error occurs immediately after the system starts without any user activity. You can delete programs from Startup by using Task Manager.

- Load the computer in Safe Mode.
- Right-click on Task Bar and then on Task Manager.
- Go to Startup tab.
- To delete a program from the startup list select it and disable by clicking Disable in the right lower corner of the window.
Consult Microsoft Support Service
Microsoft offers several solutions to eliminate the blue screen error. «REFMON_INITIALIZATION_FAILED» (0x0000006C) can be fixed with the help of Windows Update or by addressing Windows Support.
- Go to Microsoft Support Service.
- Enter your error code and message into the search field and follow the directions.
- If you don’t find a ready solution as the community where your query can be answered by a certified system administrator.
Install Latest System Updates
Windows provides updates that extend your driver database and correct errors or security vulnerabilities. Download the latest updates to get rid of the error «REFMON_INITIALIZATION_FAILED» (0x0000006C).
You can launch Windows Update like this:
- Go to Start menu and select Settings.
- In the Settings window go to Update and Security tab.
- To install the latest Windows updates click on Check for updates and wait until they are found and installed.
It is recommended to set up automatic download and installation of system updates with the help of Advanced Options.
To enable automatic system update you need to start Windows Update:
- Go to Start menu and choose Settings.
- In the Settings window go to the Update and Security menu and select Windows Update. To install the latest Windows updates click on Check for updates and wait until they are found and installed.
- Go to Advanced Options and choose the mode of update installation — Automatic.
Scan The System For Viruses
The blue screen of death with the error «REFMON_INITIALIZATION_FAILED» 0x0000006C can be caused by computer viruses that infected your system.
To check the computer for viruses launch your antivirus program.
Modern antiviruses allow checking both hard disks and RAM. Run a full system scan.
Test Your RAM
System memory problems may cause errors, loss of data or even make your computer stop working.
Before you start checking RAM, take it out of the slot on the motherboard and then stick it back again. Sometimes the error REFMON_INITIALIZATION_FAILED» can be caused by the memory stick which was set into the slot incorrectly or not tight enough, and sometimes by the slot contacts covered with dust.
If the above actions did not make things better, you can check your RAM with the means of your operating system – Windows Memory Diagnostic.
You can start this tool in two ways:
- With the help of Control Panel:
Go to Control Panel / System and Security / Administrative Tools. Launch the application Windows Memory Diagnostic.
With the use of Run:
Launch the Run tool with the combination of keys Windows + R. Type in mdsched and press Enter. The Windows Diagnostic tool will start.
To start the checking select one of the suggested variants to decide how your RAM will be tested after the computer is restarted.
If the diagnostic tool finds errors that cannot be corrected, such memory should be replaced (that is, you have to replace the memory stick where errors were found).
Make a Clean Installation of Windows
If none of the methods helped you to get rid of REFMON_INITIALIZATION_FAILED», try reinstalling Windows. In order to make a clean installation of Windows you need to create a setup disk or another media which you are going to use to install the OS.
Start the computer with the setup disk. To do it you may need to change boot priority in BIOS or UEFI for newer computers.
Following the installer menu stages, specify the disk where you want your Windows installed. You will have to format it then. If you are not satisfied with the number or size of the local disks they can be deleted and repartitioned.
Remember that formatting, deleting or partitioning your disks will destroy all files in the hard disk.
After specifying the disk to install Windows to, the process of copying system files and installing the operating system will start. During the installation, no additional action is required. In the process, the screen will go off for a while several times, and the computer will restart on its own to complete certain stages of installation.
Depending on the version of Windows at one of the stages you may have to select or enter basic personalization settings, choose how the computer works with networks and select settings of your account or create a new one.
As the computer loads the desktop, a clean installation of Windows is finished.
Note. Before you start a clean installation of Windows make sure you have drivers for all your hardware and that your files are safe. Download and save drivers to a separate media, and create a backup copy of important data.


