- Gaming Performance / System Optimization / Useful Tweaks
- REGISTRY TWEAKS
- 27 comments:
- Windows 10: Five Useful Registry Tweaks for Gaming Performance
- Make priority of gaming responsiveness
- Increase the hosting buffer size
- Disable Nagle’s Algorithm
- Change the DefaultTTL
- Clean invalid registry files
- Windows 10 Registry tweaks to improve Performance and Experience
- Launch Registry Editor
- Windows 10 Registry tweaks to improve performance
- 1] Improve the Speed of Your Internet
- 2. Activate Verbose Mode
- 3. Remove Shake to Minimize
- 4. Add “Open with Notepad” to the context menu
- 5. Enable Dark Mode
- 6. Go to the Last Active window with a single click
- 7. Add “Check for Update” to the context menu
- 8. Disable the LockScreen
- 9. Disable Action Center
- 10. Change your Animation
Gaming Performance / System Optimization / Useful Tweaks
Game / Performance / Networking tweaks, tips, hacks, apps
REGISTRY TWEAKS

You also can use Environment Variables to set a priority (different one). I imagine it helps more on laptops but its not a bad idea to set a program or driver from there. I guess that will be the next one I write here .
27 comments:
![]()
hello! ([HKEY_LOCAL_MACHINE\SOFTWARE\Microsoft\Windows NT\CurrentVersion\Multimedia\SystemProfile\Tasks\Games]) «SFIO Priority»=»High» isn’t better to set it to «Critical» ?
[HKEY_LOCAL_MACHINE\SOFTWARE\Microsoft\Windows NT\CurrentVersion\Multimedia\SystemProfile\Tasks\Games]
«Affinity»=dword:00000000
«Background Only»=»False»
«Clock Rate»=dword:00003710
«GPU Priority»=dword:00000006
«Priority»=dword:00000002
«Scheduling Category»=»High»
«SFIO Priority»=»High»
HKEY_LOCAL_MACHINE\SYSTEM\CurrentControlSet\Control\Session Manager\Memory Management
LargeSystemCache=0
essa regedit é boaa?

Critical most likely will cause you stuttters in game. Its meant for small, not demanding processes and mostly System onees.
![]()
Hey! The irq you choose are msi related but didnt you say you shouldnt use them?
MSI related What you mean??
![]()
Irq with minus are in the msi mode ( «Its not good if you set an MSI based driver with IRQL priority so keep that in mind.» )
Yes, thats true. At least for the modern hardware. Old GPUs dont use MSI for ex. Since its old method and u can use Affinity tool. I thought i made that clear. I’ll check it out. Thanks. If you use the MSI Utility it should be overrided anyway, or the driver itself will.
hello thank you
![]()
[HKEY_LOCAL_MACHINE\SOFTWARE\Microsoft\Windows NT\CurrentVersion\Multimedia\SystemProfile] «NoLazyMode»=dword:1
Where is this coming from? I’ve trawled the web for 2 days now, I see no documentation on it whatsoever.
As far as I’m considered, this is a ambiguous random entry that anyone can write in their registry in whatever key they like.
What funcionality did it serve, where did it come from? Was it something of actual usage in older versions of the OS in the Windows ecosystem?
ambiguous. that sounds. ambiguous 😀
Ok,I’ll skip the part that i say you are probably a noob (the fact that you ask about LazyMode but not about Latency Sensitive along with that Google reference kinda suggests that) and that Google is not = knowledge and go straight to the answer. There is another setting called AlwaysOn. This comes from Win7 & 8 days, when there is no multimedia activity the drivers stops working (idle itself). These settings prevents it from doing so & the priorities are always active. Some of my tweaks have settings that doesnt work in Win10 but i keep them for compatibility reasons because there are many people who still use Win7. With that said I have no reason to believe that they doesnt work. These tweaks in SystemProfile are not required for gaming these days because are very hard to spot, the impact is negligible & I recommend them only for competitive gaming anyway. You also can disable the driver but Im not sure thats a good thing.
Windows 10: Five Useful Registry Tweaks for Gaming Performance
To improve gaming performance, you might have tried various methods. Among them, tweaking registry is also a notable method, which can improve gaming performance to some extends. In this post, we will introduce to you five useful registry tweaks for gaming performance in Windows 10.
Make priority of gaming responsiveness
MMCSS, the abbreviation of Multimedia Class Scheduler, is a Windows service that allows multimedia applications to get prioritized access to CPU for time-sensitive processing. To ensure games get prioritized access to CPU resources, we can tweak the registry. Here are detailed steps.
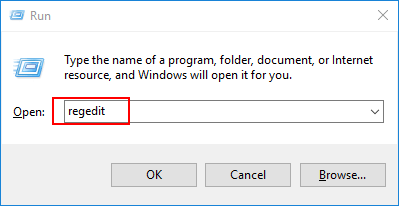
Step 1: Hit Windows key + R shortcut to launch a Run box. Then type regedit and hit Enter to open Registry Editor window.
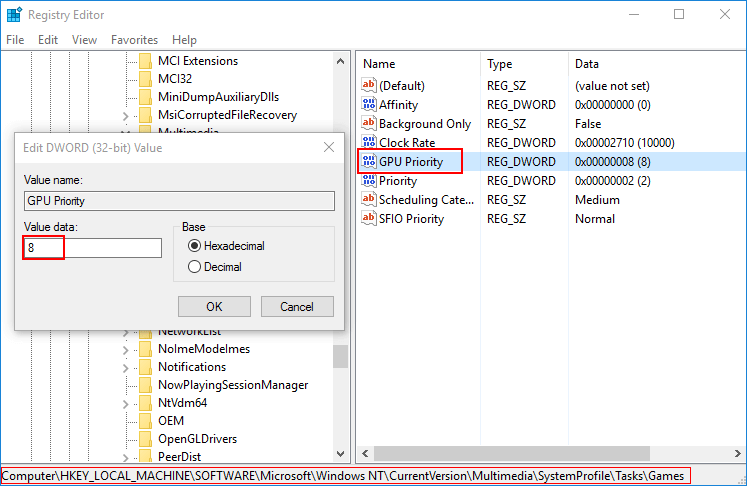
Step 2: Navigate to the following path in the left panel:
Step 3: Double-click GPU Priority, Priority and Scheduling Category respectively. Tweak the values of GPU Priority to 8, Priority to 6, Scheduling Category to High. After this change, you might realize that the internet speed is improved as well as gaming performance.
Increase the hosting buffer size
The size of hosting buffer reflects the ability to host data or services in a high-latency environment. By default, the system sets the buffer size as 16384 bytes but sometimes it is not enough if the amount of memory is small. Tweaking this value by Registry Editor will help reduce the impact of lag while gaming. Here is a guide.
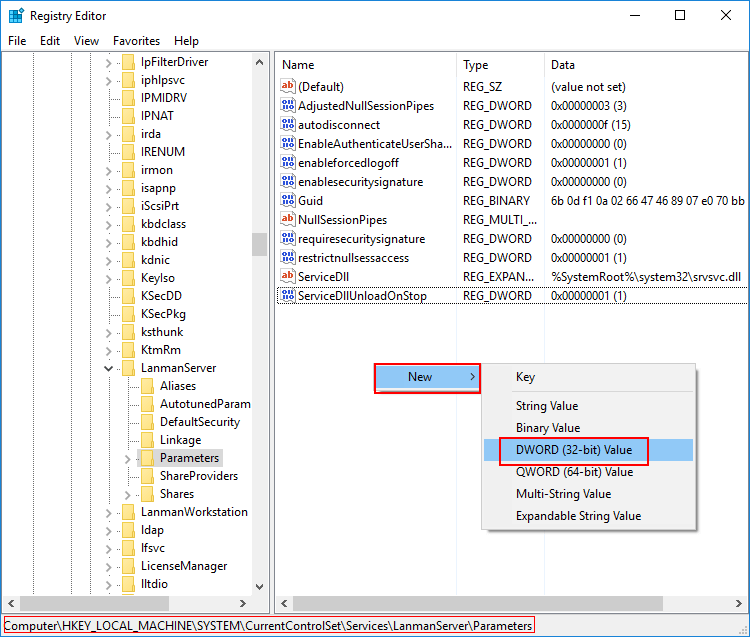
Step 1: Open Registry Editor window and navigate to the following path:
Step 2: Right-click the blank space on the right panel. Move the mouse cursor over New and select DWORD (32-bit) Value option.
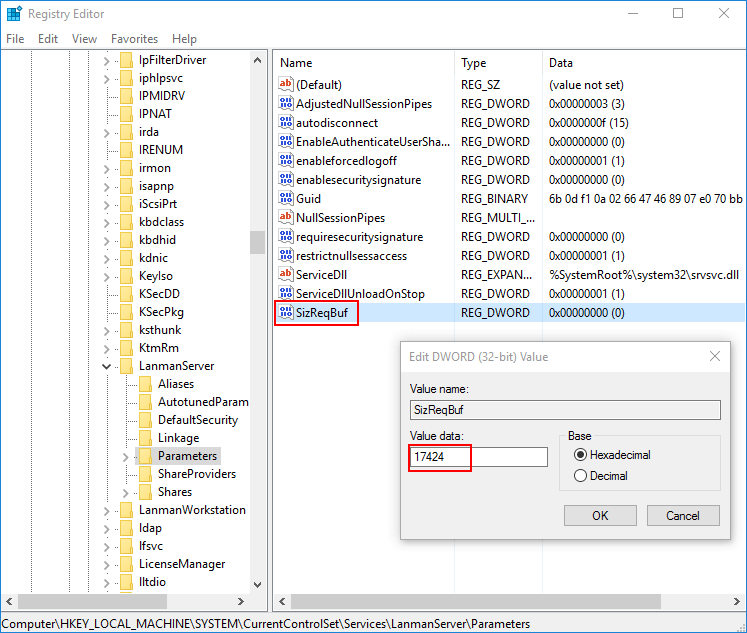
Step 3: Name it SizReqBuf and double-click it and set its value to 17424.
Disable Nagle’s Algorithm
Nagle’s algorithm is a means of improving the efficiency of network transmissions by combining several small packets into a single, large. It is enabled by Windows system by default. However, it might increase the latency or ping while gaming. So, it is recommended to disable it by Registry Editor.
Step 1: Open Registry Editor window and navigate to the following path:
Step 2: You can see lots of folders in Interfaces folder and you need to find out the folder containing the IP address. Then right-click the designated folder and move the mouse cursor over New option and select DWARD (32-bit) Value to create two new DWORDs.
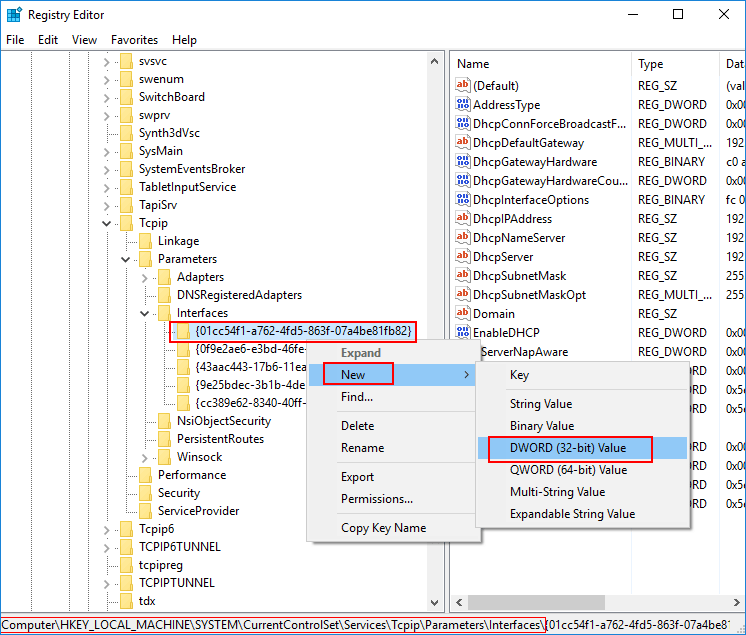
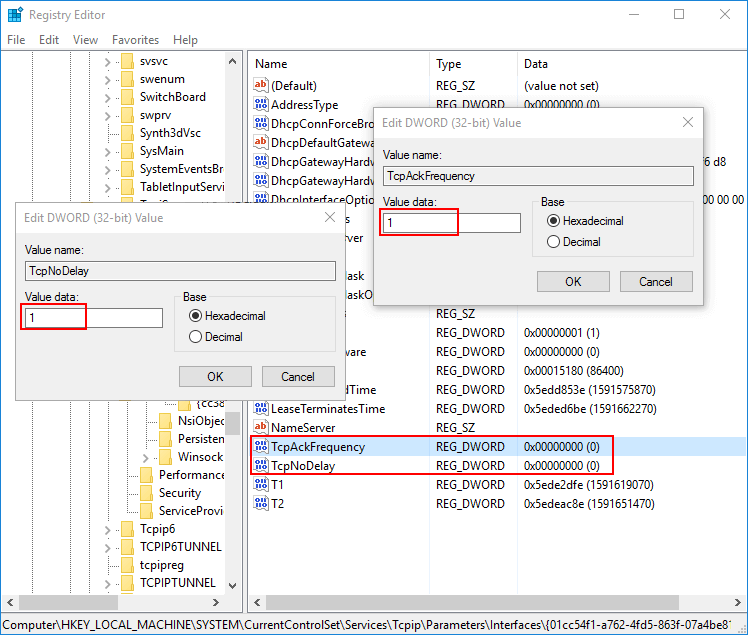
Step 4: Name these two values TcpAckFrequency and TcpNoDelay. Then double-click them and tweak their value to 1. Finally, Nagle’s Algorithm will be disabled.
Change the DefaultTTL
Time to Live (TTL) tells routers the time a packet should stay in the air while attempting delivery before discarding, which can prevent a data packet from circulating indefinitely. If the value is high, your computer will waste much time to wait for a failed packet to deliver decreasing the efficiency of your network. Network plays a crucial role in gaming. So, it is good for gaming to decrease this value by Registry Editor.
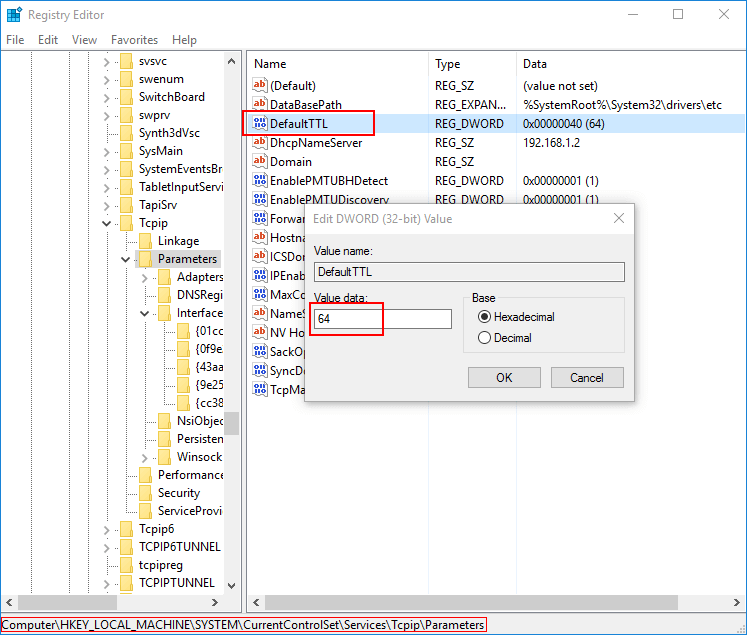
Step 1: Open Registry Editor window and navigate to the following path:
Step 2: Double-click the DefaultTTL in the right side and set its value to 1-255. A recommended value is 64. If you can’t find DefaultTTL registry, you need to create a new value and name it as DefaultTTL. That’s all. This registry tweak can also increase the internet speed.
Clean invalid registry files
A great number of unused and invalid registry entries might slow down your computer affecting your gaming experience. To improve your Windows for gaming, it is time to clean the invalid registry. Is there any way to clean out those registry files in your computer? Here I recommend to you a utility – System Genius that allows you to remove those invalid registry entries in Windows computer safely by one click. Here is a tutorial.
Step 1: Download System Genius. Then install it on your computer.
Step 2: Launce it and click Registry in the left panel of interface. Then go to the right menu and click Scan button to checkup the invalid registry files on your computer.
Step 3: Once completed, all the invalid registry files are shown in the result. You can click Clean to remove all the invalid registry entries from your computer.
Tips: System Genius allows you to delete the registry one by one. You can tick the one that you want to clean and get more details. Then you can know its actual location and click Clean to remove them.
Step 4: Click OK and the whole process ends. It is recommended that you clean the invalid registry files weekly. Finally, you will find out it is so dramatic to improve computer performance as well as gaming.
In addition, System Genius is a multi-functional Windows optimization utility that can help you clean up the junk files, free up system disk space, disable the auto-run programs and manage Windows system services, etc.
Windows 10 Registry tweaks to improve Performance and Experience
If you want to make your Windows 10 operating system work seamlessly then this article is for you. In this article, we are going to talk about some of the Windows 10 registry tweaks to make Windows faster & optimize it.
All the hacks mentioned here are tested thoroughly by me and will not damage your computer. Nevertheless, it is a good idea to backup your Registry and create a system restore point first before you proceed.
Launch Registry Editor
You need to first launch the Registry Editor. You can launch the registry editor by following two methods.
- Hit Win+R
- Type regedit
- Click OK.
This way you will be able to launch Registry Editor.
Windows 10 Registry tweaks to improve performance
1] Improve the Speed of Your Internet
Internet is one of the most important modern tools that has transformed the 21st Century. Because of this things like Augmented Reality and self-driving cars are real. Most of us are directly or indirectly dependent on the Internet. Therefore, a slow internet can act as a hurdle for your productivity.
To improve your Internet Speed with the help of the Windows 10 Registry you need to follow the steps mentioned below:-
Step 1: Navigate using the following route:
Step 2: Right-click on Parameters> New> DWORD 32.
Step 3: Name it “IRPStackSize”. Then double-click on it and change the value to 32.
After setting this up, you should restart your computer to increase your network speed.
Now while we may not have included the images for the following tweaks, the procedure to edit the Registry is the same.
2. Activate Verbose Mode
If you are a geek and want to know every detail of your computer during startup and optimize it accordingly, then we have one Windows 10 registry tweaks to make Windows faster & optimize it. We have the “Verbose Mode”.
To activate it you need to follow our step-by-step guide prescribed steps:-
Step 1: Navigate using the following route:-
Step 2: Right-click on Microsoft > New> DWORD 32.
Step 3: Name it “VerboseStatus” and change the value to 32.
Finally, restart your computer to activate Verbose Mode
3. Remove Shake to Minimize
Are you sick and tired of your screen accidentally minimizing? Well, it is not accidental it is an unnecessary feature that Microsoft has introduced in every Windows OS – namely Shake to Minimize.
This feature is not very popular and hence, you think that you have accidentally clicked the minimize button. Therefore, if you want to remove this feature then follow the prescribed steps:-
Step 1: Navigate using the following route:-
Step 2: Right-click on Advanced> New> DWORD 32.
Step 3: Name it “DisallowShaking” and change the value to 1.
This will disable the Shake to Minimize feature and also the problem of accidental minimization.
4. Add “Open with Notepad” to the context menu
When you right-click on your desktop the appeared list is called the Context menu. There are a few options available in the context menu but if you want you can even customize it accordingly and one such customization adding the Open with Notepad option.
To do that, you need to follow the prescribed steps:-
Step 1: Navigate using the following route:-
Step 2: Right-click on Shell> New> Key. Then rename it to Open With Notepad.
Step 3: Right-click on Open with Notepad> New> Key. Then rename it to Command.
Step 4: Double-click on Default from the right panel of the Window, in the Value data section type “notepad.exe %1” and click OK.
Now, close the Registry Editor, right-click on the file that you want to open with Notepad, and select the “Open with Notepad” option.
5. Enable Dark Mode
Dark Mode is a feature that most of us use on our smartphones but there is a way by which you can implement it on your Windows computer as well. If you have an LED screen this can even save your battery as an LED screen is made up of pixels and in order to show blacks, it turns the pixels off.
To do enable Dark Mode in Windows 10 with the help of the registry editor you need to follow the prescribed steps:-
Step 1: Navigate through the following path in the registry:-
Step 2: Right-click on Themes> New> Key. Then rename it to Personalize.
Step 3: Now, right-click on Personalize> New> DWORD(32-bit) Value. Then rename it to AppsUseLightTheme.
Step 4: Double-click on it to make sure that the value is 0.
Step 5: Now, navigate through the following path in the registry:-
Note: If there is no Personalize key, right-click on Themes and create a new key – Personalize.
Step 6: Now, there will be an “AppsUseLightTheme” option on the right panel of the screen, then change its value to 1.
This will change your current theme to dark.
6. Go to the Last Active window with a single click
If you want to do a lot of multitasking then this registry hack is for you. In this, we are going to enable a click to activate the last window from the registry with the help of Registry.
To do that, you need to follow the prescribed steps:-
Step 1: Navigate through the following path in the registry editor.
Step 2: Right-click on Advanced> New> DWORD (32-bit) Value. Rename it to LastActiveClick
Step 3: Double click on LastActiveClick and change its value to 1.
Now, you can just click once on the icon on the taskbar to go to the last active window.
7. Add “Check for Update” to the context menu
Updates are very vital for your Operating System but it is very lengthy to update your system as you have to launch Settings> Updates & Security> Check for Updates.
But what if we can add the option to the context menu. In this section, we are going to do just that with the help of the Registry Editor.
To add “check for update” to the context menu you need to follow the prescribed steps:-
Step 1: Navigate via the following route in the registry editor.
Step 2: Right-click on Shell> New> Key, rename it to CheckforUpdates.
Step 3: Right-click on CheckforUpdates> New> Key, rename it to commands.
Step 4: Right-click on Commands> New> String Value. Rename it to SettingsURI.
Step 5: Double-click on SettingsURI and type the following command in the Value data section.
Click OK and close the registry editor.
Now, go to your home screen, right-click anywhere and you will see an option “Check for update” in the context menu.
8. Disable the LockScreen
If you want to launch your Operating System as fast as possible then removing the lock screen can help as it adds another step that is not at all useful to the user. It will not threaten your privacy but increase the speed of your startup process.
To disable the lock screen with the help of the registry editor you need to follow the prescribed steps:-
Step 1: Navigate using the following route:-
Step 2: Right-click on Windows> New> Key, rename it to Personalization.
Step 3: Right-click on Personlization> New> DWORD 32. Rename it to NoLockscreen
Step 4: Double-click on it “NoLockscreen” and change the value to 1.
This way we have removed an unnecessary step in the startup process.
9. Disable Action Center
The Action Center in Windows is very useful, many people love it and many hate this constant poping of the screen. Therefore, in this article, we are going to learn how to disable the Action Center for the latter group of people.
To do that, you need to follow the following steps:-
Step 1: Navigate through the following route:-
Step 2: Right-click on Windows> New> Key. Rename it to Explorer.
Step 3: Right-click on Explorer> New> DWORD (32-bit) Value. Rename it to DisableNotificationCenter.
Step 4: Double-click on DisableNotificationCenter and change the value to 1.
Now you will not be annoyed by the Notification Center.
10. Change your Animation
If you want to quicken your UI then one of the easiest ways to do that is by changing the animation time. In this section, we are going to do that with the help of the registry editor.
To do that you need to follow the prescribed steps:-
Step 1: Navigate through the following route:-
Step 2: Now, from the right panel of the screen search for MenuShowDelay.
Double-click it to open and change the value to 200 here, the value is in milliseconds, therefore, you can change it to any particular time you want).
After this close the registry editor and then enjoy the express pace of your UI.
We hope you find some of these tweaks useful.
TIP: If you haven’t yet downloaded our freeware Ultimate Windows Tweaker, we recommend you do so as it offers several great tips to optimize your Windows 10 experience.
Date: February 6, 2021 Tags: Registry, Tweaks


