- Как отключить функцию распознавания речи в Windows 10
- Отключить распознавание речи в Windows 10
- Отключить функцию распознавания речи в Интернете
- Не удалось установить компоненту распознавание речи для английского языка
- Два способа отключить Распознавание голоса в Windows 10.
- Чтобы отключить распознавание голоса в Windows 10, выполните следующие действия.
- Отключить распознавание речи в сети с помощью настройки реестра.
- Disable Online Speech Recognition in Windows 10
- Disable Online Speech Recognition with a Registry tweak
- About Sergey Tkachenko
- Disable Speech Recognition feature in Windows 10
- Disable Speech Recognition feature in Windows 10
- Perform a full system scan using Restoro. To do so, follow the instructions below.
Как отключить функцию распознавания речи в Windows 10
В этом посте мы расскажем, как отключить Распознавание речи в Windows 10 v1809 . Распознавание речи – это технология, которая используется для управления компьютерами с помощью голосовых команд. С распознаванием речи вы можете произносить команды, на которые компьютер будет реагировать, и вы также можете диктовать текст на компьютер, что устраняет необходимость набирать слова в любом текстовом редакторе или текстовом редакторе. Функция распознавания речи, позволяет общаться с вашим компьютером. Вы можете улучшить свои компьютеры, чтобы лучше понимать свой собственный голос, чтобы улучшить точность дикции. Однако, чтобы повысить его точность, вы должны «обучить особенности». Если вы не нашли его производительность удовлетворительной, следуйте приведенным ниже инструкциям, чтобы отключить его.
Отключить распознавание речи в Windows 10

Чтобы отключить распознавание речи в Windows 10, откройте «Настройки»> «Удобство доступа»> «Речь» и включите или выключите Включить распознавание речи , чтобы включить или отключить эту функцию.
Отключить функцию распознавания речи в Интернете
Онлайновое распознавание речи позволяет вам общаться с Cortana и приложениями, которые используют облачное распознавание речи.
1] через настройки
Чтобы отключить распознавание речи в Интернете в Windows 10:
- Нажмите « Пуск » и выберите « Настройки ».
- Перейдите в раздел «Конфиденциальность».
- Переключитесь на « Речь » и на правой панели сдвиньте переключатель, чтобы отключить функцию « Онлайн распознавание речи ».
Речевые сервисы существуют как на вашем устройстве, так и в облаке. Это связано с тем, что Microsoft собирает необходимую информацию с этих служб, чтобы улучшить взаимодействие с пользователем. Поэтому, чтобы остановить это, отключите параметр Знакомство с вами , а также в разделе « Подписание и ввод персонализации ».
2] с помощью редактора реестра
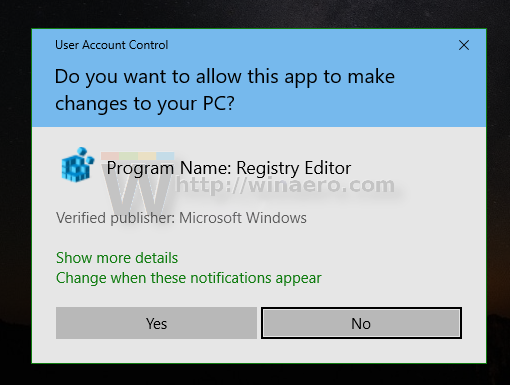
Откройте диалоговое окно Выполнить , нажав комбинацию Windows + R. В пустом поле диалогового окна введите « regedit » и нажмите « Enter ».
Далее перейдите по следующему адресу:
HKEY_CURRENT_USER \ Software \ Microsoft \ Speech_OneCore \ Settings \ OnlineSpeechPrivacy
Проверьте значение по умолчанию HasAccepted в правой панели окна.
- HasAccepted = 1 означает, что онлайн-распознавание речи включено.
Чтобы навсегда отключить эту функцию, дважды нажмите клавишу и измените значение слова D с 1 на 0 .
Пожалуйста, имейте в виду, что даже если вы используете 64-битную Windows, как в моем случае, вы все равно должны создать 32-битное значение DWORD.
Перезагрузите компьютер еще раз, чтобы изменения вступили в силу.
В дальнейшем вам не следует включать функцию распознавания речи в Windows 10.
Не удалось установить компоненту распознавание речи для английского языка
Каждый день вылазит сообщение, что не удалось установить. Как это можно установить или отключить
Для решения данного вопроса, пожалуйста, попробуйте в командную строку Администратора поочерёдно ввести следующие команды проверок и исправлений и нажмите Enter :
1. Dism /Online /Cleanup-Image /CheckHealth
2. Dism /Online /Cleanup-Image /RestoreHealth
3. sfc / scannow
Также, Вы можете обновить образ Windows без ущерба для личных файлов.
Восстановить целостность поврежденных системных файлов Windows 10 можно путем обновления системы посредством утилиты Media Creation Tool . Ее можно скачать на официальном сайте Microsoft . Обновление Windows 10 – длительный по времени, в то же время самый надежный способ вернуть операционной системе работоспособность. Процесс обновления Windows 10 по времени проходит примерно столько же, сколько и процесс ее переустановки. В рамках проведения этого процесса все поврежденные системные файлы будут перезаписаны, сохранятся данные пользовательского профиля, установленные программы и внесенные системные настройки, а на выходе получим свежайшую, со всеми установленными обновлениями Windows 10.
Запускаем Media Creation Tool . Принимаем лицензионные условия.
Выбираем Обновить этот компьютер сейчас .
Далее последует загрузка файлов для обновления, будут проведены подготовительные действия. После чего необходимо жать кнопку Установить . И ждать завершения процесса обновления.
Пожалуйста, сообщите результат.
Если данная информация была полезна, пожалуйста, отметьте её как ответ.
Два способа отключить Распознавание голоса в Windows 10.
Публикация: 21 Октябрь 2018 Обновлено: 7 Август 2019
Windows предоставляет функцию распознавания речи на основе устройств (доступную как с помощью приложения Windows Recech Recognition Desktop), так и с помощью облачной службой распознавания речи на тех рынках и регионах, где доступна Cortana. Microsoft может использовать голосовые данные, взаимодействия с компьютером, чтобы улучшить услуги распознавания речи.
Чтобы использовать распознавание речи, необходимо включить параметр «Знакомство с вами» (параметр конфиденциальности в разделе «Персонализация рукописного ввода и ввода с клавиатуры»), поскольку голосовые службы существуют как в облаке, так и на вашем устройстве. Информация, которую Microsoft собирает с их помощью, позволяет их улучшить. Речевые службы, которые не передаются в облако и присутствуют только на вашем устройстве, такие как «Диктор» и «Распознавание речи Windows», по-прежнему будут работать, если этот параметр отключен, но Microsoft уже не будет собирать данные.
Если для параметра «Диагностика и использование данных» («Параметры» → «Конфиденциальность» → «Диагностика и отзывы») установлено значение «Полные», входящие данные для рукописного ввода и ввода текста отправляются в Microsoft, и компания использует эти данные в совокупности, чтобы улучшить платформу для всех пользователей.
Чтобы отключить распознавание голоса в Windows 10, выполните следующие действия.
- Откройте приложение «Параметры».
- Перейдите в раздел «Конфиденциальность» → «Голосовые функции».
- Справа отключите опцию «Распознавания голоса в сети» передвинув ползунок переключателя в положение «Откл.».
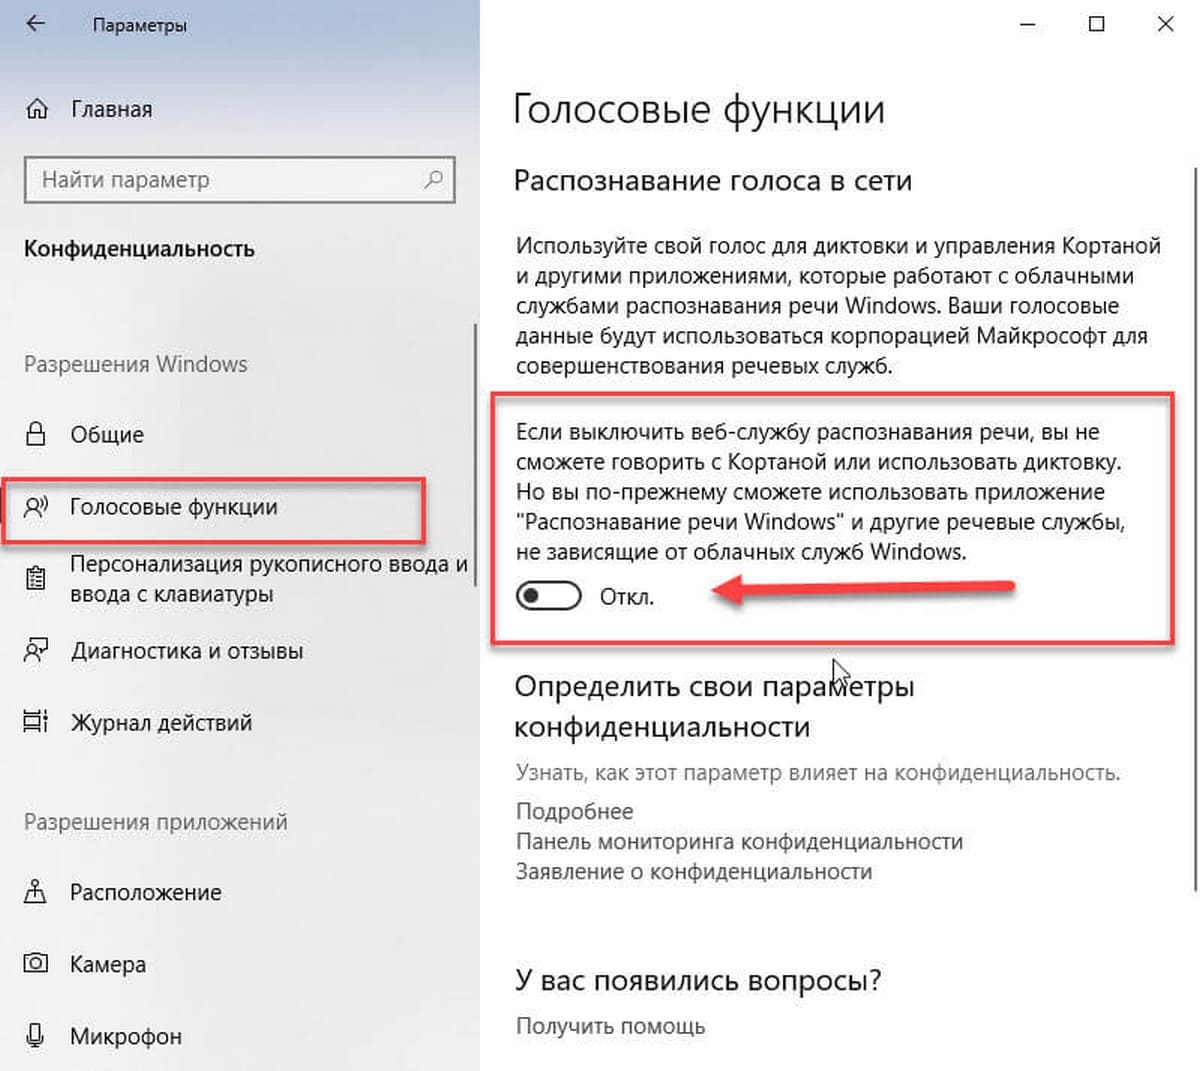
Теперь функция отключена.
Кроме того, вы можете применить настройки реестра.
Отключить распознавание речи в сети с помощью настройки реестра.
- Загрузите следующий ZIP-архив: загрузите ZIP-архив.
- Извлеките его содержимое в любую папку. Вы можете разместить файлы непосредственно на рабочем столе.
- Дважды кликните файл Off-Online Recognition.reg, чтобы начать процесс слияния.
Чтобы отменить изменение при необходимости, используйте файл On-Online Speech Recognition.reg.
Все!
Файлы реестра, выше, изменяют ветвь реестра
Они изменяют параметр DWORD (32 бита) с именем HasAccepted.
- HasAccepted = 1 — Включить распознавание речи в сети.
- HasAccepted = 0 — Функция распознавания речи отключена.
Кроме того, начиная с Windows 10 build 17063, ОС имеет ряд новых параметров в разделе «Конфиденциальность». К ним относятся возможность управления разрешениями на использование для ваших библиотек / папок, микрофона , календаря , информации учетной записи пользователя , файловой системы , местоположения , контактов , истории вызовов , электронной почты , обмена сообщениями и т. Д.
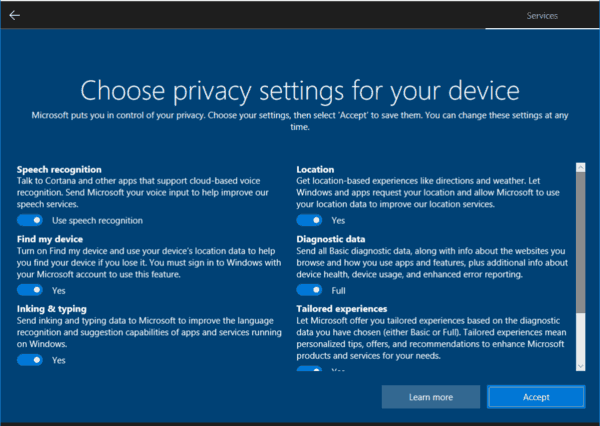
Наконец, вы можете отключить распознавание речи в сети на странице конфиденциальности программы установки Windows во время установки ОС с нуля.
Disable Online Speech Recognition in Windows 10
Windows provides both a device-based speech recognition feature (available through the Windows Speech Recognition Desktop app), and a cloud-based speech recognition service in those markets and regions where Cortana is available. Microsoft may use the voice data collected on your computer to help improve their speech services.
When your Diagnostic and usage data setting (Settings > Privacy > Diagnostics & feedback) is set to Full, your inking and typing input data is sent to Microsoft, and the company use this data in the aggregate to improve the inking and typing platform for all users.
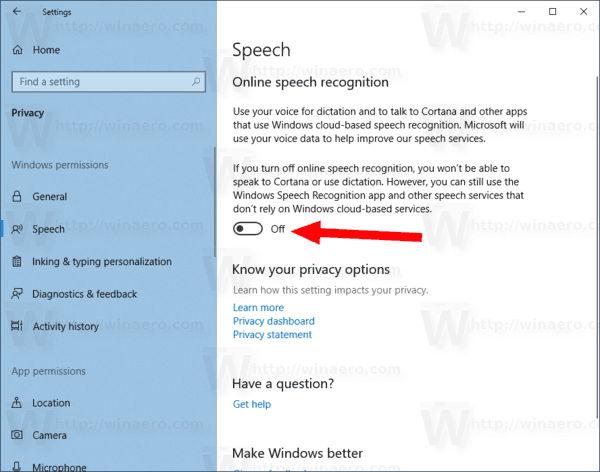
To disable Online Speech Recognition in Windows 10, do the following.
- Open the Settings app.

- Go to Privacy -> Speech.
- On the right, turn off the toggle option under Online speech recognition.
- The feature is now disabled.

Alternatively, you can apply a Registry tweak.
Disable Online Speech Recognition with a Registry tweak
- Download the following ZIP archive: Download ZIP archive.
- Extract its contents to any folder. You can place the files directly to the Desktop.
- Unblock the files.
- Double click on the Disable Online Speech Recognition.reg file to merge it.
- To undo the change when needed, use the provided file Enable Online Speech Recognition.reg.
The Registry files above modify the Registry branch
They change the 32-bit DWORD value named HasAccepted.
- HasAccepted = 1 — Online Speech Recognition is enabled.
- HasAccepted = 0 — Online Speech Recognition is disabled.

Note: Even if you are running 64-bit Windows you must still create a 32-bit DWORD value.
Also, Starting with Windows 10 build 17063, the OS has got a number of new options under Privacy. These include the ability to control usage permissions for your Library/data folders, microphone, calendar, user account info, file system, location, contacts, call history, email, messaging, and more. Also, there is a new layout for privacy settings shown above.
Finally, you can disable Online Speech Recognition from the privacy page of the Windows Setup program when installing the OS from scratch.
Articles of interest:
Winaero greatly relies on your support. You can help the site keep bringing you interesting and useful content and software by using these options:
Share this post
About Sergey Tkachenko
Sergey Tkachenko is a software developer from Russia who started Winaero back in 2011. On this blog, Sergey is writing about everything connected to Microsoft, Windows and popular software. Follow him on Telegram, Twitter, and YouTube.
Disable Speech Recognition feature in Windows 10
Disable Speech Recognition feature in Windows 10

Speech Recognition is a technology used to control computers using voice commands. Through this feature, you can say commands that your computer will respond to, and aside from that, you can also dictate text to your computer which eliminates the need to type words in any word processing program or text editor. All in all, the Speech Recognition feature allows you to communicate with your computer and improves your computer’s ability to understand your own voice better as well as improve its diction accuracy. However, before you can improve its accuracy, you need to “train the feature” first. And if so far you are not satisfied with its performance, you actually have the option to disable it. So in this post, you will be guided on how you can disable the Speech Recognition feature in Windows 10 v1809.
To disable Speech Recognition in your computer, follow the steps below.
Step 1: Go to Settings > Ease of Access.
Step 2: From there, go to Speech.
Step 3: Now switch off the toggle button for Speech Recognition to disable this feature.
On the other hand, you can also disable the Online Speech Recognition feature if you really don’t want to have anything to do with it. You have two options to do that – you can either do it using Settings or using the Registry Editor.
Disable Online Speech Recognition feature via Settings:
- Click on the Start button and select Settings.
- Next, go to the Privacy section and click on the Speech option located at the right pane.
- Then switch the toggle button off to turn off the Online Speech Recognition feature.
Note: Speech services exist on your computer and even in the cloud since Microsoft collects essential information from these services in order to enhance user experience and if you want to stop this, you have to turn off the “Getting to know you” option under the “Inking and typing Personalization” section.
Disable Online Speech Recognition feature via Registry Editor:
Before you proceed, you need to create a System Restore Point first.
- Tap the Win + R keys to open the Run dialog box.
- Then type “regedit” in the field and hit Enter to open the Registry Editor.
- Next, navigate to the following registry path:
HKEY_CURRENT_USERSoftwareMicrosoftSpeech_OneCoreSettingsOnlineSpeechPrivacy
- After that, check the default value of the “HasAccepted” key located in the right pane. As you can see its value is set to “1” which means that the Speech Recognition feature is enabled. And so to change it, you have to set “0” as its new value to permanently disable the feature.
- Just double click on the key and change the value from “1” to “0”. Keep in mind that even if you are using a 64-bit Windows 10 computer, you still have to create a 32-bit DWORD value.
- After that, restart your computer to apply the changes made.
That’s about it. You should now be able to enjoy using your computer without the Speech Recognition feature. However, if you are currently experiencing some system issues on your Windows 10 PC, there is a one-click solution you could check out known as Restoro to resolve them. This program is a useful tool that could repair corrupted registries and optimize your PC’s overall performance. Aside from that, it also cleans out your computer for any junk or corrupted files that help you eliminate any unwanted files from your system. This is basically a solution that’s within your grasp with just a click. It’s easy to use as it is user-friendly. For complete set of instructions in downloading and using it, refer to the steps below.
Perform a full system scan using Restoro. To do so, follow the instructions below.
- Turn on your computer. If it’s already on, you have to reboot it.
- After that, the BIOS screen will be displayed, but if Windows pops up instead, reboot your computer and try again. Once you’re on the BIOS screen, repeat pressing F8, by doing so the Advanced Option shows up.

- To navigate the Advanced Option use the arrow keys and select SafeMode with Networking then hit
- Windows will now load the SafeMode with Networking.
- Press and hold both R key and Windows key.

- If done correctly, the Windows Run Box will show up.
- Type in the URL address, https://errortools.com/download/restoro in the Run dialog box and then tap Enter or click OK.
- After that, it will download the program. Wait for the download to finish and then open the launcher to install the program.
- Once the installation process is completed, run Restoro to perform a full system scan.

- After the scan is completed click the “Fix, Clean & Optimize Now” button.


