- Windows 10 Pro Lite x64 for Winclone
- Descriptions for Windows 10 Pro Lite x64 for Winclone
- Overview
- Winclone 8
- Описание и возможности
- Как пользоваться
- Загрузка и установка
- Инструкция по работе
- Достоинства и недостатки
- Похожие приложения
- Системные требования
- Скачать
- Видеообзор
- Вопросы и ответы
- Migrating Windows 10 to a Mac Pro (2019) with Winclone 8
- Overview
- Required Items
- Create Winclone Image of Source Mac
- Restore Image to Destination Mac
- Injecting Drivers
Windows 10 Pro Lite x64 for Winclone
| Name | Windows 10 Pro Lite x64 for Winclone [mactorrents.io].dmg |
|---|---|
| Size | 2.33 GB |
| Created on | 2017-12-15 22:55:22 |
| Hash | 4c1a7292f1fd64234bb8db3d68ae8c983c194c8d |
| Files | Windows 10 Pro Lite x64 for Winclone [mactorrents.io].dmg (2.33 GB) |
Descriptions for Windows 10 Pro Lite x64 for Winclone
Name: Windows 10 Pro Lite x64 for Winclone
Mac Platform: Intel
Language : Multi
Web Site: https://www.microsoft.com/
Overview
Clone Windows image mounted for easy and quick installation on a Mac without capricious Boot Camp.
Tested on mac os 10.13.1. Set via Winclone Pro 6 v6.1.5.
Based on the assembly of “Windows 10 x64 Lite 1709 (16299.19) for SSD v3 xlx” .
The system weighs only about 5GB. Most of the poppy with a small disk.
Screenshots were made after the installation of Visual Studio and all drivers.
Adapted for mounting on SSD, but can be installed on the HDD, in this case, it is strongly recommended to apply Tweaks_SSD-to-HDD.reg
The paging file is exposed to a minimum. If you have little physical memory, including additional paging file to another drive ( “The size of the choice of the system”), or increase the “Maximum Size” on the main.
Completely disable swapping on the main disk is not recommended!
Printer services are disabled in the component, including, if necessary.
Windows Defender, Edge and Microsoft Store in all versions removed. Then install will not work.
In the assembly, you can opt out, only updated manually when in “the Windows Update” pressing the corresponding button. Also download off “Malicious Software Removal Tool”, hibernation, quick start.
When installing the assembly does not connect to the network setting “their” drivers, as Driver download automatically!
Application Off-SwapFile.reg file will disable swapfile.sys, used only for tile applications.
Features:
Maximum off “logging” and collecting all sorts of data, leaving only necessary to operate the system logs. Thus, the system does not waste time and resources to collect the data to be sent to the Hindus))).
Delete:
Shop all tile applications, “Windows Defender”, Edge (can not be restored!), OneDrive, Quick Help, Feedback, Disk Recovery, multipoint connector, Containers, Ponte data center, Active Directory Services Lightweight Directory, Geolocation, Telemetry .
The hosts file is added to the recording block sending telemetry and advertising on Skype.
Installation:
Download and extract the files.
Through the “Disk Utility” to create a partition for Windows format “MS-DOS (FAT)” , everywhere are advised to call it “BOOTCAMP”, but you can experiment.
The system weighs approximately 5GB, 25GB partition I made that got into the program. Less 10GB make sure it is not necessary.
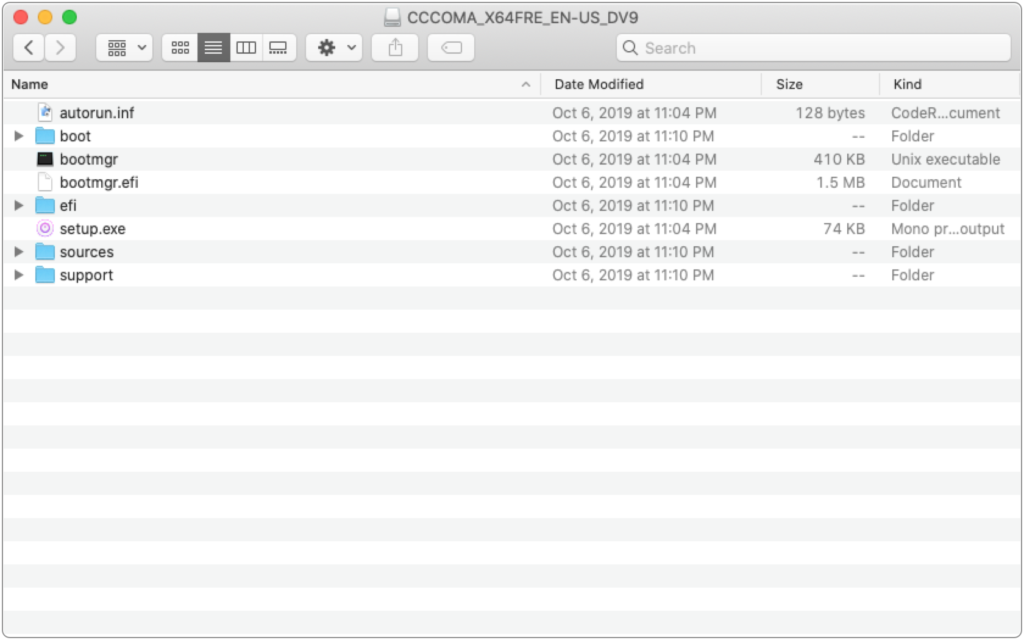
Make sure that your computer is compatible: Generally a dozen works even on old computers a decade ago. But there can be problems with drivers Boot Camp. They simply can not be established. Download the driver via Boot Camp: Install and open the last Winclone. Drag it downloaded image c extension .winclone.
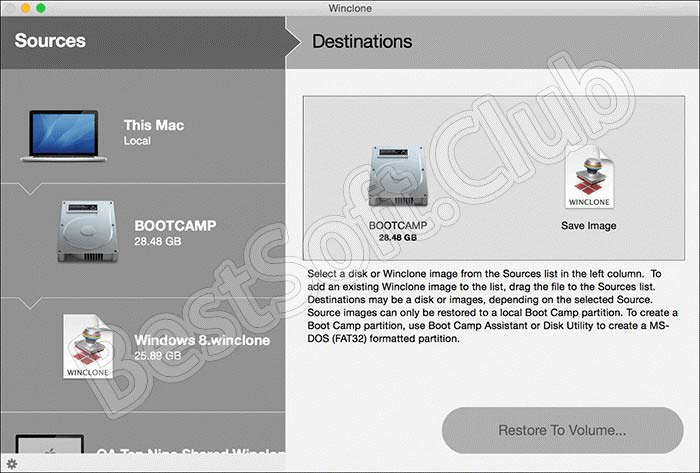
1. Select an image
2. Select the created partition
3. Run
Winclone 8

На ноутбуки и компьютеры от Apple можно устанавливать операционную систему Windows XP, 7, 8 или 10, чтобы использовать две платформы с одного устройства. Однако штатная дисковая утилита Mac OS не работает с разделами системы от Microsoft. Поэтому резервное копирование разделов Boot Camp осуществляется через сторонний софт под названием Winclone 8. У нас вы можете бесплатно скачать приложение через торрент по ссылке в конце страницы. Также ознакомьтесь с кратким обзором функционала и особенностей.
Описание и возможности
Стандартный инструмент для работы с дисками выдает ошибку при попытке создания или восстановления образа с Windows. Данная функция крайне полезна при непредвиденных случаях – поломках ОС, самого устройства, вирусах и так далее. Пользователь может легко восстановить все личные данные из сжатого образа BootCamp. Рассмотрим основные функции программы:
- создание раздела Boot Camp;
- клонирование Boot Camp на отдельный раздел или диск;
- создание образов с данными системы в сжатом виде;
- восстановление информации из ранее созданного образа;
- ручная настройка конфигурации резервного копирования и восстановления.
Winclone не способна заменить полноценную утилиту для работы с загрузчиками и разделами жесткого диска, но с основной задачей справляется без каких-либо нареканий. Вместе с данным приложением вы можете быть уверены в том, что в экстренной ситуации сможете вернуть прежнее состояние Windows за 10-15 минут.
Программа совместима со старыми Windows XP и Vista, а также работает с файловыми системами FAT32 и NTFS.
Как пользоваться
Теперь пройдемся по основным пунктам использования – установка, настройка, архивирование или восстановление образов.
Загрузка и установка
Сначала скачайте бесплатную утилиту через torrent-файл с помощью ссылки в конце страницы. В архиве содержится файл с расширением DMG, который можно запустить только в системе Mac OS X. Поэтому загружайте его сразу на устройстве от Apple или скопируйте позднее.
Запустите файл DMG двойным кликом мышки на системе Mac OS X. Если вы столкнулись с сообщением о том, что приложение не скачано из App Store, то разблокируйте установку от непроверенных разработчиков через настройки ОС. После этого система смонтирует образ, а вы сможете запустить установщик и следовать инструкции. Процедура инсталляции не отличается от подобных операций на Windows.
Инструкция по работе
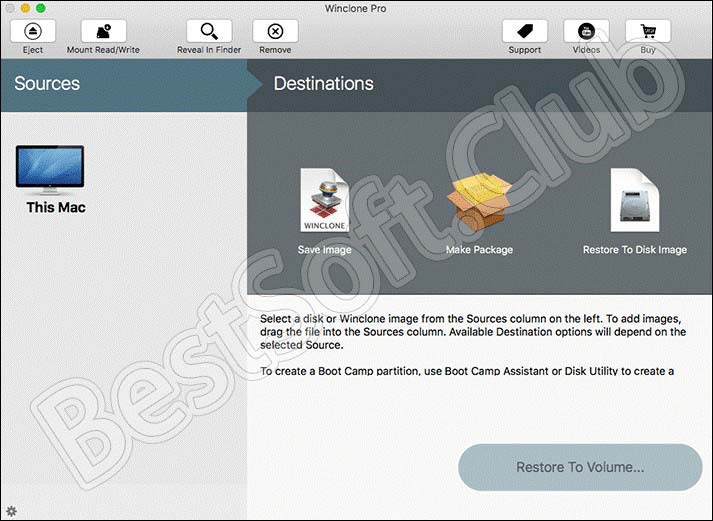
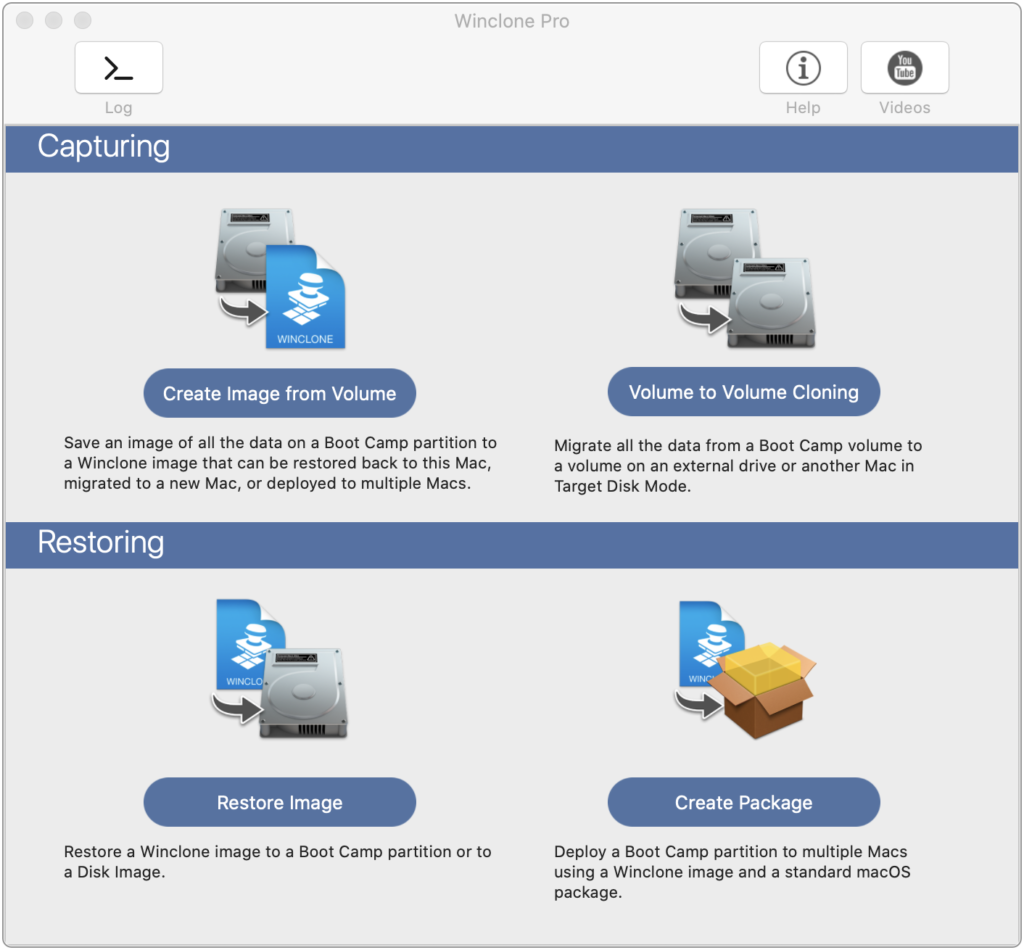
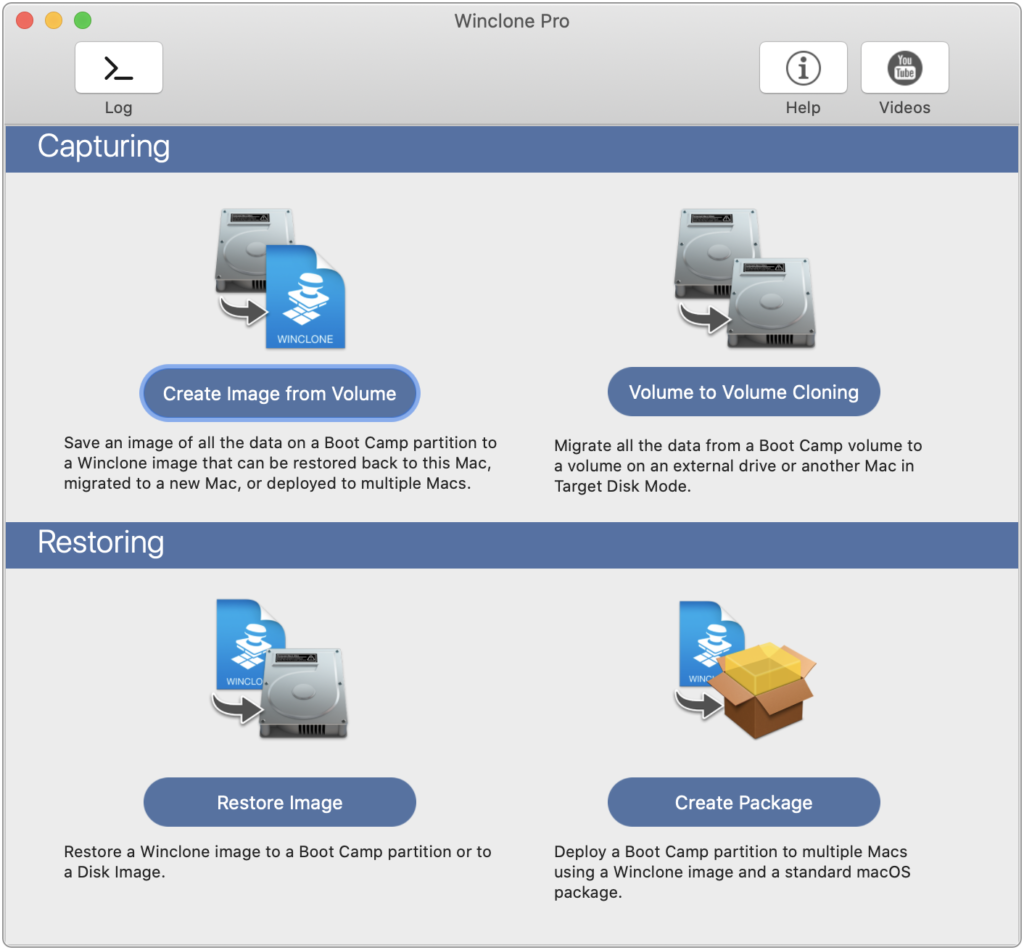
Использование софта делится на несколько разных процедур. В Capturing можно выбрать создание образа из существующего раздела или копирование одного раздела на другой. Через Restoring выполняется восстановление системы Windows из образа на чистый раздел или распаковка сжатых файлов.
Вам достаточно выбрать нужную функцию, указать диск или раздел, с которым будет осуществляться взаимодействие. Процедура сжатия или распаковки не занимает больше 15 минут при нормальном состоянии жесткого диска устройства.
При попытке восстановления некоторые пользователи сталкиваются с ошибкой Winclone could not install the helper tool. Предлагаем один из способов устранения данной проблемы:
- Откройте Winclone и перейдите в настройки.
- В пункте обновления данных BCD выставьте пункт «Никогда».
- Теперь нужно перезапустить Mac и выполнить восстановление.
- Затем верните настройку в положение «Спрашивать» и проделайте процедуру восстановления Windows еще раз.
Способы решения проблемы могут меняться в зависимости от версии Mac OS X и операционной системы Windows, которую вы собираетесь копировать или восстанавливать таким методом.
Достоинства и недостатки
Выделим плюсы и минусы приложения для резервного копирования на Mac OS.
- быстродействие;
- простое управление;
- работа из-под запущенной системы;
- создание максимально сжатых образов;
- поддержка большинства версий Windows;
- восстановление ОС сразу на нескольких устройствах Mac.
- отсутствие русского языка.
Похожие приложения
При необходимости обратите внимание на ряд аналогичных утилит:
Системные требования
Требования к мощности компьютера представлены ниже:
- Центральный процессор: с частотой 2 ГГц и выше;
- Оперативная память: 2 Гб и выше;
- Пространство на жестком диске: 20 Мб;
- Платформа: Mac OS X.
Программное обеспечение поддерживает резервирование и восстановление Windows XP, 7, 8, 10 x32/x64. В состав Winclone не входят образы систем – их нужно качать отдельно!
Скачать
Загружайте архив с утилитой с помощью нажатия на прикрепленную кнопку.
| Версия: | 8 |
| Разработчик: | Twocanoes Sftware |
| Год выхода: | 2021 |
| Название: | Winclone |
| Платформа: | Mac OS 10.12 и выше |
| Язык: | Английский |
| Лицензия: | Бесплатно |
| Пароль к архиву: | bestsoft.club |
Видеообзор
Посмотрев данный ролик, вы узнаете больше полезных сведений о работе с софтом.
Вопросы и ответы
Задавайте вопросы и пишите отзывы по поводу утилиты через блок для комментариев внизу. Мы читаем все комментарии и отвечаем посетителям при необходимости.
Migrating Windows 10 to a Mac Pro (2019) with Winclone 8
Migrating Windows 10 from an older Mac to a Mac Pro (2019) with Winclone 8 requires an additional step of injecting the Apple SSD driver to allow initial boot of Windows 10. This article covers all the steps to migrate from an older (non-T2) Mac.
Overview
To migrate Windows 10 from an older Mac to a Mac Pro (2019), a Winclone image is saved on the older Mac, copied to an HFS+ formated external drive, and restored to a new partition on the new Mac. Prior to booting into Windows 10, a USB flash drive is created with the Apple drivers (downloaded from Boot Camp assistant) and a Windows 10 installation ISO. The new Mac is then booted from the USB flash drive and a script is run to install the drivers on the restored Boot Camp partition.
Required Items
- Winclone 8 from https://twocanoes.com/winclone
- Source Mac (non-T2 Mac that has the Windows 10 Boot Camp partition to be migrated)
- Destination Mac (Mac Pro [2019])
- External Drive formatted as HFS+ for copying the image from the Source Mac to the Destination Mac.
- Windows 10 ISO downloaded from Microsoft, 1909 or later.
- Windows Support drivers downloaded on the new Mac from the Action menu in Boot Camp Assistant.
- 8 GB (or larger) USB Flash Drive formatted as ExFAT. The Windows installer and drivers will be copied to this drive.
- External Drive resources from Twocanoes Software.
Create Winclone Image of Source Mac
On the source Mac, create a Winclone image using Winclone 8 and save to the External drive formatted as HFS+. The Winclone image must be a File-based format (specified in Winclone Preferences). File-based imaging is the default imaging format in Winclone 8.
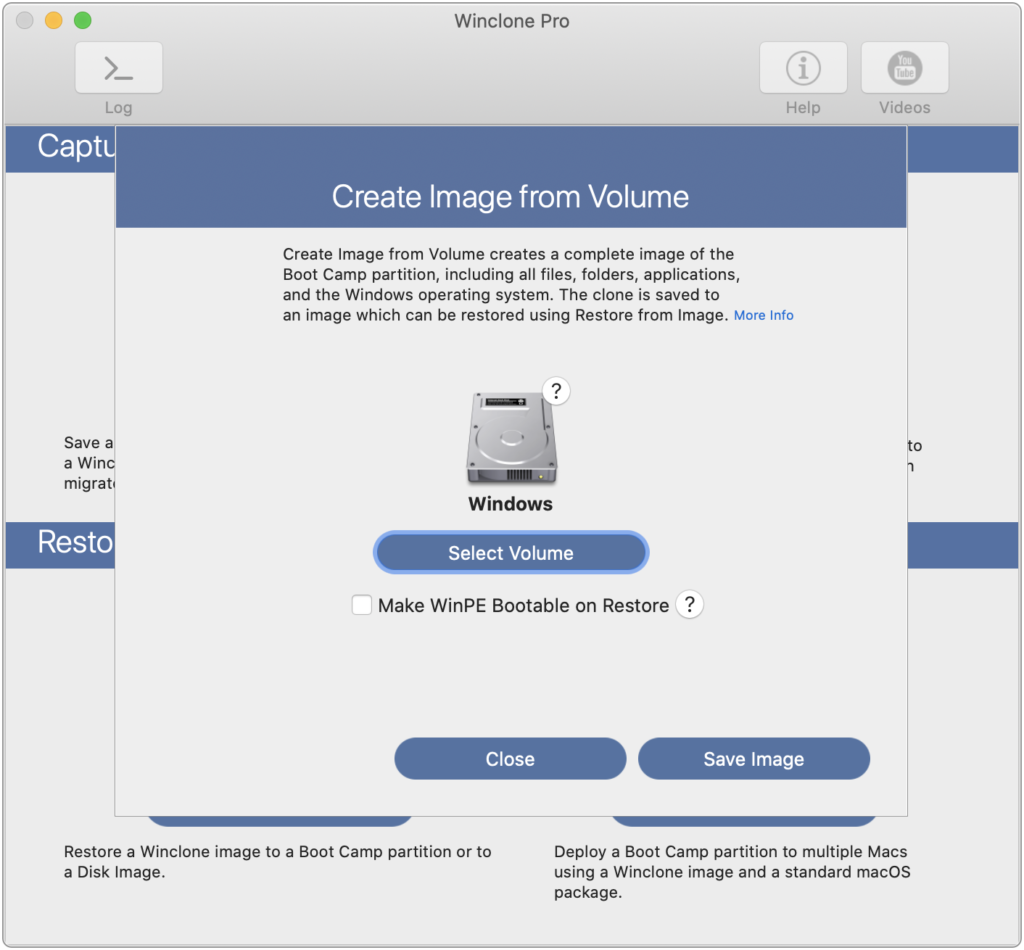
Open Winclone 8 and select “Create Image from Volume”:
Select the Boot Camp partition and click “Save Image”:
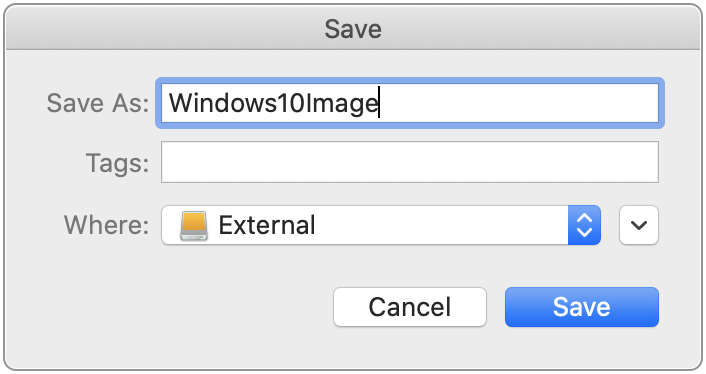
Give the image a name and click “Save to the HFS+ formatted external drive”:
Restore Image to Destination Mac
On the destination Mac, create a Boot Camp partition using Disk Utility and restore the Winclone image.
NOTE: MAKE SURE YOU HAVE A GOOD BACKUP OF THE DATA IN MACOS PRIOR TO CREATING A NEW PARTITION IN CASE OF ERROR.
Open Disk Utility in the Utilities folder:
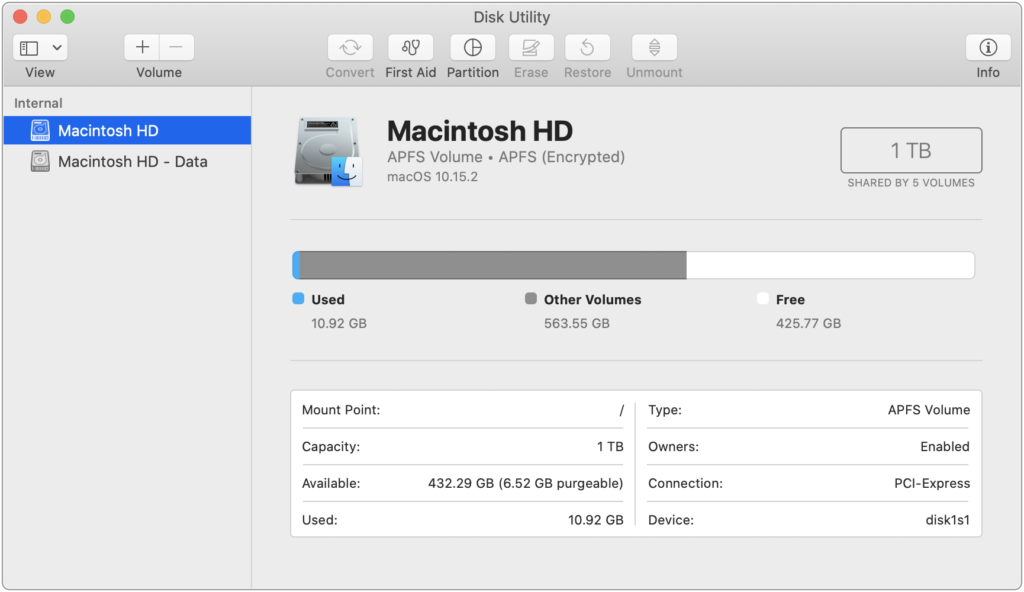
Select the Macintosh volume and click the Partition button.
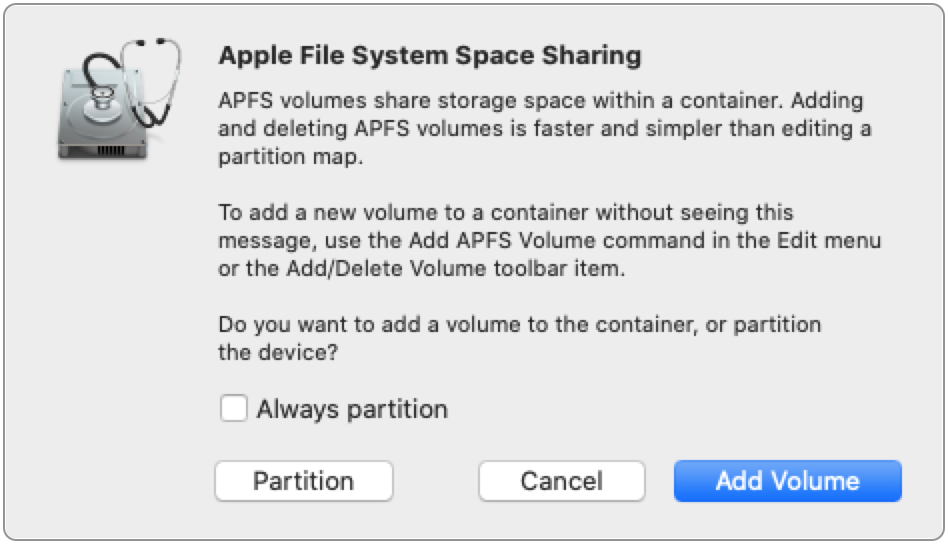
If you are prompted to add volume to a container or adding a partition, select “Partition”:
Click “+” to add a partition:
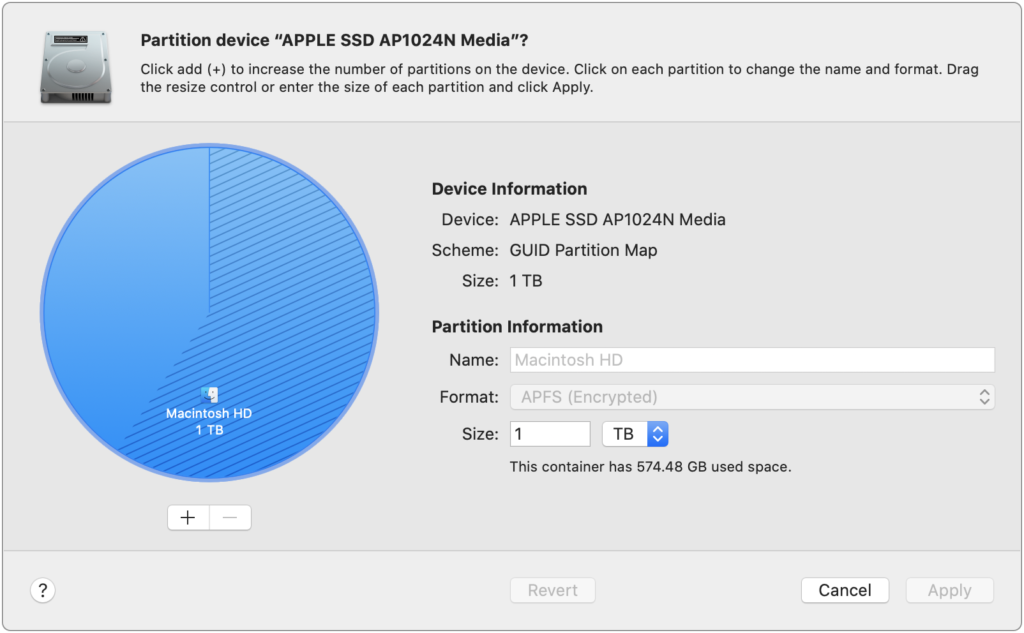
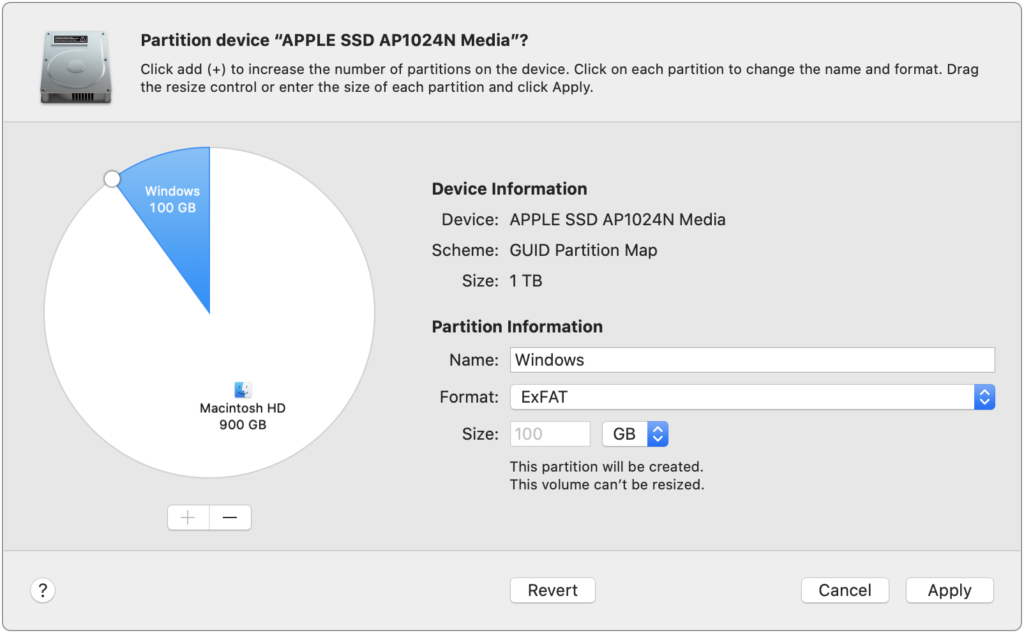
Select the size of the new Boot Camp partition, give it a name, and select the format as ExFAT. When the Winclone image is restored, the format will automatically be changed to NTFS. Note that the size of the partition can be any size that is large enough to hold the data used in the migrating Boot Camp partition.
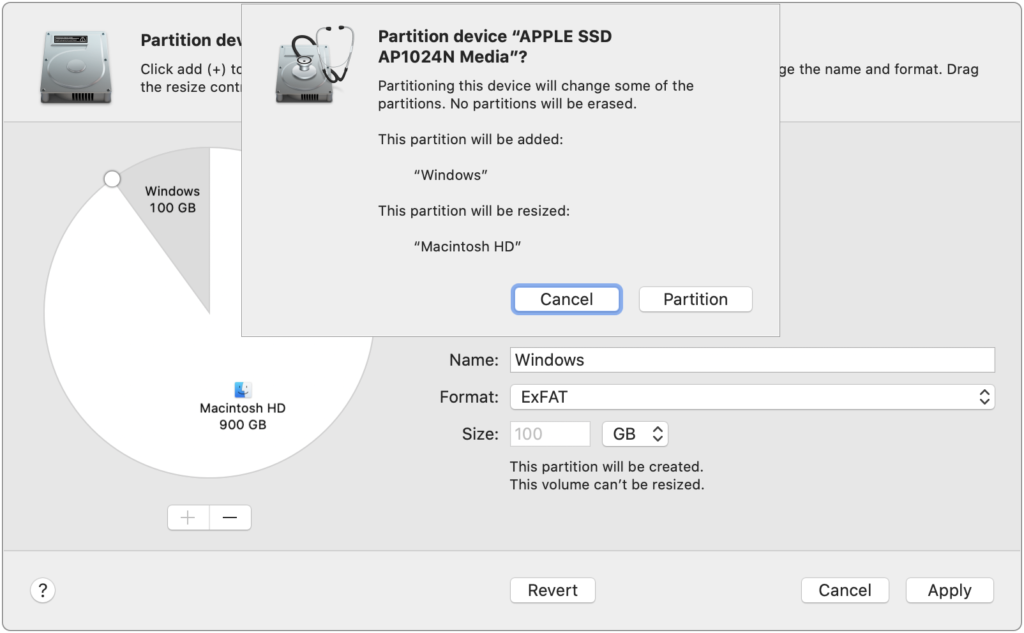
Confirm the addition on the new partition by verifying that a new partition will be added and the Mac volume will be resized:
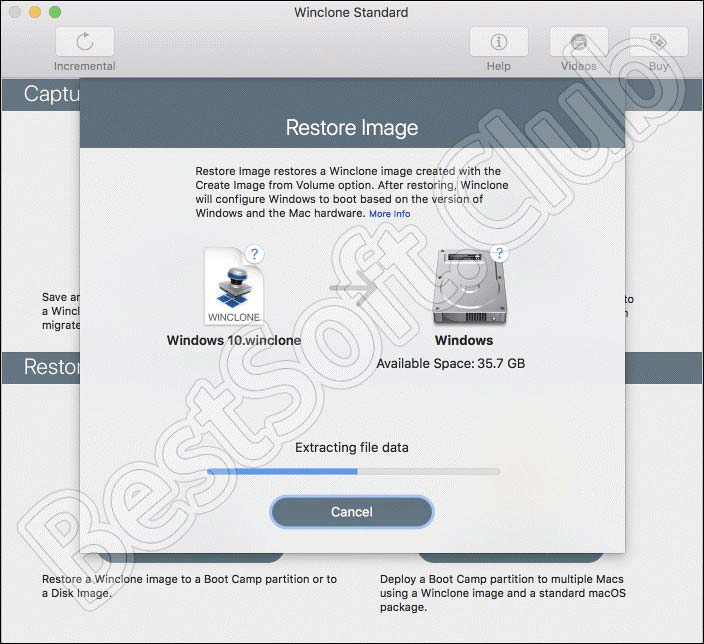
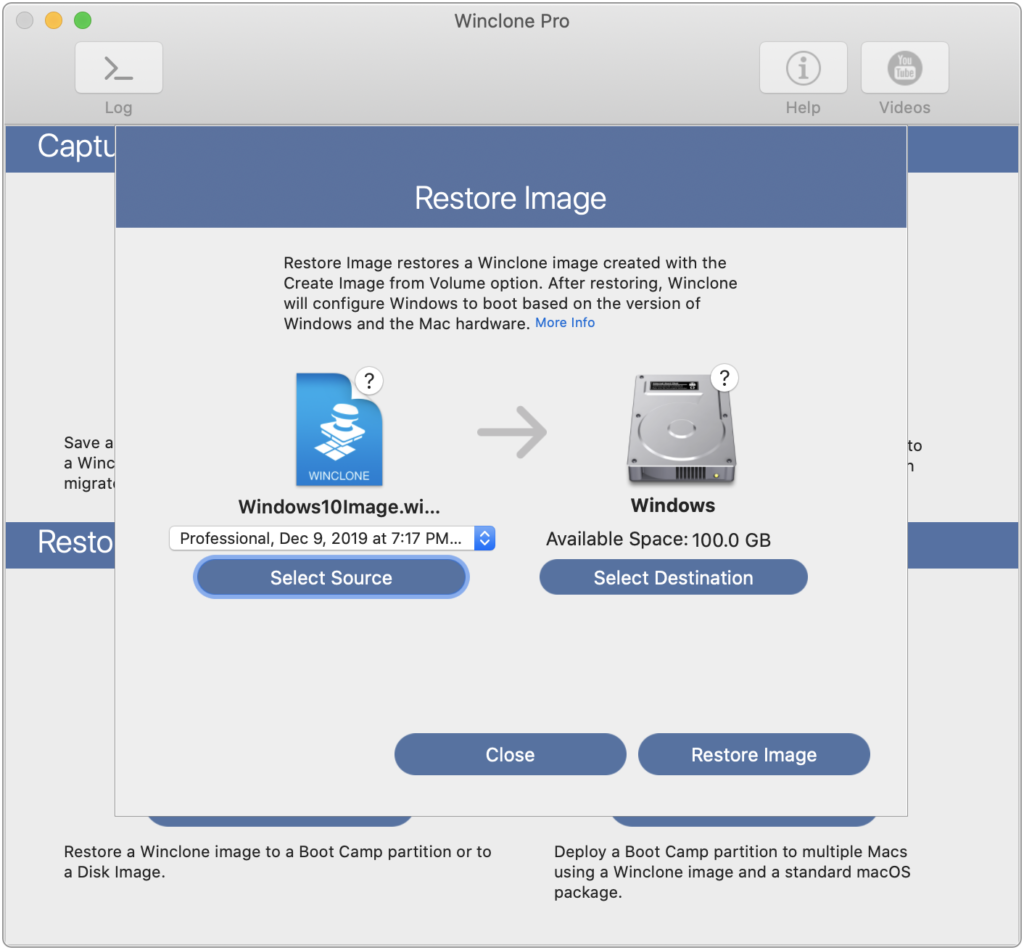
Using Winclone 8, restore the Winclone image by clicking the “Restore Image” button:
Select the Winclone image created on the Source Mac and the new Boot Camp partition you created. Click “Restore Image”:
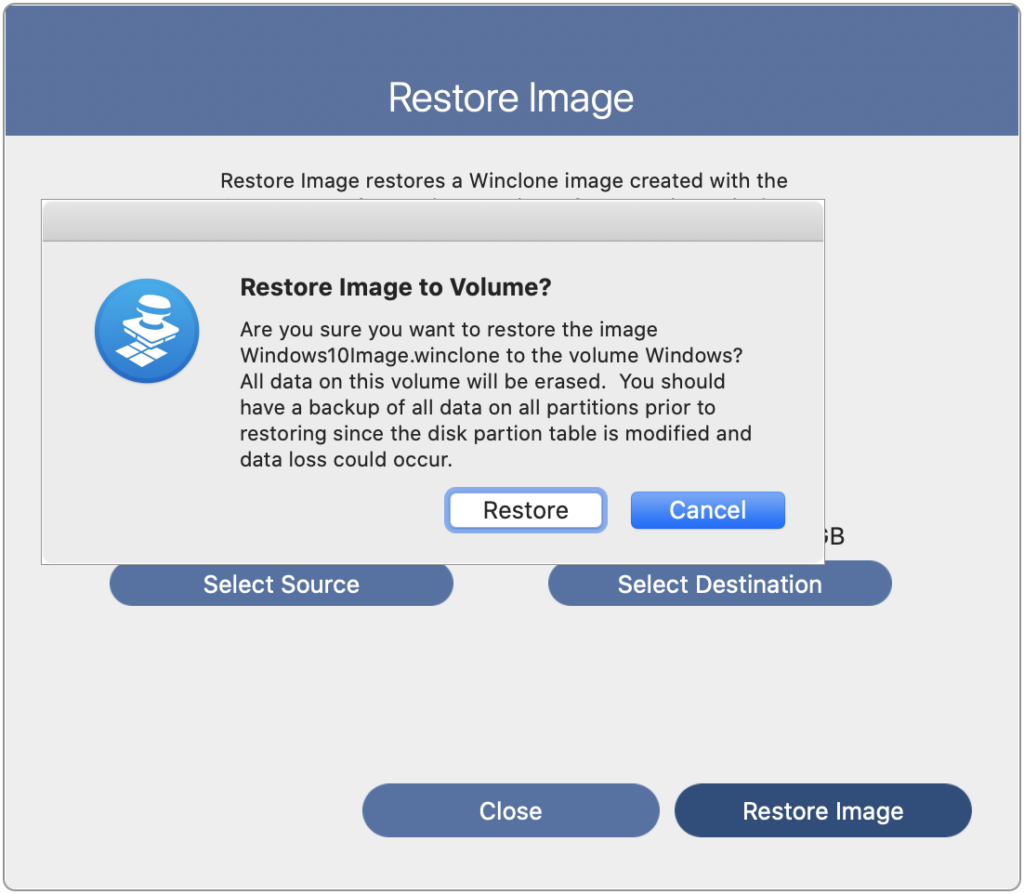
Verify that you want to restore:
Injecting Drivers
Once the Winclone image has been restored, booting to the Boot Camp partition will result in a “Inaccessible Boot Device” blue screen error. This is due to the lack of a generic driver in Windows 10 for the mass storage on the T2 Macs. In order to boot Windows, this driver must be injected from Windows on an external drive.
- Disable Secure Boot and enable external booting in Startup Security Utility by rebooting the Mac and holding Command-R to boot in to Recovery. When you see the macOS Utilities window, choose Utilities > Startup Security Utility from the menu bar. More information here.
- Reboot back to macOS.
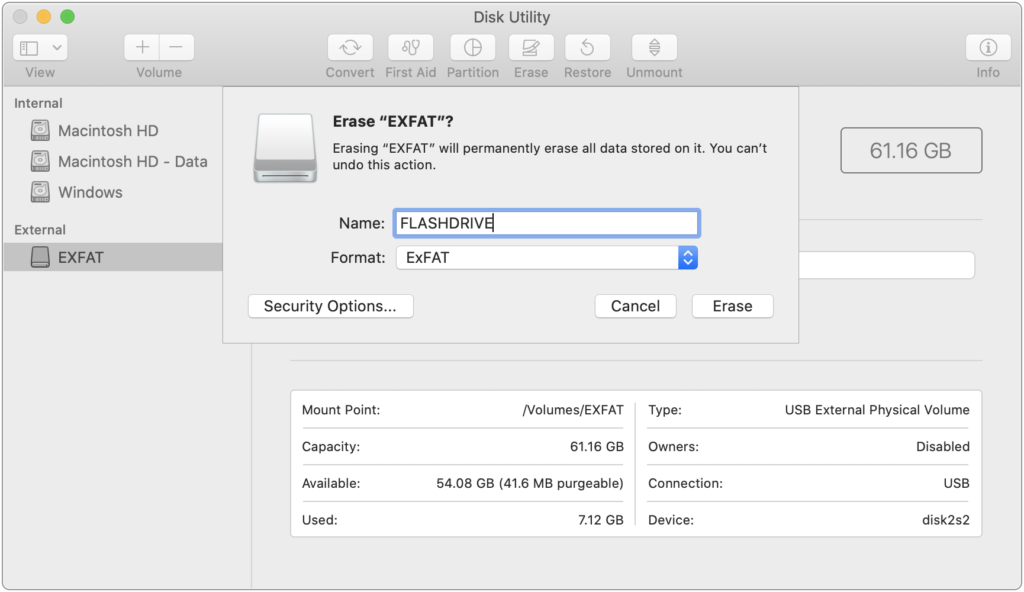
- Format the 8 GB (or larger) USB Flash Drive as ExFAT by opening Disk Utility, selecting the Flash Drive and clicking the Erase button. Select ExFAT as the format.
- Mount the Windows 10 ISO by double clicking it in the Finder:
- Copy all the items in the ISO to the USB Flash Drive in the Finder by selecting all the items and then dragging to the USB Flash Drive.
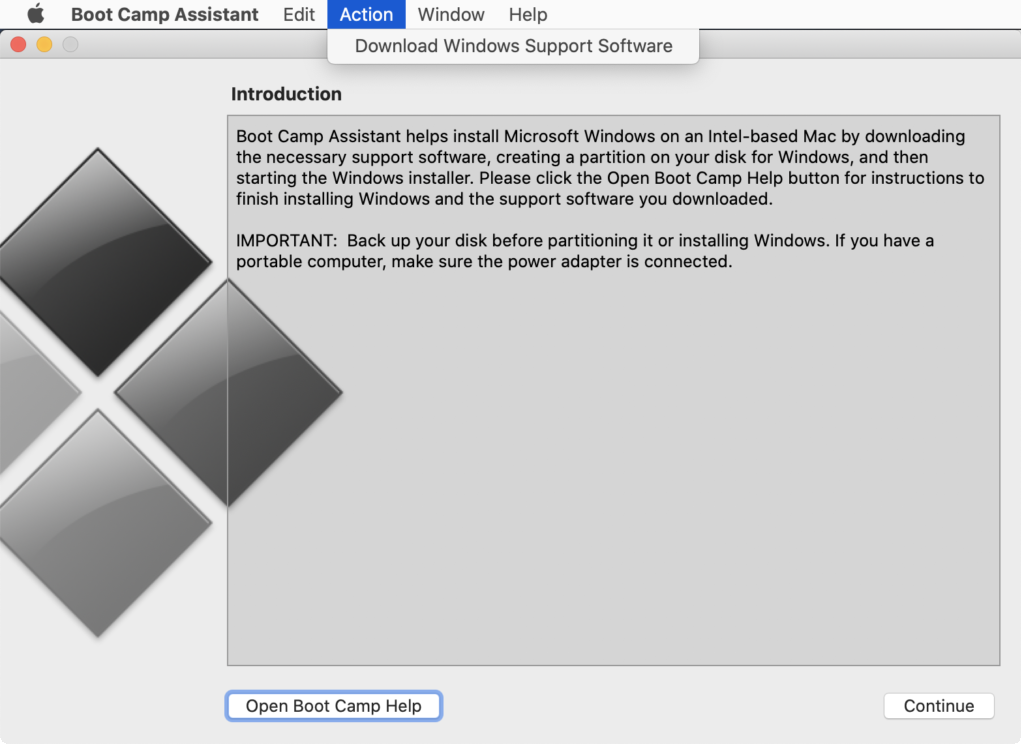
- Download the Windows Support drivers by opening Boot Camp Assistant in the Utilities folder and selecting “Download Windows Support Software” from the Action menu. Select a destination on the local hard drive to save the drivers:
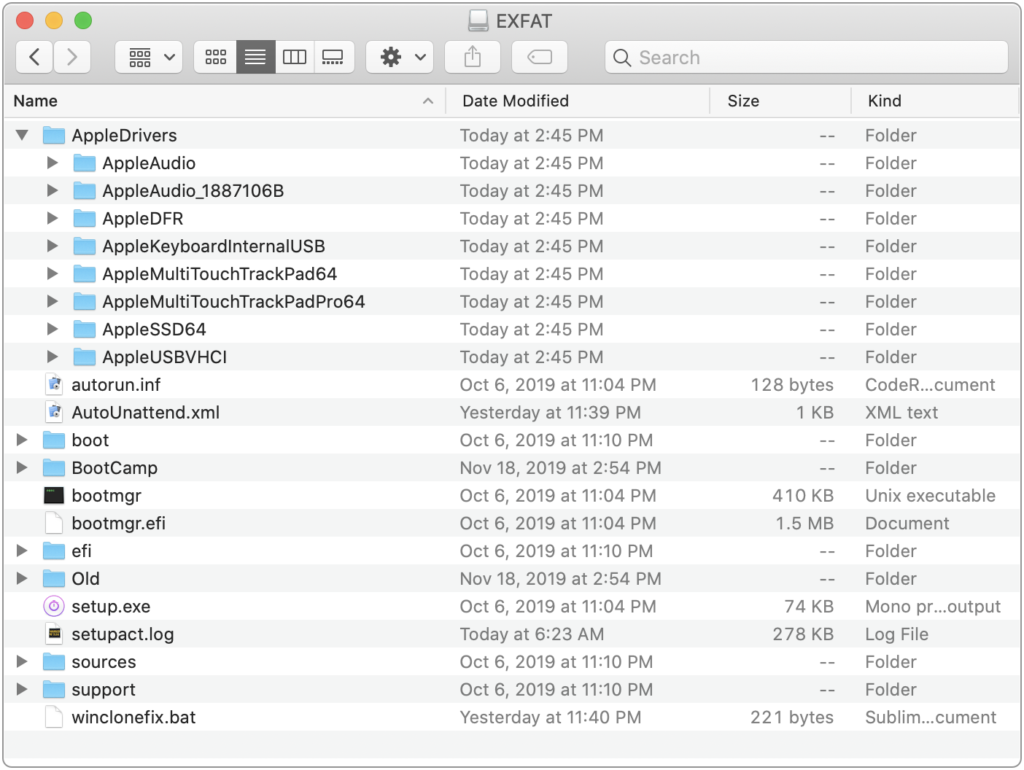
- Copy the BootCamp folder from WindowsSupport to the USB Flash Drive.
- Download the external drive resources from Twocanoes, unzip and copy the contents (empty AppleDrivers folder, AutoUnattend.xml, and winclonefix.bat) to the USB Flash drive.
- Inside the $WinPEDriver$ folder in the WindowsSupport folder, copy any folder that starts with “Apple” to the AppleDrivers folder.
- The USB Flash Drive should contain all the resources needed to inject the drivers:
- Reboot the Mac and hold the Option key during startup. Select the EFI drive and the Mac will boot from the USB flash drive. When the installer starts. do not start installing.
- Press shift-F10 to open a DOS command prompt. You may have to wait a minute for the Touch Bar, keyboard, and mouse to start working. Once the DOS command prompt shows, click on the window to bring it to the front and enter in the following command:
- Follow the prompts to hit return as it runs the commands. When completed, the Mac will reboot. You can now boot into the Boot Camp partition.
- Once you have booted into the Boot Camp partition, you can install the remaining drivers by opening the setup.exe on the USB flash drive and using the installer to install/repair the existing driver installation.


