- How to Remove Recent Files from Quick Access in Windows 10
- Delete recent files from Quick Access
- 1. Change Folder and search options
- 2. Remove individual Recent Files from Quick Access
- How to remove Quick Access from Windows 10
- Why would anyone want to remove Quick Access?
- How to remove Quick Access
- Method 1: Turn off Quick Access
- Method 2: Remove Quick Access
- How to Remove Files or Folders From Quick Access in Windows 10
- How to stop Quick Access from adding folders
- How to customize Quick Access in Windows 10
How to Remove Recent Files from Quick Access in Windows 10
If you are a Windows 10 user and you are wondering if you can remove the recent files stored in the Quick Access folder,then the answer to your question is ‘Yes’. So, follow the steps listed below to learn how to remove recent files from Quick Access in Windows 10. All this will take just five minutes of your time. 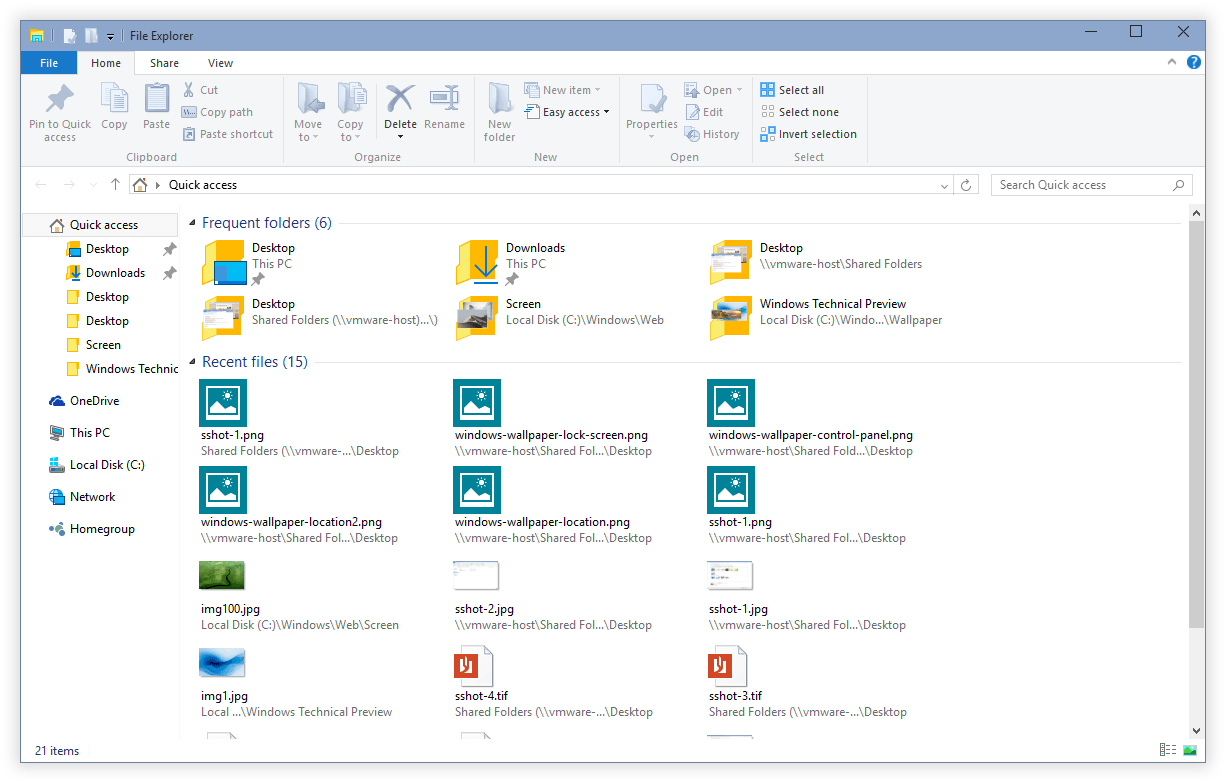
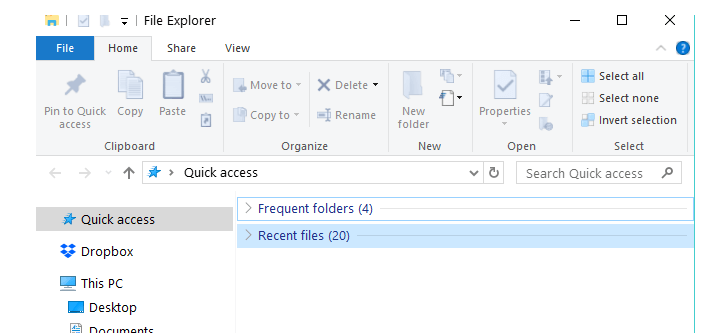
The Quick Access feature of Windows 10 also includes two categories of files: the Frequent folders and also the Recent files which is the one we will be focusing on this article. Seeing that a lot of the Windows 10 users want their privacy on the device to be as safe as possible, here’s how to delete or remove the recent files from the File Explorer‘s new feature Quick Access.
Delete recent files from Quick Access
1. Change Folder and search options
- From the Start menu of your Windows 10 operating system, you will need to left click or tap on the “File Explorer” feature to open it.
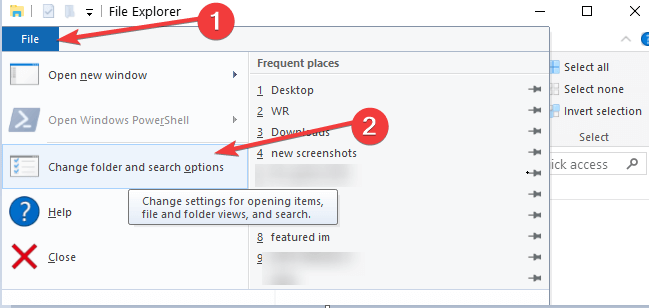
- Left click or tap on the “File” feature that is situated in the upper left side of the File Explorer window.
- Now from the “File” menu, left click or tap on the “Change Folder and search options” feature.
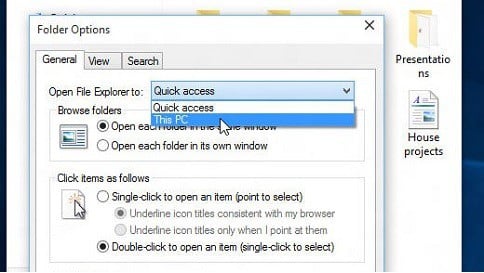
- The Folder Options window should pop up.
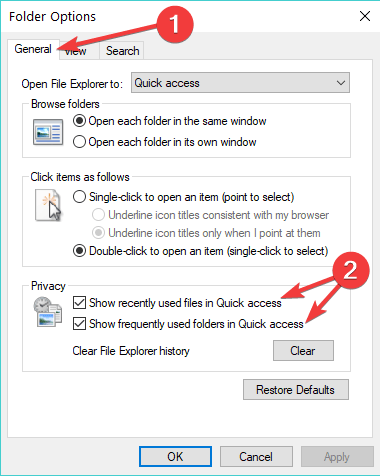
- Left click or tap on the “General” tab situated in the upper side of the “Folder options” window.
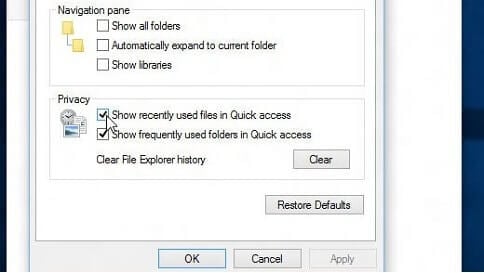
- Under the General tab locate the “Privacy” topic situated in the lower side of this window.
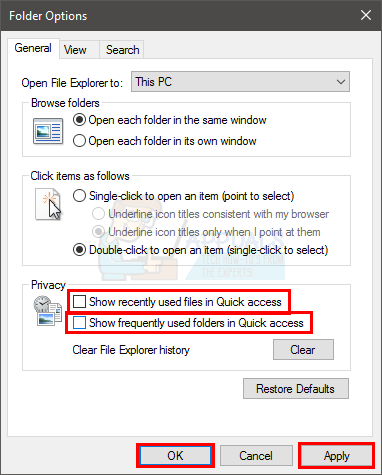
- Uncheck the box next to the “Show recently used files in Quick Access:” feature presented there.
Note: If you are interested in disabling the frequently used folders feature you will only have to uncheck the box next to the “Show frequently used folders in Quick Access” feature. - After you unchecked the box, you will need to left click or tap on the “Apply” button situated right at the bottom of the “Folder options” window.
- Left click or tap on the “OK” button in order to close this window.
- And now you are done, you can go ahead and check if your recent files are disabled in Quick Access.
2. Remove individual Recent Files from Quick Access
If you want to delete individual files from Windows 10 Quick Access, here are the steps to follow:
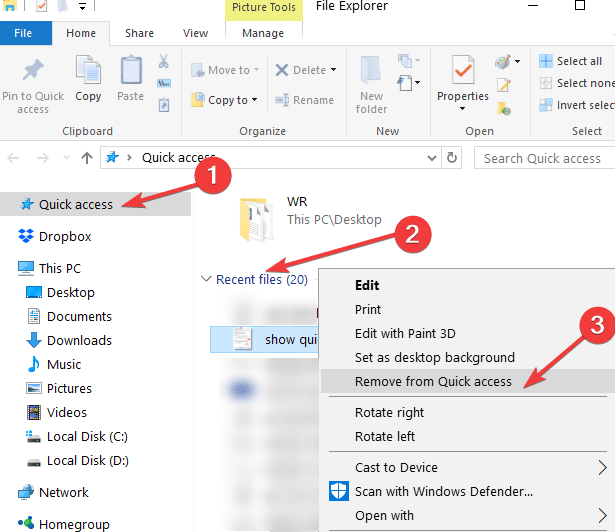
- Launch File Explorer > click on the Quick Access option in the left hand pane
- Scroll down to Recent files and extend the list
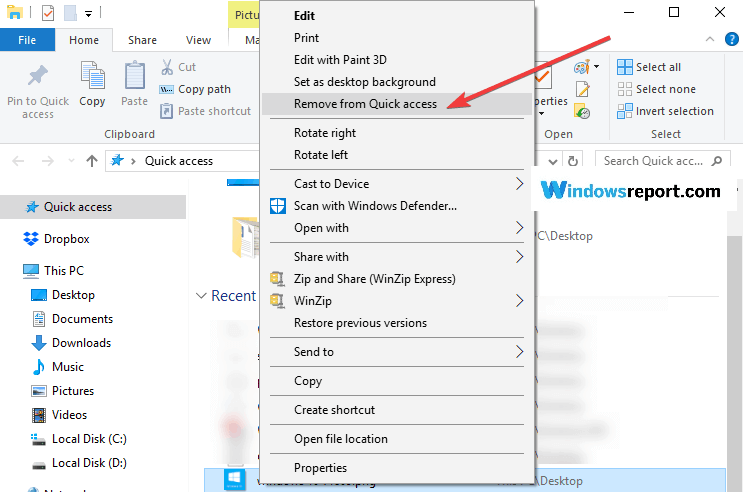
- Select the file(s) that you want to delete > right-click on them > select Remove from Quick Access.
I am sure that any user of the Windows operating systems will manage to follow this tutorial in no more then 10 minutes of their time. If you ran into any issues along the way,write us in the comments section below and we will help you as soon as possible.
RELATED STORIES TO CHECK OUT:
How to remove Quick Access from Windows 10
Windows 10 brings surely brings a lot of new features and one of them is known as the Quick Access feature. Although there are plenty of people who like this feature but there are a few of us who don’t see any benefit of the Quick Access feature. Quick Access feature, if you aren’t familiar with it, basically lets you access the most recently used files of your computer. The Quick Access section is available on the left side of your Window Explorer (it should be the top on).
Why would anyone want to remove Quick Access?
You might be asking, why would anyone want to remove Quick Access? Just like any other feature, Quick Access is useful for some while completely useless for others. Since it isn’t a basic feature that needs to be on the Windows in order for your Windows to work, people might want to get rid of it.
The reasons may vary from person to person. I, personally, have never used the Quick Access feature but I am not bothered by it to a point where I would want to remove it. For some people, it might be bothering to have something that they aren’t going to use or it might be taking up space that they don’t like. But, the biggest reason why people get rid of it is the privacy factor. If anyone else uses your computer then they will be able to see the most recently used file on your computer. This might not be a big deal for you but it certainly is for a lot of people especially the ones who like to keep their activities private. So, the reason depends on the person.
How to remove Quick Access
There are basically two methods that can be used to get rid of the Quick Access.
Method 1: The first one won’t actually remove the Quick Access from your File Explorer but rather turn off the Quick Access feature. This basically means that the Quick Access section will be visible on the File Explorer but you won’t be able to see the most recently used files in it. This method is suitable for those who don’t want other people to look at their most recently used files. It is a quick method that doesn’t require any technical knowledge.
Method 2: The other method is a bit complicated and takes a bit of time. But, this method will completely remove the Quick Access from your File Explorer. This means that there won’t even be a Quick Access section in your File Explorer. So, if you are looking to free up the space on the left pane then go for the second method.
Now, let’s have a look at the steps involved in performing these steps
Method 1: Turn off Quick Access
Follow the steps given below to turn off the Quick Access feature
- Hold Windows key and press E
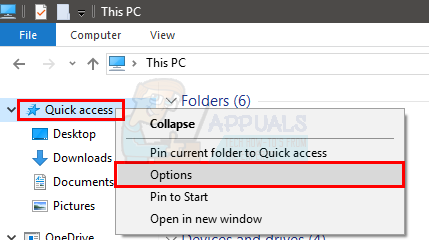
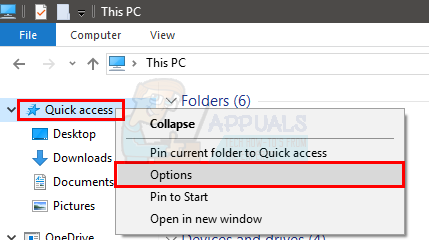
- Right click the Quick Access (from the left pane) and select Options
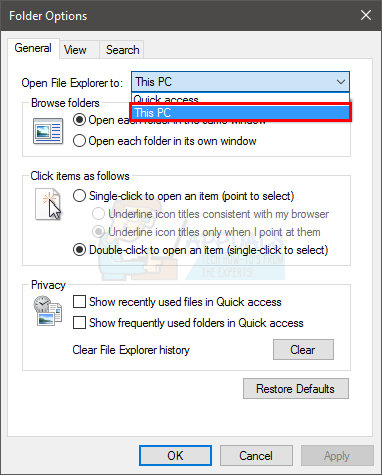
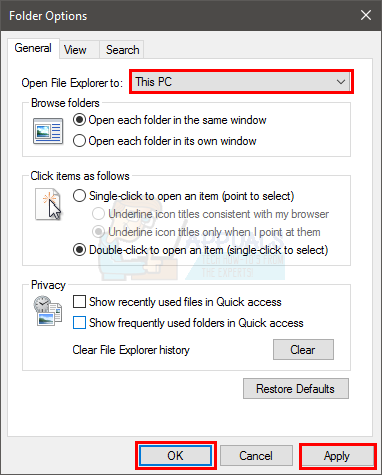
- Select This PC from the drop down menu in Open File Explorer to: section
- Uncheck the options Show recently used files in Quick Access and Show frequently used folders in Quick Access
- Click Apply then select Ok
That’s it. Once you press ok, your recently used files and folders won’t show up on the Quick Access.
Method 2: Remove Quick Access
As mentioned above, this method will completely remove the Quick Access section from your File Explorer.
Note: This method will also remove the drag and drop feature of your File Explorer. This means that you won’t be able to drag and drop files to and from the File Explorer to any other place. You will have to copy/paste the files.
Note: You must be signed in as administrator in order for this method to work properly.
- Hold Windows key and press E
- Right click the Quick Access (from the left pane) and select Options
- Select This PC from the drop down menu in Open File Explorer to: section
- Click Apply then select Ok
- Hold Windows key and press R
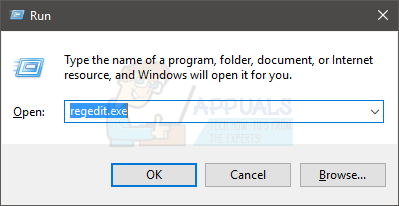
- Type regedit.exe and press Enter
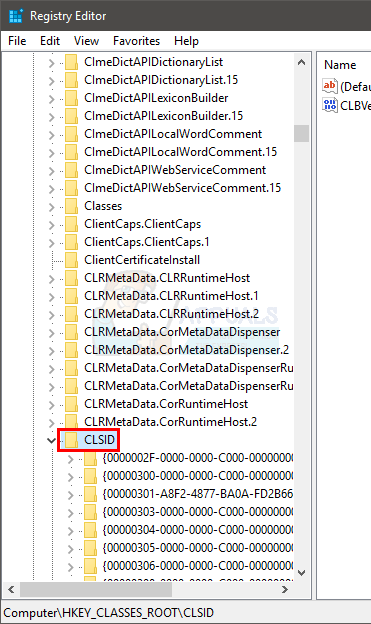
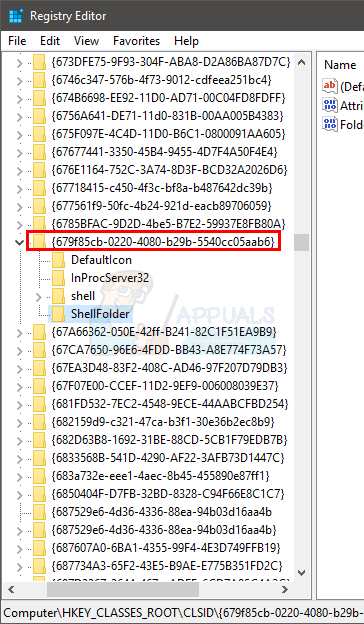
- Navigate to this address HKEY_CLASSES_ROOT\CLSID\<679f85cb-0220-4080-b29b-5540cc05aab6>\ShellFolder. If you don’t know how to navigate to this address then follow the steps given below
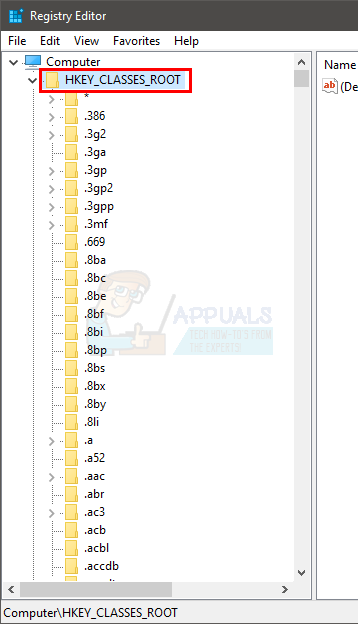
- Locate and double click HKEY_CLASSES_ROOT from the left pane
- Locate and double click CLSID from the left pane
- Locate and double click from the left pane
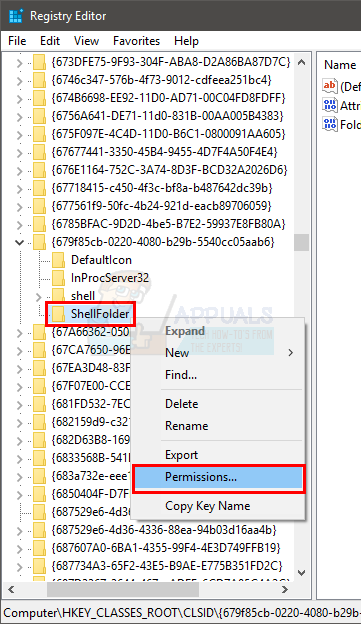
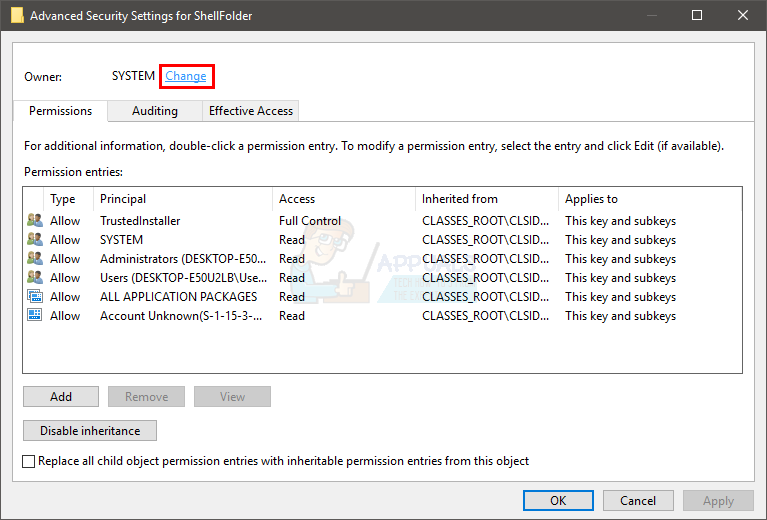
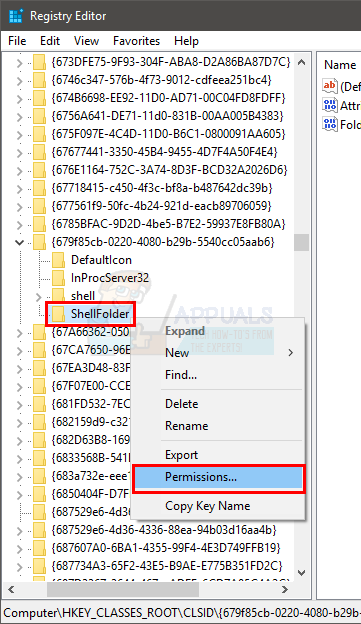
- Now, before we do any changes in ShellFolder, we need to take the ownership of this specific folder/registry. Locate and right click ShellFolder from the left pane
- Select Permissions
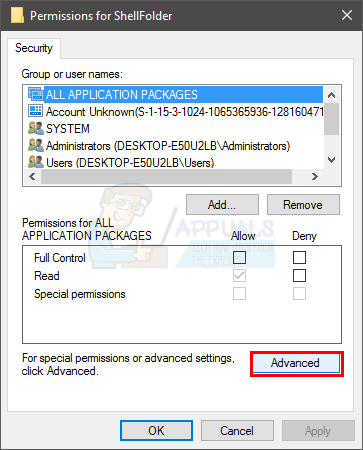
- Select Security tab and select Advanced
- Click Change in the Owner section. Click yes if it asks to confirm
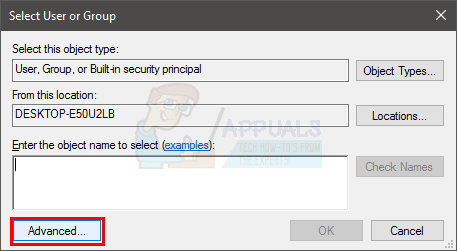
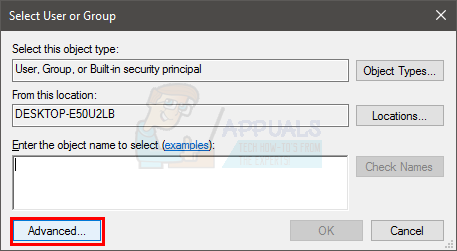
- Click Advanced
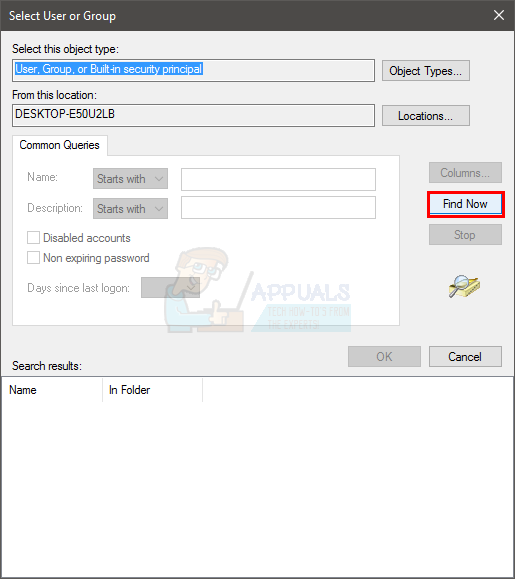
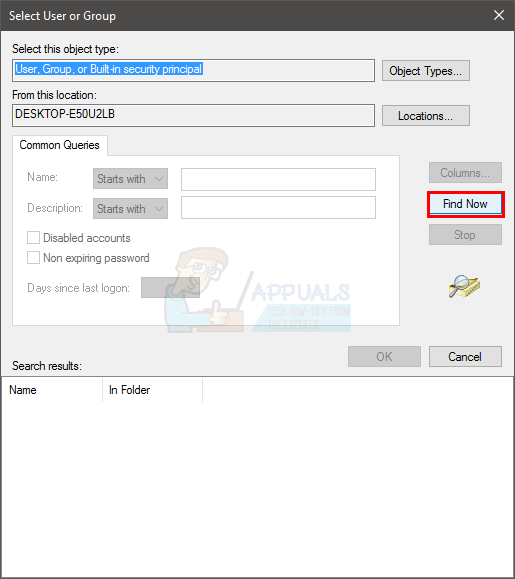
- Click Find Now. A new list of account names will appear in the bottom section of the window named search results
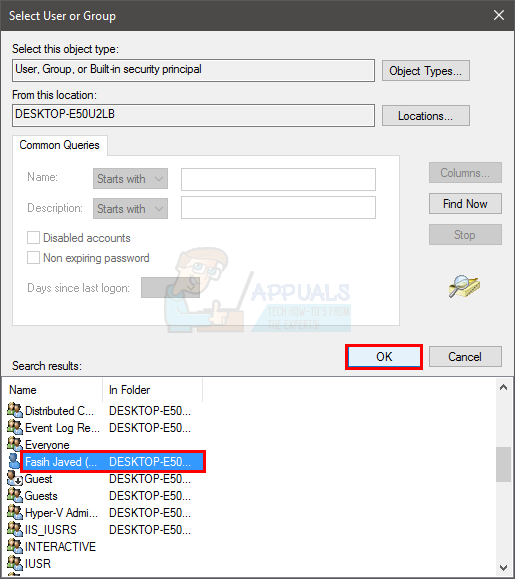
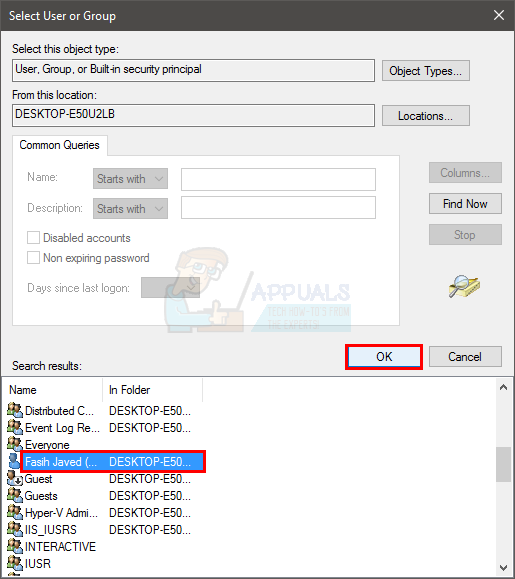
- Select the name of your account. The one that you are logged in as and want to set the owner of the ShellFolder
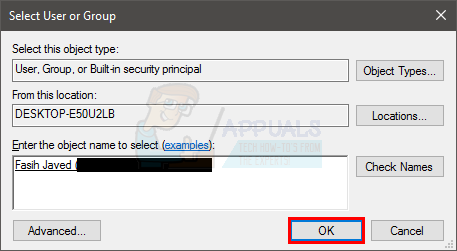
- Click Ok
- Now, you should be back on the Select User or Group Select Ok again
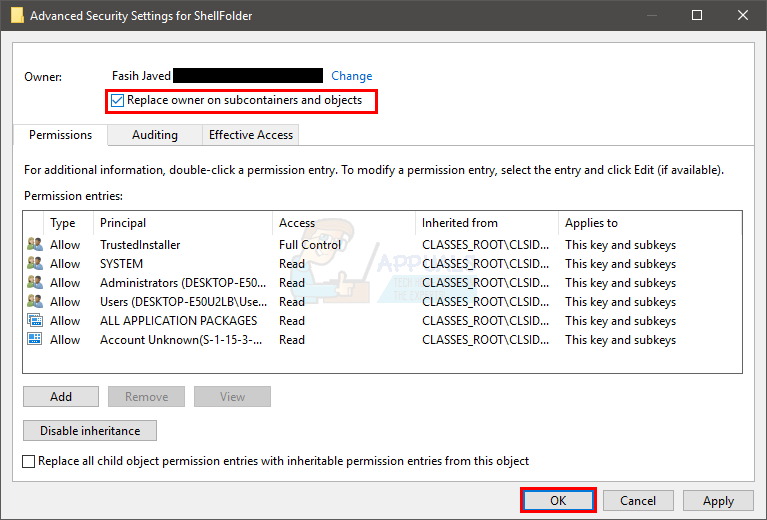
- Now, you should be back to the Advanced Security for ShellFolder. You should be able to see the name of your account in the Owner section. That means everything was done right
- Check the option Replace owner on subcontainers and objects (if it is there) and press Ok
- Select Yes if it asks for confirmation
- Now, we need to set the permissions for the ShellFolder. Right click ShellFolder from the left pane
- Select Permissions
- Click Advanced
- Click Find Now. A new list of account names will appear in the bottom section of the window named search results
- Select the name of your account. The one that you are logged in as and want to set the owner of the ShellFolder
- Click Ok
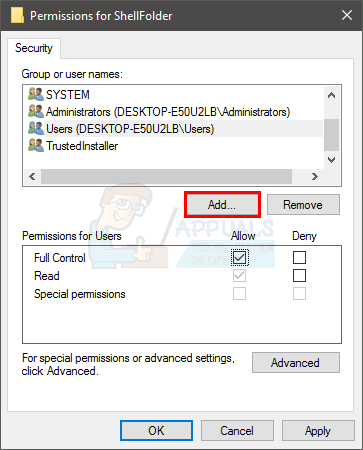
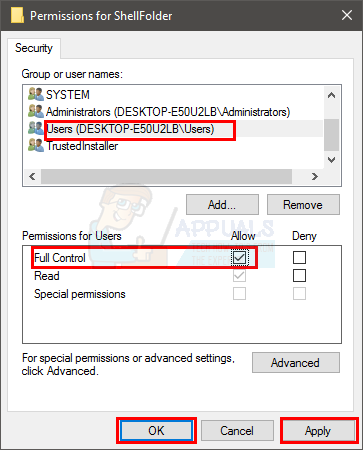
- Select the newly added user from the Group or User names section
- Check the Full Control’s Allow option from the Permissions for “your selected account name” You need to give full control over this folder so you will select the allow option. So check that option.
- Click Apply then Ok
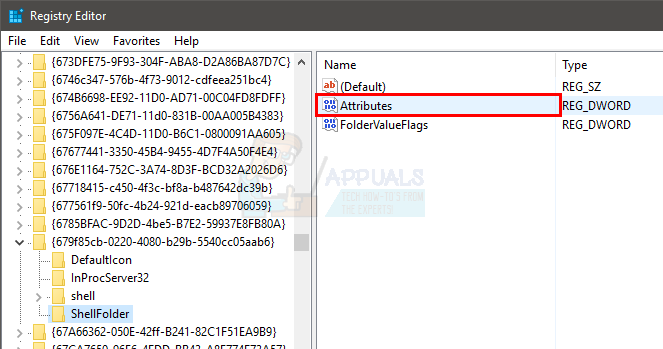
- Now that we have taken the permissions and allowed full control, it’s time to make the changes to remove Quick Access. Click ShellFolder and double click Attributes entry from the right pane.
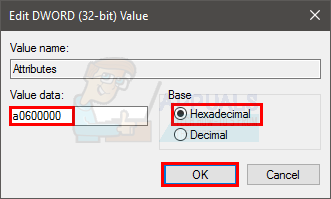
- Make sure the Hexadecimal option is selected in the Base section. Type a0600000 in the Value data and click Ok
That’s it. Now close all the windows and restart your PC. Once your system is rebooted, there should be no Quick Access section in the File Explorer.
Note: If you want to bring the Quick Access back then follow the steps given above and enter a0100000 in place of a0600000 in the last step. a0100000 is the default value so setting Attributes to this value will bring back the Quick Access.
How to Remove Files or Folders From Quick Access in Windows 10
Microsoft changed a couple of things in File Explorer in Windows 10 Technical Preview builds, as well as the stable Windows 10 OS versions. One of these changes/additions is Quick Access, which allows you to open the files you recently used. But if you want to remove a certain file from Quick access, we’ll show you how in this article.
In Windows 10, a new File Explorer location, Quick access opens automatically whenever you open File Explorer. It collects information about files and folders you recently used and shows them in the File Explorer, so you can easily access them again.
How to stop Quick Access from adding folders
But sometimes you might not want your private files to show up in Quick access, and you’ll want to hide them. You can simply delete the file, but it will also be deleted from its original location, so we don’t recommend this. But you can also hide the file from Quick access section and prevent it from further showing up, and here’s how to do that:
- Open File Explorer and Quick access will probably be opened by default, if not click on Quick access
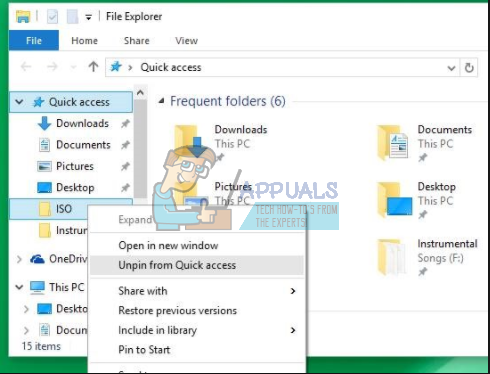
- Right-click any file or folder you want to hide from Quick access
- Choose “Remove from Quick Access” to hide the selected file or folder
That would be all, the file or folder you selected will never show up in the Quick access again.
The Quick access location in File Explorer is the successor of Recent files feature, which was placed in the Start Menu in older versions of Windows. Since the Recent files feature is removed in Windows 10 Technical Preview, using the Quick access is probably the easiest and fastest way to access your recent files.
How to customize Quick Access in Windows 10
If you want to fully configure Quick Access on your computer, you can also set it to show only pinned items and choose what folder you want it to open first. We’ll list the steps to follow below.
Display pinned folders in Quick Access
- Open Quick Access > go to the View tab > select Options.
- Clear the check boxes listed in the Privacy section > hit Apply and that’s it.
Open Windows 10 to This PC
- In this case, navigate to the View tab > select Options.
- Go to ‘Open File Explorer to’ > use the drop-down menu to select This PC > hit Apply.
If you have any comments or suggestions, please write to us in the comments section below, we would love to hear your thoughts.
RELATED STORIES TO CHECK OUT:

