- Windows bind filter driver
- Startup Type
- Default Properties
- Default Behavior
- Dependencies
- Restore Default Startup Type for Windows Bind Filter Driver
- Automated Restore
- Configuring an INF File for a Monitoring Filter Driver
- Fix: bindflt.sys failed GSOD Error in Windows 10 1809
- Solutions to bindflt.sys failed GSOD Error in Windows 10 1809
- Run System File Checker (SFC)/ Scannow command
- Разработка MiniFilter драйвера
Windows bind filter driver
Binds filesystem namespaces to different locations and hides this remapping from the user.
This service exists in Windows 10 only.
Startup Type
| Windows 10 version | Home | Pro | Education | Enterprise |
|---|---|---|---|---|
| 1507 | not exists | not exists | not exists | not exists |
| 1511 | not exists | not exists | not exists | not exists |
| 1607 | not exists | not exists | not exists | not exists |
| 1703 | not exists | not exists | not exists | not exists |
| 1709 | not exists | not exists | not exists | not exists |
| 1803 | Manual | Manual | Manual | Manual |
| 1809 | Manual | Manual | Manual | Manual |
| 1903 | Manual | Manual | Manual | Manual |
| 1909 | Manual | Manual | Manual | Manual |
| 2004 | Automatic | Automatic | Automatic | Automatic |
| 20H2 | Automatic | Automatic | Automatic | Automatic |
Default Properties
| Display name: | Windows Bind Filter Driver |
| Service name: | bindflt |
| Type: | filesys |
| Path: | %WinDir%\system32\drivers\bindflt.sys |
| Error control: | normal |
| Group: | FSFilter Top |
Default Behavior
The Windows Bind Filter Driver service is a file system driver. If Windows Bind Filter Driver fails to start, the error is logged. Windows 10 startup proceeds, but a message box is displayed informing you that the bindflt service has failed to start.
Dependencies
Windows Bind Filter Driver is unable to start, if the FltMgr service is stopped or disabled.
Restore Default Startup Type for Windows Bind Filter Driver
Automated Restore
1. Select your Windows 10 edition and release, and then click on the Download button below.
2. Save the RestoreWindowsBindFilterDriverWindows10.bat file to any folder on your hard drive.
3. Right-click the downloaded batch file and select Run as administrator.
Configuring an INF File for a Monitoring Filter Driver
The following NDIS filter driver installation issues are associated with monitoring filter drivers:
Set the Class INF file entry to NetService in the INF file. The following example shows a sample Class entry for the INF file.
The DDInstall section in a filter driver INF file must have a Characteristics entry. The following example shows how you should define the Characteristics entry in your filter INF file.
The 0x40000 value indicates that NCF_LW_FILTER (0x40000) is set. Filter drivers must not set the NCF_FILTER (0x400) flag. The values of the NCF_ Xxx flags are defined in Netcfgx.h. For more information about NCF_ Xxx flags, see DDInstall Section in a Network INF File.
Set the NetCfgInstanceId INF file entry in the INF file, as the following example shows.
You can use the Uuidgen.exe tool to create the GUID for the NetCfgInstanceId entry.
The DDInstall section of the INF file for a filter driver must include an Addreg directive for an Ndi key. The INF file must specify the Service entry under the Ndi key. The ServiceBinary entry in the service-install section of the INF file specifies the path to the binary for the filter driver. For more information, see Adding Service-Related Values to the Ndi Key and DDInstall.Services Section in a Network INF File.
The DDInstall section in a filter driver INF file must have FilterType and FilterRunType entries. To specify a monitoring filter, define the FilterType entry in your INF file, as the following example shows.
The FilterType value 0x00000001 indicates that the filter is a monitoring filter.
Define the FilterRunType entry in your INF file, as the following example shows.
The 0x00000002 value in the preceding example indicates that the filter module is optional. To install a mandatory filter module, set the FilterRunType entry to 0x00000001. For more information, see Mandatory Filter Drivers.
NoteВ В We highly recommend that a monitoring lightweight filter (LWF) driver should not be mandatory, unless it is to be used in a controlled environment where there will be no optional modifying LWF drivers. This is because a mandatory monitoring LWF driver can cause optional modifying LWF drivers to fail FilterAttach. A monitoring LWF driver is bound over every modifying filter and binding by design to facilitate monitoring of networking traffic at all levels. Consider the following scenario:
- An instance of a mandatory monitoring LWF driver is installed over an optional modifying LWF driver.
- The lower modifying optional LWF driver fails to attach to a lower component. This will cause the mandatory monitoring LWF driver’s FilterAttach handler not to be called.
- Because now an instance of a mandatory LWF driver is not loaded, NDIS will not bind any protocols (such as TCP/IP) to the interface or NIC, thus rendering the interface to be unusable.
The following example shows how a filter driver INF file specifies the name of the service.
In this example, «NdisMon» is the name of the driver’s service as it is reported to NDIS. Note that the name of a filter driver’s service can be different from the name of the binary for the driver, but typically they are the same.
The following example shows how the filter INF file references the name of the filter driver’s service when it adds that service.
A filter INF file must specify at least the primary service name of the filter for the CoServices attribute, as the following example shows.
For more information about the CoServices attribute, see Adding Service-Related Values to the Ndi Key.
The FilterClass value in the INF file for a filter driver determines its order in a stack of modifying filters. However, monitoring filter drivers do not define the FilterClass key. Instead the monitoring filter module that is installed first is closest to the miniport adapter.
You must define the following entries in the monitoring filter driver INF file to control the driver bindings:
For more information about controlling the driver bindings, see Specifying Filter Driver Binding Relationships.
A monitoring filter INF file should specify common parameter definitions for the filter driver, parameters that are associated with a specific adapter, and parameters that are associated with a particular instance (filter module). The following example shows some common parameter definitions.
Fix: bindflt.sys failed GSOD Error in Windows 10 1809
Bindflt.sys failed GSOD is a new error in Windows 10 1809, that has reported by many users in recent days. People are finding this bug after installing Windows 10 insider build 18309 on their system. During this issue, startup gets stuck displaying the Green screen of Death (GSOD) along with System_service_exception message.
Nowadays, GSOD overtakes BSOD when users try to Shut down the PC or sometimes even when they are doing a minimal task on Windows 10. On different Windows forums, there are already discussions going on. Here in this article, we will tell you some workarounds to tackle bindflt.sys failed issue in a composite way.

Solutions to bindflt.sys failed GSOD Error in Windows 10 1809
First of all, let’s see what the bindflt.sys failed is actually. This system file is basically a Windows Bind Filter Driver services component. You can access it by navigating to the path %WinDir%\system32\drivers folder. The prime role of the file is to bind system file namespaces to a different locale and hide the remapping from the users. In case it fails, the Event Viewer will log this error and the same will be displayed to the current user who is using Windows Machine. The failed, deleted or damaged bindflt.sys file might be recovered using Windows 10 installation media.
Here is how to fix bindflt.sys failed GSOD Error in Windows 10 1809 –
Run System File Checker (SFC)/ Scannow command
In most cases, damaging the system file of the operating system leads to bindflt.sys failed GSOD. In this case, the SFC /scannow command is helpful to bypass this Error in Windows 10 1809. The System File Checker is a utility to detect the corrupt system file which creates the trouble. Follow the procedure pointed out below to run SFC Command on your system.
Step-1: Press Win+R hotkey to launch Run dialog box.
Step-2: In the void space, type cmd, press and hold “Ctrl + Shift’ together then hit Enter key to open Command Prompt with administrator privileges.
Step-3: When UAC prompts, click Yes to authorize the access.
After that, on the elevated command prompt, type the “below command” near the blinking cursor and hit Enter to proceed.
This command will take approx 10 minutes to detect the problem in system files. Therefore wait patiently until the process is finished.
Разработка MiniFilter драйвера
Довелось мне как-то на работе столкнуться с задачей управления доступа и перенаправления запросов к файловой системе в рамках определенных процессов. Реализовать необходимо было простое, легко конфигурируемое решение.
Решил разрабатывать MiniFilter драйвер, конфигурируемый при помощи текстового файла.
Рассмотрим, что из себя в общем виде представляет MiniFilter:
Фильтрация осуществляется через так называемый Filter Manager, который поставляется с операционной системой Windows, активируется только при загрузке мини фильтров. Filter Manager подключается напрямую к стеку файловой системы. Мини фильтры регистрируются на обработку данных по операциям ввода/вывода при помощи функционала Filter Manager, получая, таким образом, косвенный доступ к файловой системе. После регистрации и запуска мини фильтр получает набор данных по операциям ввода/вывода, которые были указаны при конфигурировании, при необходимости может вносить изменения в эти данные, таким образом влияя на работу файловой системы.
На следующей схеме в упрощенном виде показано как функционирует Filter Manager. 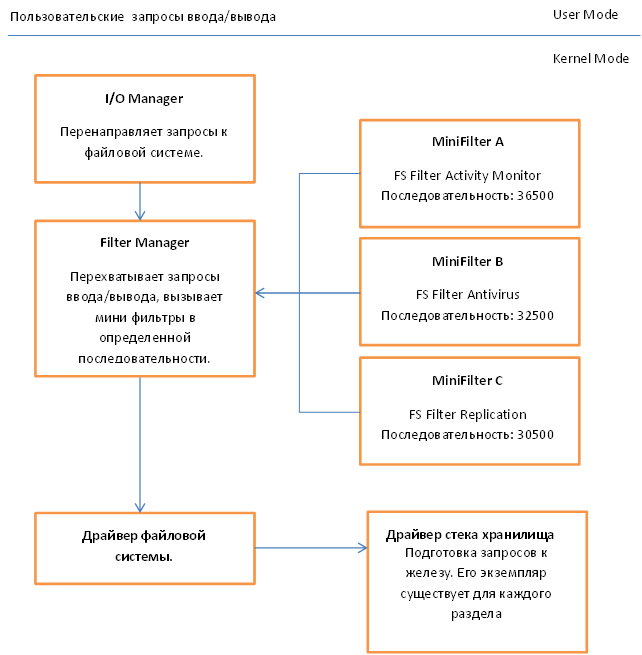
Более подробную теоретическую информацию Вы можете получить на сайте MSDN, воспользовавшись ссылкой в конце статьи. Достаточно не плохо все разобрано.
Мы же двинемся в сторону разработки и рассмотрим некоторые базовые структуры, которые необходимо заполнить.
Общие глобальные данные.
В этой структуре будем хранить ссылку на объект нашего драйвера и ссылку на экземпляр фильтра. Хочу заметить, что PFLT_FILTER уникально идентифицирует мини фильтр и остается константой на все время работы драйвера. Используется при активации или остановке процесса фильтрации.
Тут стоит остановиться на нескольких поляx:
- Callbacks – ссылка на структуру, определяющую, что и при помощи каких функций мы собираемся обрабатывать.
- FilterUnload – функция, которая будет вызвана при отключении фильтра.
- FilterLoad – функция, которая будет вызвана при инициализации фильтра.
Далее рассмотрим структуру Callbacks:
Здесь мы указываем, что будем перехватывать операцию CreateFile, также указываем функции, которые будут вызываться, соответственно, до и после выполнения операции над файлом.
Далее привожу код функций, которые вызываются при инициализации и отключении фильтра.
Думаю, код не нуждается в дополнительных комментариях, так как все достаточно стандартно. Замечу только, что наш драйвер не будет работать для сети.
Теперь давайте рассмотрим функцию инициализации драйвера:
Регистрация мини фильтра осуществляется посредством вызова функции FltRegisterFilter, в которую мы передаем полученный на входе theDriverObject, структуру FilterRegistration, описанную ранее и ссылку на переменную, куда будет помещен созданный экземпляр фильтра fileManager.pFilter. Для запуска процесса фильтрации нужно вызвать функцию FltStartFiltering( fileManager.pFilter ).
Так же обращу внимание, что загрузка файла конфигурации и его обработка выполняется посредством следующих вызовов ConfigInfo = ReadConfigurationFile(); и ParseConfigurationFile(ConfigInfo) соответственно.
Данные из конфигурационного файла преобразуются в следующий набор структур.
Головной структурой выступает CONFIGURATION_MAP, которая хранит в себе ссылку на описание процесса ProcessRule, а так же указатель на следующий элемент. В свою очередь PROCESS_CONFIGURATION_RULE хранит ссылку на имя процесса и непосредственно на структуру правил перенаправления ввода/вывода, которая так же, как и REDIRECT_MAP является связным списком.
Рассмотрим функцию выгрузки драйвера, она достаточно проста:
Здесь мы лишь удаляем регистрацию фильтра и высвобождаем все наши конфигурационные структуры.
Теперь давайте обратимся к самой интересной части, а именно к функции, которая занимается перенаправлением операций ввода/вывода. Так как у нас достаточно простой драйвер, делать это мы будем прямо в PreFileOperationCallback.
Определяем основные переменные, а также проверим, не пришло ли нам уже что-то отфильтрованное, и если так, то эту операцию нужно пропустить, в противном случае мы можем получить рекурсию вызовов, что может повлечь BSOD.
Здесь обращаемся к данным структур полученных от FilterManager. Структура PFLT_CALLBACK_DATA – хранит данные по текущей операции ввода/вывода, FilterManager руководствуется полями этой структуры при обращении к файловой системе. Соответственно, если мы хотим изменить поведение Windows при обращении к файлам или каталогам, мы должны отразить это в PFLT_CALLBACK_DATA. Более конкретно, нас интересует поле Data->Iopb->TargetFileObject, используя его мы сможем получить путь до файла в текущем разделе и позже изменить его при необходимости, изменив таким образом поведение ОС. PCFLT_RELATED_OBJECTS — содержит объекты связанные с данной операцией ввода/вывода, такие как ссылку на файл, раздел и прочее. Проверим, что нужные нам элементы структуры заполнены. Также проверим, что функция в контексте которой мы выполняемся действительно MJ_CREATE.
В этом участке кода мы выделяем память для пути и имени процесса. Не представляю какого размера будет строка, так что выделяем максимально возможную строку WCHAR. Исходный код GetProcessImageName рассматривать не буду, скажу только, что она возвращает полный путь до файла в следующем виде: \Device\HarddiskVolume4\Windows\notepad.exe. т.е раздел, ну и собственно, путь до файла.
Функция FindRuleByProcessName в случае успеха возвращает первый элемент связанного списка содержащего правила перенаправления по текущему процессу, в противном случае NULL.
Высвобождаем ненужную память и проверяем то, что мы получили какой-то объект, а не NULL. redirectRuleItem = rule->ProcessRule.Rule — обращение к первому правилу для данного процесса.
Начинаем проход по всем правилам для данного процесса, сравниваем ссылку на текущий файл с тем, что у нас есть в конфигурации. Если совпало, пытаемся получить дополнительную информацию о файле, например, к какому разделу он принадлежит. Для этого используем функцию FltGetFileNameInformation.
Если все ок, пытаемся выделить раздел, после чего формируем итоговую строку. Итоговый путь = Текущий раздел + Куда направить запрос ввода/вывода.
Далее, конфигурируем системные структуры, так чтобы File Manager еще раз обработал этот запрос, но только теперь уже по другому пути. Для этого важно проставить следующие значения полей Data->IoStatus.Information = IO_REPARSE и Data->IoStatus.Status = STATUS_REPARSE;, а так же указать новый путь до файла FileObject->FileName.Buffer = fullPath.Buffer;. В качестве результата функции возвращаем FLT_PROP_COMPLETE.
Не забываем перейти к следующему элементу списка перенаправлений. FLT_PREOP_SUCCESS_NO_CALLBACK возвращаем если делать с текущей операцией Filter Manger ничего не должен.
На данный момент переопределение ввода/вывода работает только в рамках одного раздела, как только отлажу вариант с поддержкой нескольких разделов, выложу.
Устанавливать мини фильтр необходимо при помощи специально оформленного inf файла, пример, которого Вы найдете в исходниках к данной статье.
Конфигурационный файл имеет следующий вид:
Файл должен располагаться в корне диска C, имя должно быть: minifilter.conf.
Итак мы имеем возможность перенаправления запросов файлового ввода/вывода, однако реализовать в дополнение, скажем, механизм запрета доступа к файлу достаточно просто. Необходимо выделить файл, доступ к которому нужно запретить и указать следующее значение для поля системной структуры Data->IoStatus.Status = STATUS_ACCESS_DENIED;. Не забыть вернуть FLT_PROP_COMPLETE в качестве результата функции.
Чтобы стартовать или остановить сервис я использую KMD Manager. Для анализа утечек памяти PoolTag. Что касается отладки, то можно использовать DbgView, однако для Windows Vista и выше отладочные сообщения необходимо активировать, для этого нужно создать DWORD ключ в реестре по следующему пути HKEY_LOCAL_MACHINE\SYSTEM\CurrentControlSet\Control\Session Manager\Debug Print Filter с именем DEFAULT и значением 8.
Для запуска драйвера в 64 битной версии Windows 7 нужно будет отключить проверку подписи драйверов, для этого нужно перезагрузить компьютер, при старте системы нажать F8 и выбрать пункт Disable Driver Signature Enforcement, либо воспользоваться утилитой Driver Signature Enforcement Overrider(DSEO). Данная утилита позволит активировать тестовый режим отладки драйверов и подписать нужный драйвер фейковым сертификатом, что в конечном итоге позволит без проблем его использовать.
В не зависимости от того, включено логирование или нет, после запуска сервиса в DbgView Вы должны наблюдать нечто подобное. 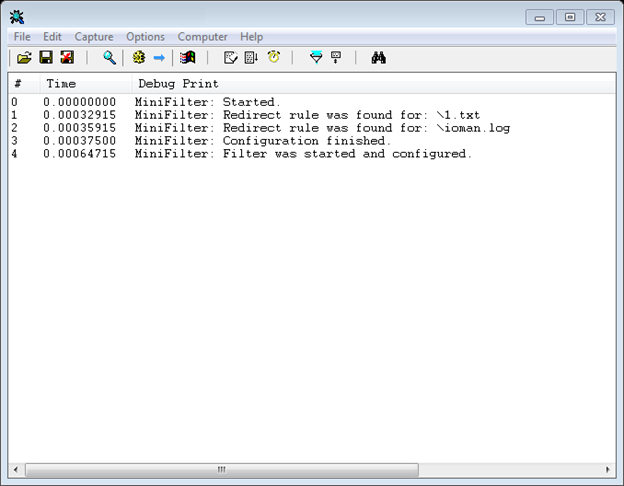
А так наш драйвер будет выглядеть в DeviceTree 
Могу добавить, что код пока еще достаточно сырой и требует доработок, однако в целом функционирует нормально. Собственно, если у Вас будет BSOD, я не виноват). Тестировал только на Windows 7 X86 и Windows 7 IA64.


