- Инструкция по обновлению BIOS c флешки
- Шаг 1: Определение модели материнской платы
- Шаг 2: Загрузка прошивки
- Шаг 3: Установка обновления
- Find out how to easily update your BIOS
- How can I flash the BIOS on Windows 10?
- 1. Is it necessary to update the BIOS?
- 2. Which version of BIOS are you currently using?
- 3. Update from BIOS
- Run a System Scan to discover potential errors
- 4. Create a DOS USB drive
- 5. Use Windows-based programs
- Frequently Asked Questions
- How to check bios version Windows 10?
- Should I update my bios?
- How long does it take for a BIOS update?
Инструкция по обновлению BIOS c флешки
Причины для обновления версий у БИОСа могут быть разные: замена процессора на материнской плате, проблемы с установкой нового оборудования, устранение выявленных недостатков в новых моделях. Выполнить процедуру обновления с помощью флеш-накопителя можно в несколько простых шагов. Стоит сразу сказать, что все действия нужно выполнять именно в том порядке, в котором они приведены ниже.
Шаг 1: Определение модели материнской платы
Для определения модели можно сделать следующее:
- взять документацию к Вашей материнской плате;
- открыть корпус системного блока и заглянуть внутрь;
- воспользоваться средствами Windows;
- использовать специальную программу AIDA64 Extreme.
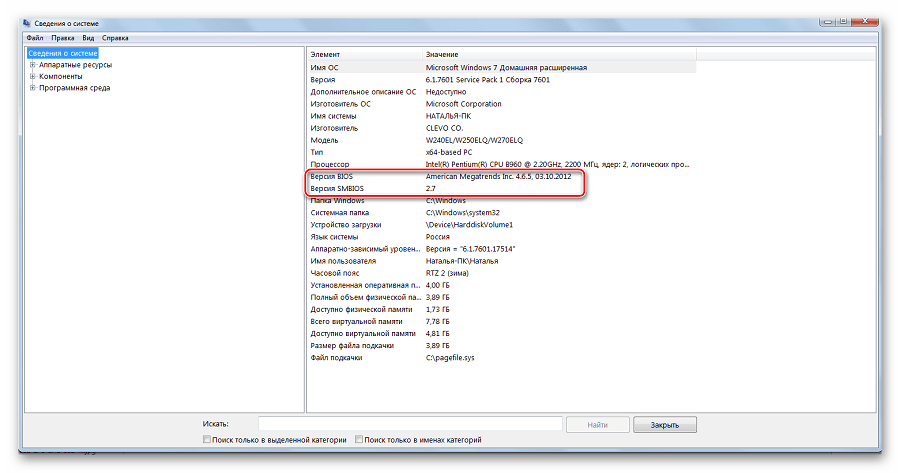
Если более подробно, то для того, чтобы просмотреть нужную информацию с помощью программных средств Windows, выполните вот что:
- Нажмите комбинацию клавиш «Win» + «R».
- В открывшемся окне «Выполнить» введите команду msinfo32 .
- Нажмите «ОК».
- Появилось окно, в котором содержится информация о системе, и в нем есть данные об установленной версии BIOS.
Если выполнить эту команду не удается, тогда воспользуйтесь ПО AIDA64 Extreme, для этого:
- Установите программу и запустите ее. В главном окне слева, во вкладке «Меню» выберете раздел «Системная плата».

Как видим, все достаточно просто. Теперь необходимо загрузить прошивку.
Шаг 2: Загрузка прошивки
- Войдите в интернет и запустите любой поисковик.
- Введите название модели системной платы.
- Выберите на сайт производителя и перейдите на него.
- В разделе «Download» найдите «BIOS».
- Выберите последнюю версию и скачайте ее.
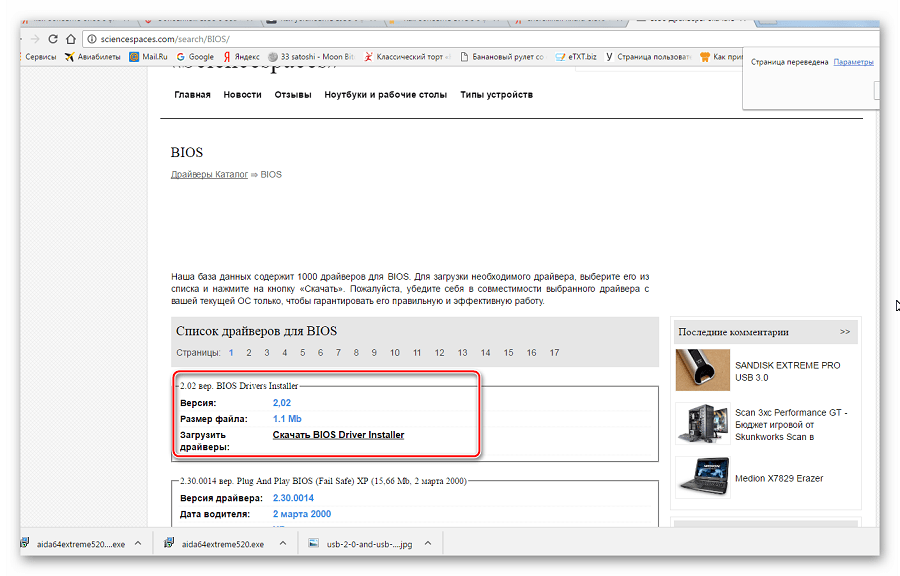
Когда прошивка загружена, можно устанавливать ее.
Шаг 3: Установка обновления
Сделать обновления можно по-разному – через БИОС и через ДОС. Рассмотрим каждый метод более подробно.
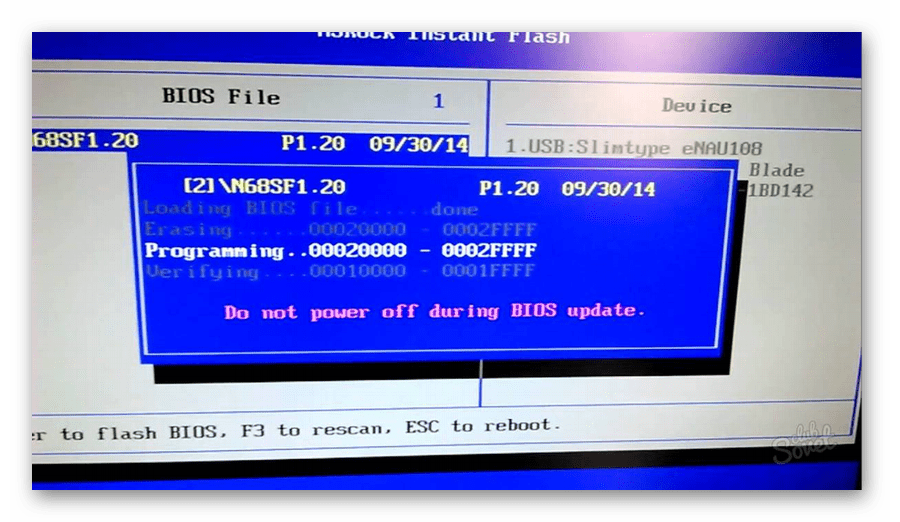
Обновление через БИОС происходит следующим образом:
- Зайдите в BIOS, удерживая при загрузке функциональные клавиши «F2» или «Del».
- Найдите раздел со словом «Flash». Для системных плат с технологией SMART, выбирается в этом разделе пункт «Instant Flash».
- Нажмите «Еnter». Система автоматически определяет флешку и обновляет прошивку.
Иногда для переустановки BIOS требуется указать загрузку с флешки. Для этого сделайте следующее:
- Зайдите в BIOS.
- Найдите вкладку «BOOT».
- В ней выберете пункт «Boot Device Priority». Здесь отображается приоритет загрузки. Первой строкой обычно стоит жесткий диск с ОС Windows.
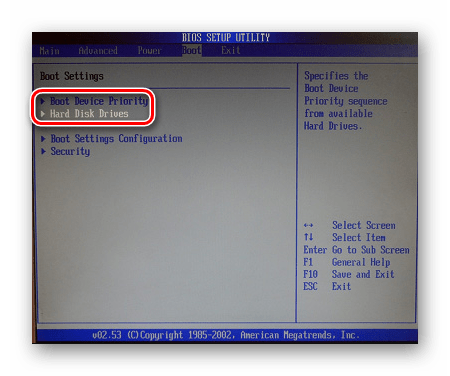
Более подробно читайте о данной процедура в нашем уроке по настройке BIOS для загрузки с USB-накопителя.
Такой способ актуален, когда нет возможности сделать обновления из операционной системы.
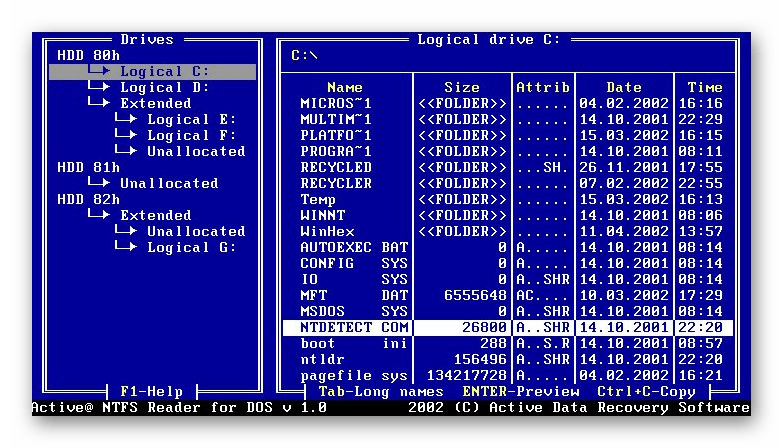
Та же процедура посредством DOS делается немного более сложно. Этот вариант подходит для опытных пользователей. В зависимости от модели материнской платы этот процесс включает следующие этапы:
- Создайте загрузочную флешку на основании скачанного на официальном сайте производителя образа MS-DOS (BOOT_USB_utility).
- из архива BOOT_USB_utility установите приложение HP USB Drive Format Utility;
- в отдельную папку распакуйте USB DOS;
- затем вставьте флешку в компьютер и запустите специальную утилиту HP USB Drive Format Utility;
- в поле «Device» укажите флешкe, в поле «Using» значение «DOS system» и папку с USB DOS;
- нажмите «Start».
Происходит форматирование и создание загрузочной области.
awdflash flash.bin /cc/cd/cp/py/sn/e/f
Более подробную инструкцию по работе с этим методом обычно можно найти на сайте производителя. Крупные производители, такие как ASUS или Gigabyte, постоянно обновляют BIOS для материнских плат и для этого имеют специальное ПО. Используя такие утилиты, сделать обновления несложно. 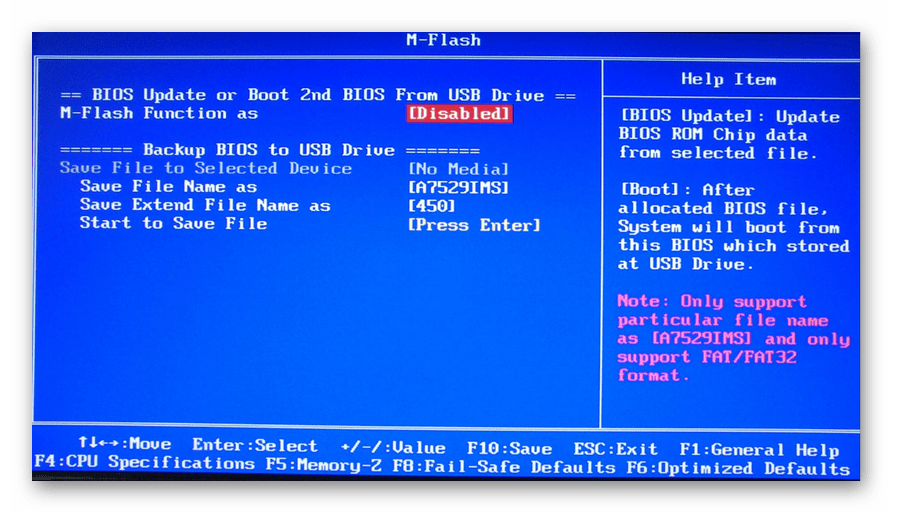
Не рекомендуется делать перепрошивку БИОСа, если в этом нет необходимости.
Небольшой сбой при обновлении приведет к поломке системы. Делайте обновления BIOS только в случае, когда система работает некорректно. При загрузке обновлений скачивайте полную версию. Если указано, что это альфа или бета-версия, то это говорит о том, что она нуждается в доработке.
Также рекомендуется делать операцию по перепрошивке BIOS при использовании ИБП (источника бесперебойного питания). Иначе, если произойдет отключение питания во время обновления, то BIOS слетит и Ваш системный блок перестанет работать.
Перед выполнением обновлений обязательно ознакомьтесь с инструкцией по прошивке на сайте производителя. Как правило, они идут в архиве с загрузочными файлами.
Find out how to easily update your BIOS

- If you’re not changing your hardware and you don’t have any specific errors, it’s not necessary to update the BIOS.
- The BIOS comes pre-installed on the motherboard so in this guide you will learn how to update the motherboard BIOS.
- Updating the BIOS is a tricky operation and you should start by gathering information about your motherboard and your BIOS version.
- You can update the BIOS in Windows 10 from the BIOS itself as indicated in our solutions below.

- Download Restoro PC Repair Tool that comes with Patented Technologies (patent available here).
- Click Start Scan to find Windows issues that could be causing PC problems.
- Click Repair All to fix issues affecting your computer’s security and performance
- Restoro has been downloaded by 0 readers this month.
BIOS is a crucial component of every PC that allows you to change your hardware settings without starting Windows.
Your BIOS has many features available, but some advanced users tend to update theirs in order to get access to new features.
Updating BIOS can be a somewhat complicated procedure, so today we’re going to show you how to flash your BIOS on Windows 10.
How do I update my BIOS in Windows 10? The easiest way to update your BIOS is directly from its settings. Before you start the process, check your BIOS version and the model of your motherboard.
Another way to update it is to create a DOS USB drive or use a Windows-based program. If you want to know how to do that, check the steps below.
How can I flash the BIOS on Windows 10?
- Is it necessary to update the BIOS?
- Which version of BIOS are you currently using?
- Update from BIOS
- Create a DOS USB drive
- Use Windows-based programs
1. Is it necessary to update the BIOS?
Flashing your BIOS is an advanced procedure, and if you don’t perform it properly you can cause major damage to your PC.
In most cases you don’t even have to update your BIOS unless there’s a major problem with your hardware.
The main problem with BIOS is that it’s located on a chip on your motherboard, and if the update process goes wrong, you won’t be able to start Windows at all.
If you aren’t an advanced user there’s no need to keep your BIOS updated, but if you have a hardware problem and the only way to fix it is to update BIOS, then you might have to update it.
To perform a BIOS update successfully, you need to be sure that the update process isn’t interrupted by power loss or unexpected shutdown.
If that happens, the BIOS update process will fail, and you’ll most likely cause damage to your motherboard.
To prevent any problems, be sure to connect your laptop directly to the power outlet or use a UPS for your desktop PC.
Although updating the BIOS can be potentially dangerous, there are certain benefits after updating it. Sometimes, the BIOS update brings support for new hardware, such as support for new CPUs.
Another benefit of BIOS update is improved stability and potentially new features such as overclocking.
As you can see, it’s not necessary to keep your BIOS up to date, especially because improper BIOS update can lead to many other problems.
It’s recommended to update BIOS if you have any hardware issue that might be related to your BIOS . There are several different ways to update your BIOS , and today we’re going to show you how to do it.
2. Which version of BIOS are you currently using?

Before you update your BIOS, you need to find out which version are you currently using. The easiest way to do that is to use Command Prompt or System Information tool.
We already wrote about several different methods that you can use to check your BIOS version on Windows 10, so be sure to check that article out.
In addition to BIOS version, you also need to know the model of your motherboard. If you don’t have the data readily available you can use this guide to check your motherboard model.
You can see the model of your motherboard by using any hardware information tool such as Speccy or CPU-Z. Here’s a full list of tools to check your system configuration.
After finding the version of BIOS that you’re using, you need to download the new version from your motherboard manufacturer’s website. Go to Support or Download section and select your motherboard model.
Be sure to download BIOS update for the exact model of the motherboard that you’re using.
Installing the wrong version of BIOS on your motherboard can cause damage, so be extra cautious while downloading new version of BIOS .
Almost all versions of BIOS have update notes available on the download page so you can easily see what issues does the update fix.
When you download new version of BIOS, it will be stored in an archive so you’ll need to extract it first. After that, check the available readme file for instructions and any additional information.
There are several ways to update your BIOS, and we’re going to go through them briefly.
3. Update from BIOS
- When Windows 10 starts, open the Start Menu and click the Power button.
- Hold the Shift key and choose the Restart option.
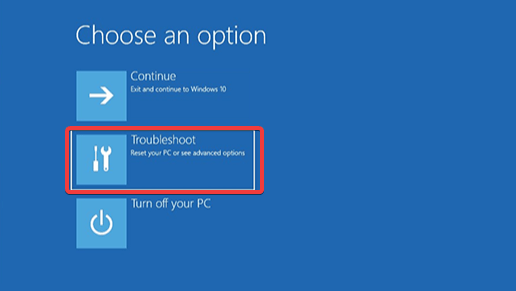
- You should see several options available. Choose Troubleshoot.

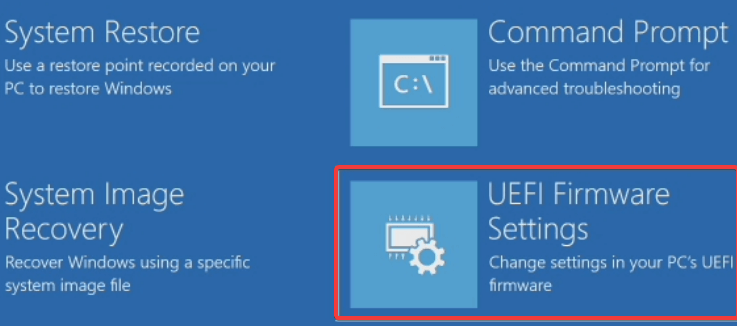
- Now select Advanced options and select UEFI Firmware Settings.
- Click the Restart button and your computer should now boot to BIOS.
Run a System Scan to discover potential errors


Some motherboard manufacturers allow you to flash your BIOS simply by accessing it and choosing the update option.
This is relatively simple and in order to do that you need to move the downloaded BIOS update to a USB flash drive.
Before moving the update to the USB drive, be sure that there aren’t any other files available on the drive. Now you need to connect the USB flash drive to your PC and access BIOS.
You can access BIOS during the boot sequence by pressing the appropriate key. In most cases that’s Del or some other F key, so keep an eye for a message that tells you to press a certain key to enter SETUP.
In addition, you can always check your motherboard manual to see which key you need to press in order to access BIOS.
Once you enter BIOS , look for BIOS update option and select it. Now you need to choose the BIOS update file from your USB flash drive and wait while your BIOS updates.
Some manufacturers offer tools that will create a USB flash drive with all the necessary files, so you won’t have to transfer them manually.
Keep in mind that update process is a bit different for each motherboard model, so be sure to check the instruction manual for details on how to update your BIOS .
4. Create a DOS USB drive
This DOS solution is an older method of flashing BIOS and probably the most complicated. This process requires you to create a bootable USB flash drive and to copy the new version of BIOS to the drive as well.
In addition, you’ll need a script that will flash the BIOS . This file will usually be available in the archive with your BIOS update, and it will have .exe or .bat extension.
In some cases, this script will have to be download separately. To create a bootable USB drive with a DOS system, you need to use third-party tools such as Rufus.
Simply format the drive using this tool and be sure to check the Create a bootable disk using FreeDOS option.
After doing that, transfer the BIOS update file and installation script to the USB drive and restart your PC. Boot your PC from the USB drive and run the setup script using DOS.
This is an advanced procedure, so we highly recommend that you check your motherboard manual for detailed instructions on how to do that.
5. Use Windows-based programs

If using DOS seems too complicated for you, you might want to consider using a Windows-based application.
Many motherboard manufacturers have BIOS update applications available that allow you to update BIOS by using simple graphic interface.
Although this is the simplest way to do it, there are certain issues with it. Installed software can sometimes interfere with this process and cause BIOS update to fail.
Security programs can often interfere with BIOS update process and cause all sorts of problems to appear, so it might be best that you disable them completely while flashing your BIOS.
Any system crash or freeze could also affect the update process, so it might be better that you use some different method to update BIOS.
Motherboard manufacturers will often recommend the best method to update your BIOS, so be sure to use that method.
Updating BIOS isn’t a hard process, but it might be potentially dangerous, so be cautious if you decide to update your BIOS .
In addition, be sure to double check everything before starting. Many BIOS update tools will give you the option to save or back up your current BIOS, so be sure to use this feature.
It’s not necessary that you update your BIOS, especially because you can cause irreversible damage to your motherboard if you don’t do it properly.
However, if you’re having a hardware issue and the only solution is to update your BIOS, be sure to carefully read your motherboard’s instruction manual to see how to update your BIOS properly.
Some computer manufacturers like Asus, Lenovo or Dell, offer a built-in tool to update your BIOS. You can always check your PC’s manual to see if it offers such a tool to make things a little bit easier.
- Download this PC Repair Tool rated Great on TrustPilot.com (download starts on this page).
- Click Start Scan to find Windows issues that could be causing PC problems.
- Click Repair All to fix issues with Patented Technologies (Exclusive Discount for our readers).
Restoro has been downloaded by 0 readers this month.
If you have any more questions or concerns with the BIOS update process, don’t hesitate to leave them in the comments section below.
Frequently Asked Questions
How to check bios version Windows 10?
The quickest way is to run the wmic bios get smbiosbiosversion line in Command Prompt as admin. More info and other ways are in this article about checking BIOS version .
Should I update my bios?
If you are not changing your configuration or experiencing any errors , you don’t need to perform this operation. But if you need to, check this guide on how to update your BIOS .
How long does it take for a BIOS update?
After preparing the file or the USB stick , once you hit the update button , the operation is quite quick. It usually takes around 1-3 minutes.


