- Windows 7 Navigation Buttons Customizer
- Windows 7 Navigation Pane Customizer – портабельная программа для настройки панели навигации в Проводнике
- Как изменить кнопки навигации в Проводнике
- Buttons
- Is this the right control?
- Examples
- Create a button
- Button interaction
- Button content
- Create a repeat button
- Create a drop down button
- Example — Drop down button
- Create a split button
- Example — Split button
- Create a toggle split button
- Differences with ToggleButton
- Example — Toggle split button
- Recommendations
- Recommended single-button layout
- Back buttons
Windows 7 Navigation Buttons Customizer

Если Вы хотите изменить не только оформление рабочего стола, меню Пуск, иконок и курсоров, но и проводника, то программа Windows 7 Navigation Buttons Customizer Вам в этом поможет. Она позволяет быстро сменить привычные стрелки навигации и строки поиска на любые другие. Если Вы не знаете с чего начать, то можете попробовать для начала готовые наборы кнопок, которые идут в комплекте с программой.
Программа полностью портативная. Её можно использовать и переносить с компьютера на компьютер без установки.
Чтобы изменить кнопки проводника нужно:
— запустить утилиту от имени администратора (клик правой кнопкой мыши на ярлыке программы)
— выбрать объект для изменения

— нажать «Change Selected Bitmap»

— выбрать внешний вид для новой кнопки

Установка завершена. Теперь у Вас новые кнопки!

Чтобы вернуть кнопкам стандартный вид нужно:
— запустить утилиту от имени администратора
— выбрать объект для изменения
— нажать «Restore Selected Bitmap»
Примечание: Обратите внимание, что иконки будут изменены, если у Вас будет полный доступ к системной библиотеке *WindowsSystem32ExplorerFrame.dll

- 2485 загрузок
- 7 958 просмотров
- 1 комментов
Изменение внешнего вида окон, папок и файлов windows 10/8/7/XP даст возможность настроить интерфейс в соответствии с персональными предпочтениями, сделать его более удобным и дружественным.
За безопасный Интернет
Проверить безопасность файла «Windows 7 Navigation Buttons Customizer» с помощью G o o g l e , способ который гарантирует 100% результат. Если на странице есть рекламные баннеры G o o g l e значит страница проверена, а файл «Windows 7 Navigation Buttons Customizer» является безопасным. Что бы убедиться в этом отключите на время блокировщик рекламы и обновите страницу.
Windows 7 Navigation Pane Customizer – портабельная программа для настройки панели навигации в Проводнике
Я уже писал о Librarian – программе для управления Библиотеками в Windows 7. Библиотеки отображаются в Проводнике, Моем компьютере, и включены в навигационное дерево. Настроить это дерево папок, добавив в него новые пункты, или удалив ненужные вам, поможет небольшая, очень простая программа Windows 7 Navigation Pane Customizer.
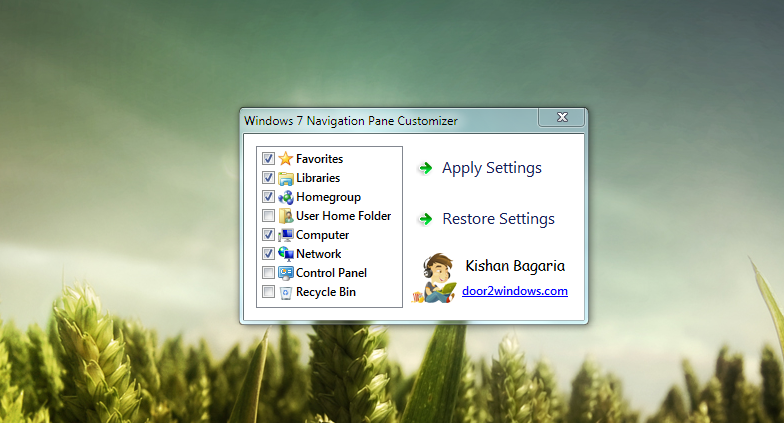
Как и в случае с Computer Customizer, портабельная утилита Windows 7 Navigation Pane Customizer позволяет упростить навигацию по важным системным разделам. Программа позволяет добавлять в навигационное дерево все значки контрольной панели, папку текущего пользователя, Корзину, Избранное, и другие важные места, а так же удалять их, если они вам более не нужны. Изменения происходят на лету, с автоматической перезагрузкой сервиса explorer.exe, так что вам даже не нужно перезагружаться.

Если вы решили восстановить исходные значения навигационного дерева, то и такая возможность предусмотрена в Windows 7 Navigation Pane Customizer одним кликом. Чтобы программа работала стабильно, для ее запуска требуются права администратора.
Как изменить кнопки навигации в Проводнике

В своей статье “Как изменить стандартный вид Windows 7″
я уже рассказал как поменять тему оформления, вид кнопки Пуск, иконки. Однако некоторые элементы оформления остались не охвачены нашим вниманием и портят своим первозданным видом все усилия по приданию системе нового и стильного макияжа. Сегодня мы поговорим о том, как изменить кнопки навигации в Проводнике.
Windows 7 Navigation Buttons Customizer — это бесплатная утилита для изменения оформления кнопок навигации, адресной строки и поля поиска в Проводнике. Утилита работает в Windows 7 и представляет собой один исполнимый файл.
После того как вы скачали и распаковали архив необходимо запустить утилиту от имени администратора. Мы видим в появившемся окне изображения элементов интерфейса, которые можно изменить. Выделяем нужный элемент, затем щелкаем кнопку Change Selected Bitmap и выбираем рисунок в формате BMP. Скачать наборы элементов оформления для программы можно на форуме разработчика
(требуется регистрация).
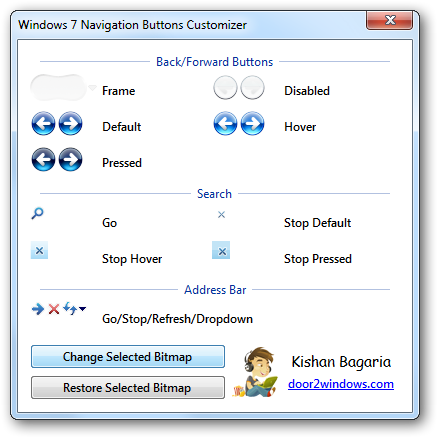
После этого Проводник автоматически перезапустится и вы увидите изменения в интерфейсе. Для того, чтобы восстановить исходный вид, выделяем нужный элемент и жмем Restore Selected Bitmap.
Скачать утилиту Windows 7 Navigation Buttons Customizer можно на сайте разработчика
. А вот здесь
можно скачать эту же утилиту, но с подробными инструкциями на русском языке и наборами различных кнопок.
В результате моя система наконец-то приобрела симпатичные кнопочки, наиболее подходящие под используемую тему. 🙂
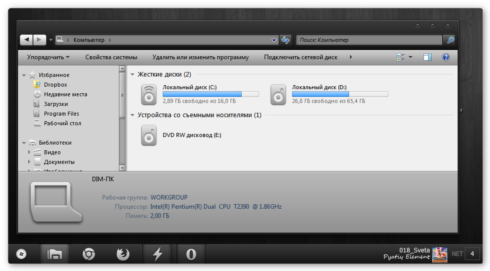
Нравится? А как вы относитесь к подобным украшательствам?
Buttons
A button gives the user a way to trigger an immediate action. Some buttons are specialized for particular tasks, such as navigation, repeated actions, or presenting menus.
The Extensible Application Markup Language (XAML) framework provides a standard button control as well as several specialized button controls.
| Control | Description |
|---|---|
| Button | A button that initiates an immediate action. Can be used with a Click event or Command binding. |
| RepeatButton | A button that raises a Click event continuously while pressed. |
| HyperlinkButton | A button that’s styled like a hyperlink and used for navigation. For more info about hyperlinks, see Hyperlinks. |
| DropDownButton | A button with a chevron to open an attached flyout. |
| SplitButton | A button with two sides. One side initiates an action, and the other side opens a menu. |
| ToggleSplitButton | A toggle button with two sides. One side toggles on/off, and the other side opens a menu. |
| ToggleButton | A button that can be on or off. |
Get the Windows UI Library
DropDownButton, SplitButton, and ToggleSplitButton are included as part of the Windows UI Library, a NuGet package that contains new controls and UI features for Windows apps. For more info, including installation instructions, see Windows UI Library.
Is this the right control?
Use a Button control to let the user initiate an immediate action, such as submitting a form.
Don’t use a Button control when the action is to navigate to another page; instead, use a HyperlinkButton control. For more info about hyperlinks, see Hyperlinks.
For wizard navigation, use buttons labeled Back and Next. For other types of backwards navigation or navigation to an upper level, use a back button.
Use a RepeatButton control when the user might want to trigger an action repeatedly. For example, use a RepeatButton control to increment or decrement a value in a counter.
Use a DropDownButton control when the button has a flyout that contains more options. The default chevron provides a visual indication that the button includes a flyout.
Use a SplitButton control when you want the user to be able to initiate an immediate action or choose from additional options independently.
Use a ToggleButton control when you want the user to be able to immediately switch between two mutually exclusive states, and a button is the best fit for your UI needs. Unless your UI benefits from a button, it might be a better choice to use an AppBarToggleButton, CheckBox, RadioButton, or ToggleSwitch.
Examples
| XAML Controls Gallery | ||||||
|---|---|---|---|---|---|---|
| Need to fix: Buttons with overflowing text. | |
| Option 1: Increase button width, stack buttons, and wrap if text length is greater than 26 characters. | |
| Option 2: Increase button height, and wrap text. |
You can also customize visuals that make up the button’s appearance. For example, you could replace the text with an icon, or use an icon in addition to text.
Here, a StackPanel that contains an image and text is set as the content of a button.
The button looks like this.
Create a repeat button
A RepeatButton control is a button that raises Click events repeatedly from the time it’s pressed until it’s released. Set the Delay property to specify the time that the RepeatButton control waits after it is pressed before it starts repeating the click action. Set the Interval property to specify the time between repetitions of the click action. Times for both properties are specified in milliseconds.
The following example shows two RepeatButton controls whose respective Click events are used to increase and decrease the value shown in a text block.
Create a drop down button
DropDownButton requires the Windows UI Library or Windows 10, version 1809 (SDK 17763) or later. To download the latest SDK, see Windows 10 SDK; to download an earlier SDK, see Windows SDK and emulator archive.
A DropDownButton is a button that shows a chevron as a visual indicator that it has an attached flyout that contains more options. It has the same behavior as a standard Button control with a flyout; only the appearance is different.
The drop down button inherits the Click event, but you typically don’t use it. Instead, you use the Flyout property to attach a flyout and invoke actions by using menu options in the flyout. The flyout opens automatically when the button is clicked. Be sure to specify the Placement property of your flyout to ensure the desired placement in relation to the button. The default placement algorithm might not produce the intended placement in all situations.
For more info about flyouts, see Menus and context menus.
Example — Drop down button
This example shows how to create a drop down button with a flyout that contains commands for paragraph alignment in a RichEditBox control. (For more info and code, see Rich edit box).
Create a split button
SplitButton requires the Windows UI Library or Windows 10, version 1809 (SDK 17763) or later. To download the latest SDK, see Windows 10 SDK; to download an earlier SDK, see Windows SDK and emulator archive.
A SplitButton control has two parts that can be invoked separately. One part behaves like a standard button and invokes an immediate action. The other part invokes a flyout that contains additional options that the user can choose from.
When invoked with touch, the split button behaves as a drop down button; both halves of the button invoke the flyout. With other methods of input, a user can invoke either half of the button separately.
The typical behavior for a split button is:
When the user clicks the button part, handle the Click event to invoke the option that’s currently selected in the drop down.
When the drop down is open, handle invocation of the items in the drop down to both change which option is selected, and then invoke it. It’s important to invoke the flyout item because the button Click event doesn’t occur when using touch.
There are many ways to put items in the drop down and handle their invocation. If you use a ListView or GridView, one way is to handle the SelectionChanged event. If you do this, set SingleSelectionFollowsFocus to false. This lets users navigate the options using a keyboard without invoking the item on each change.
Example — Split button
This example shows how to create a split button that is used to change the foreground color of selected text in a RichEditBox control. (For more info and code, see Rich edit box). Split button’s flyout uses BottomEdgeAlignedLeft as the default value for its Placement property. You can’t override this value.
Create a toggle split button
ToggleSplitButton requires the Windows UI Library or Windows 10, version 1809 (SDK 17763) or later. To download the latest SDK, see Windows 10 SDK; to download an earlier SDK, see Windows SDK and emulator archive.
A ToggleSplitButton control has two parts that can be invoked separately. One part behaves like a toggle button that can be on or off. The other part invokes a flyout that contains additional options that the user can choose from.
A toggle split button is typically used to enable or disable a feature when the feature has multiple options that the user can choose from. For example, in a document editor, it could be used to turn lists on or off, while the drop down is used to choose the style of the list.
When invoked with touch, the toggle split button behaves as a drop down button. With other methods of input, a user can toggle and invoke the two halves of the button separately. With touch, both halves of the button invoke the flyout. Therefore, you must include an option in your flyout content to toggle the button on or off.
Differences with ToggleButton
Unlike ToggleButton, ToggleSplitButton does not have an indeterminate state. As a result, you should keep in mind these differences:
- ToggleSplitButton does not have an IsThreeState property or Indeterminate event.
- The ToggleSplitButton.IsChecked property is just a Boolean, not a Nullable.
- ToggleSplitButton has only the IsCheckedChanged event; it does not have separate Checked and Unchecked events.
Example — Toggle split button
The following example shows how a toggle split button could be used to turn list formatting on or off, and change the style of the list, in a RichEditBox control. (For more info and code, see Rich edit box). The flyout of the toggle split button uses BottomEdgeAlignedLeft as the default value for its Placement property. You can’t override this value.
Recommendations
Make sure the purpose and state of a button are clear to the user.
When there are multiple buttons for the same decision (such as in a confirmation dialog), present the commit buttons in this order, where [Do it] and [Don’t do it] are specific responses to the main instruction:
Expose only one or two buttons to the user at a time, for example, Accept and Cancel. If you need to expose more actions to the user, consider using checkboxes or radio buttons from which the user can select actions, with a single command button to trigger those actions.
For an action that needs to be available across multiple pages within your app, instead of duplicating a button on multiple pages, consider using a bottom app bar.
Recommended single-button layout
If your layout requires only one button, it should be either left- or right-aligned based on its container context.
Dialogs with only one button should right-align the button. If your dialog contains only one button, ensure that the button performs the safe, nondestructive action. If you use ContentDialog and specify a single button, it will be automatically right-aligned.
If your button appears within a container UI (for example, within a toast notification, a flyout, or a list view item), you should right-align the button within the container.
In pages that contain a single button (for example, an Apply button at the bottom of a settings page), you should left-align the button. This ensures that the button aligns with the rest of the page content.
Back buttons
The back button is a system-provided UI element that enables backward navigation through either the back stack or navigation history of the user. You don’t have to create your own back button, but you might have to do some work to enable a good backwards navigation experience. For more info, see Navigation history and backwards navigation for Windows apps.


detector