- Windows server 2019 wifi adapter
- Постановка задачи
- Методы настройки сети в Windows Server 2019
- Настройка сети через графический интерфейс
- Настройка сети через Windows Admin Center
- Настройка сети Windows Server 2019 через командную строку
- Настройка сети через PowerShell
- Удаленная настройка сети
- Intel® Network Adapter Driver for Windows Server 2019*
- Available Downloads
- Wired_driver_26.2_x64.zip
- Wired_PROSet_26.2_x64.zip
- Other Versions
- Detailed Description
- Download Documentation
- This download is valid for the product(s) listed below.
- Intel Software License Agreement
Windows server 2019 wifi adapter
 Добрый день! Уважаемые читатели и гости одного из крупнейших IP блогов в рунете Pyatilistnik.org. В прошлый раз мы с вами произвели установку новой серверной системы Windows Server 2019 и произвели базовую настройку. Сегодня я хочу вам показать, какие у системного администратора есть варианты и инструменты по настройке сети в Windows Server 2019. Я покажу, как локальную настройку, так и удаленную, уверен, что новички оценят по достоинству этот материал.
Постановка задачи
Я хочу вас научить производить настройку статического IP адреса, маски, шлюза и DNS серверов на вашем сетевом интерфейсе, разными методами, локально и удаленно. Ситуаций может быть очень много. Лично я являюсь приверженцем того, что любой сервер должен иметь выделенный, статический ip-адрес исключительно под него, тут можно долго спорить, что можно делать резервирование на DHCP, через который потом можно быстрее менять настройки, но я придерживаюсь такой политики, так как из отказоустойчивый DHCP может ломаться, если вы можете меня переубедить в моем видении, то прошу в комментарии.
Методы настройки сети в Windows Server 2019
Существует ряд методов и инструментов позволяющих производить настройки вашего сетевого интерфейса, их можно разделить на два подхода:
- Локальная настройка сетевых параметров
- Удаленная настройка сетевыми параметрами
Среди инструментов можно выделить:
- Свойства сетевого интерфейса
- Утилита командной строки netsh
- Командлеты powerShell
- Использование Windows Admin Center
- Различные утилиты
Настройка сети через графический интерфейс
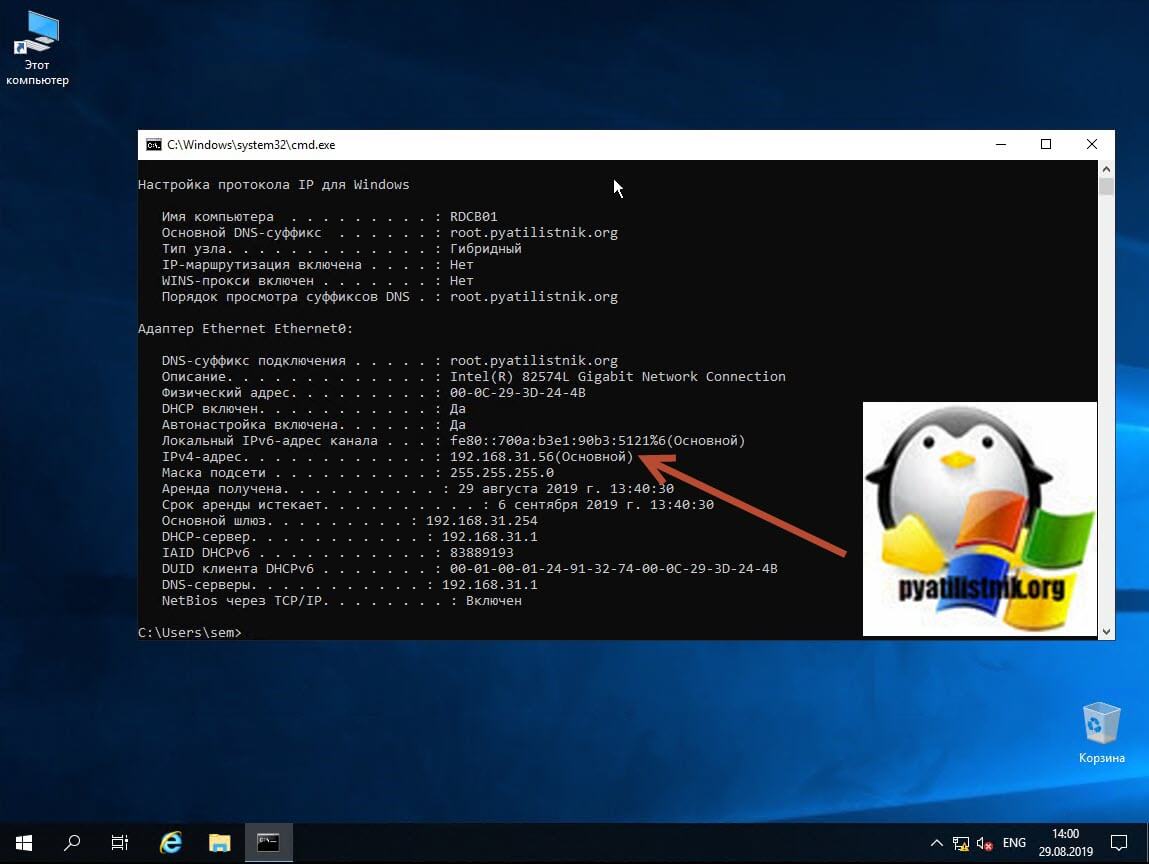
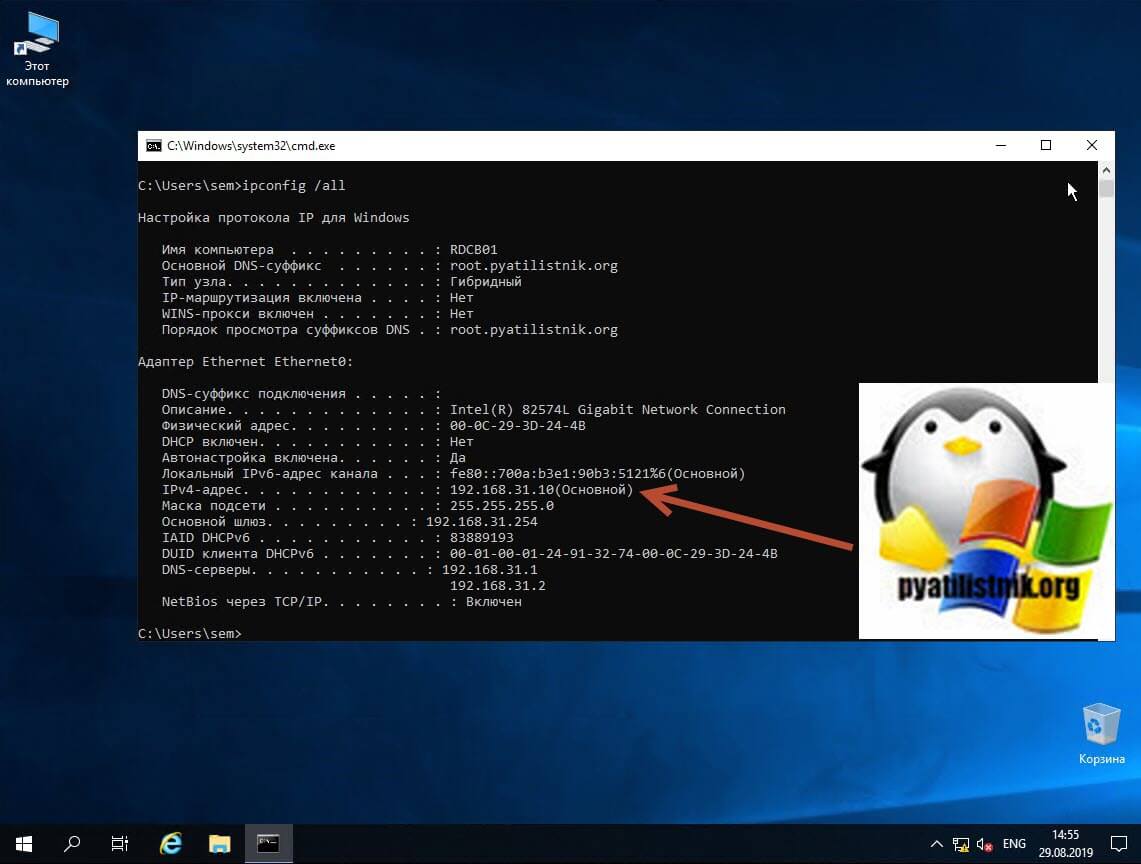
Первый метод, можно назвать классическим, так как он самый простой и подойдет для большинства администратором. Тут мы с вами будем использовать оснастку «Центр управления сетями и общим доступом«, настроим статический IP-адрес, маску сети, основной шлюз и DNS-сервера через графический интерфейс. У меня есть сервер RDCB01, для которого я выделил IP-адрес 192.168.31.10. На текущий момент айпишник прилетает от DHCP-сервера. Проверим текущие параметры интерфейса через командную строку, в которой нужно написать команду:
Чтобы открыть «Центр управления сетями и общим доступом» со списком сетевых интерфейсов, мы воспользуемся быстрыми командами Windows. Открываем окно выполнить и пишем в нем:
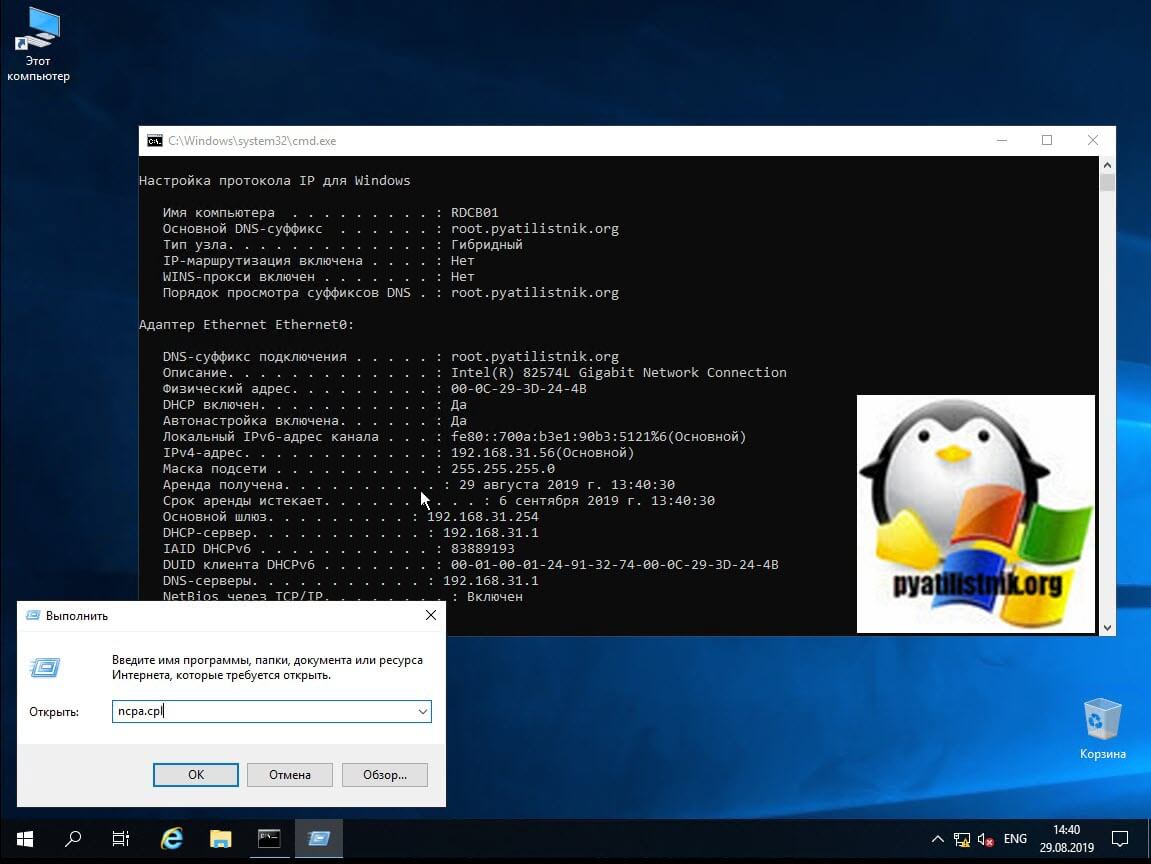
Находим нужный сетевой интерфейс, в моем примере, это единственный Ethernet0 и заходим в его свойства.

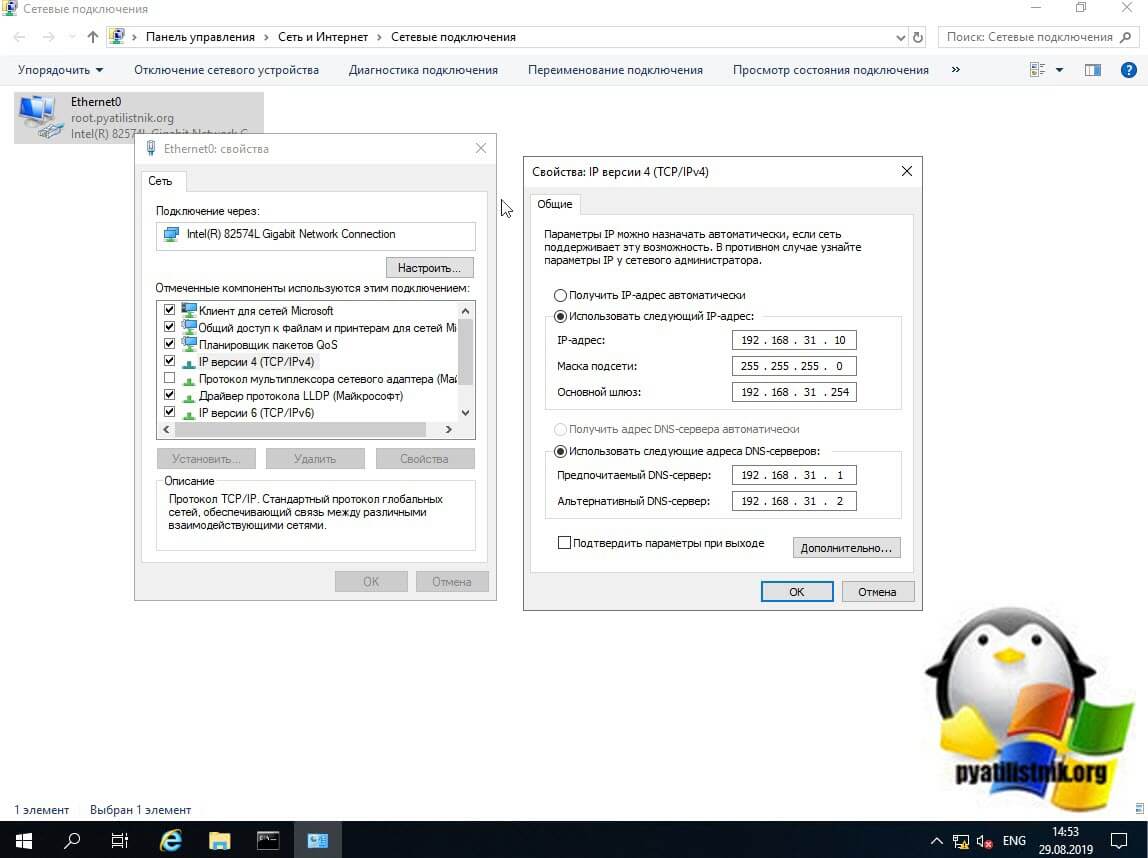
Далее находим пункт «IP версии 4 (TCP/Ipv4)»и открываем его свойства, далее мы видим, что выделение сетевых настроек производится в автоматическом режиме, через службу DHCP.
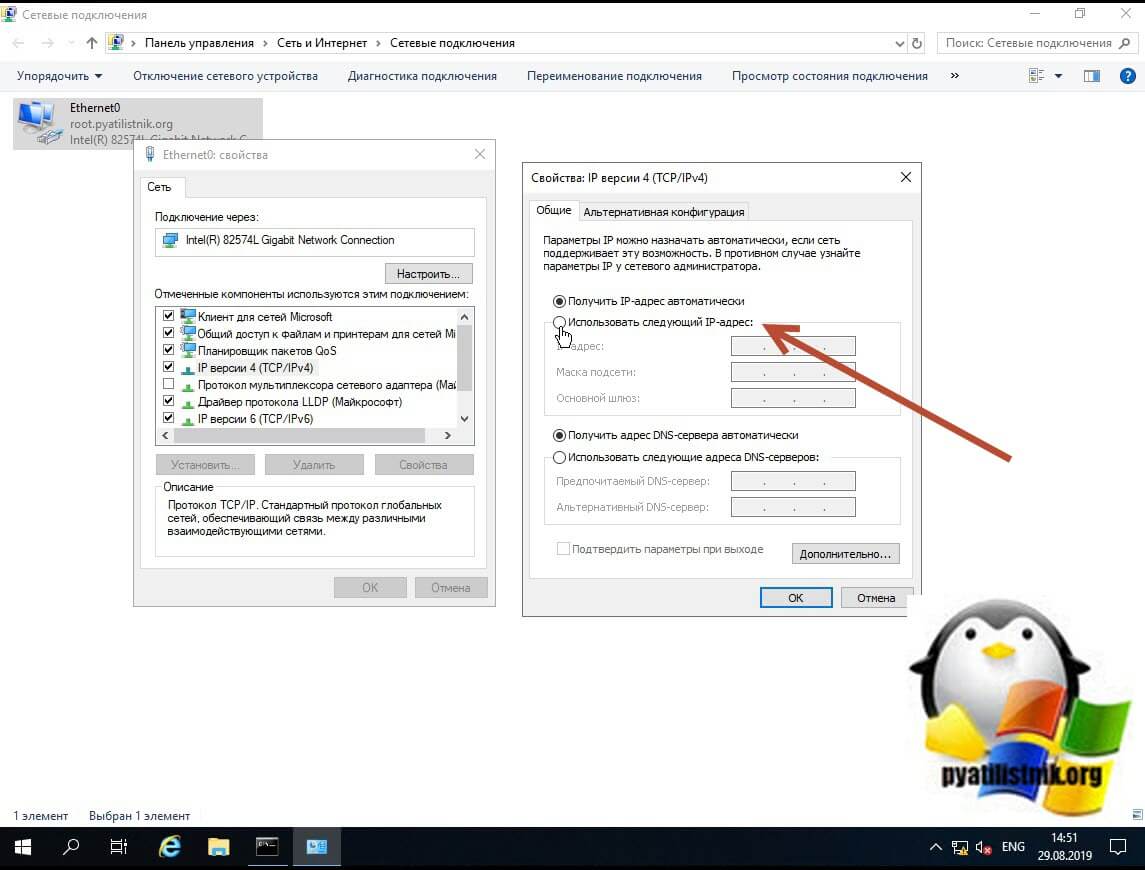
Чтобы вбить статические настройки выбираем пункт «Использовать следующий IP-адрес» и по порядку задаем настройки, подготовленные заранее. В моем случае
- IP-адрес 192.168.31.10
- Маска подсети 255.255.255.0
- Основной шлюз 192.168.31.254
- Предпочитаемый DNS-сервер 192.168.31.1
- Альтернативный DNS-сервер 192.168.31.2
Сохраняем все настройки и проверяем через Ipconfig /all, что все видится. Так же можете попробовать пропинговать ваш основной шлюз или DNS-сервер. На этом графическая настройка сети в Windows Server 2019 окончена.
Настройка сети через Windows Admin Center
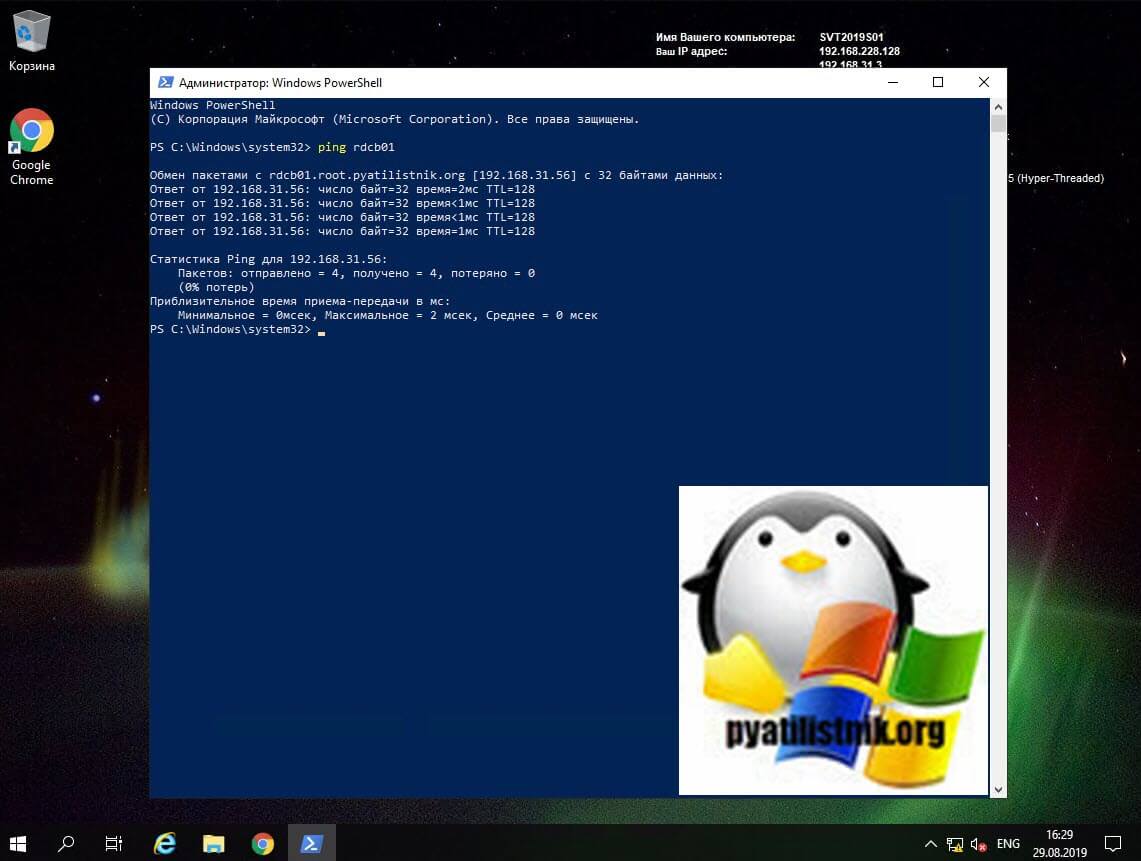
С выходом Windows Server 2019 Microsoft наконец-то создает правильный инструмент для системного администратора, я говорю, о Windows Admin Center. Я вам уже подробно рассказывал, как устанавливать Windows Admin Center и его назначение. Если в двух словах, то это крутая веб консоль позволяющая управлять серверами и рабочими станциями с любого устройства, через ваш браузер. Давайте я покажу, как вы легко можете произвести установку статического Ip-адреса, маски, основного шлюза и DNS на удаленном сервере, через WAC. Напоминаю, что делать я это буду для сервера RDCB01. Давайте его пропингуем и выясним текущий адрес. Я вижу ip-адрес 192.168.31.56.
Открываем в браузере Windows Admin Center и производим подключение к нужному серверу.
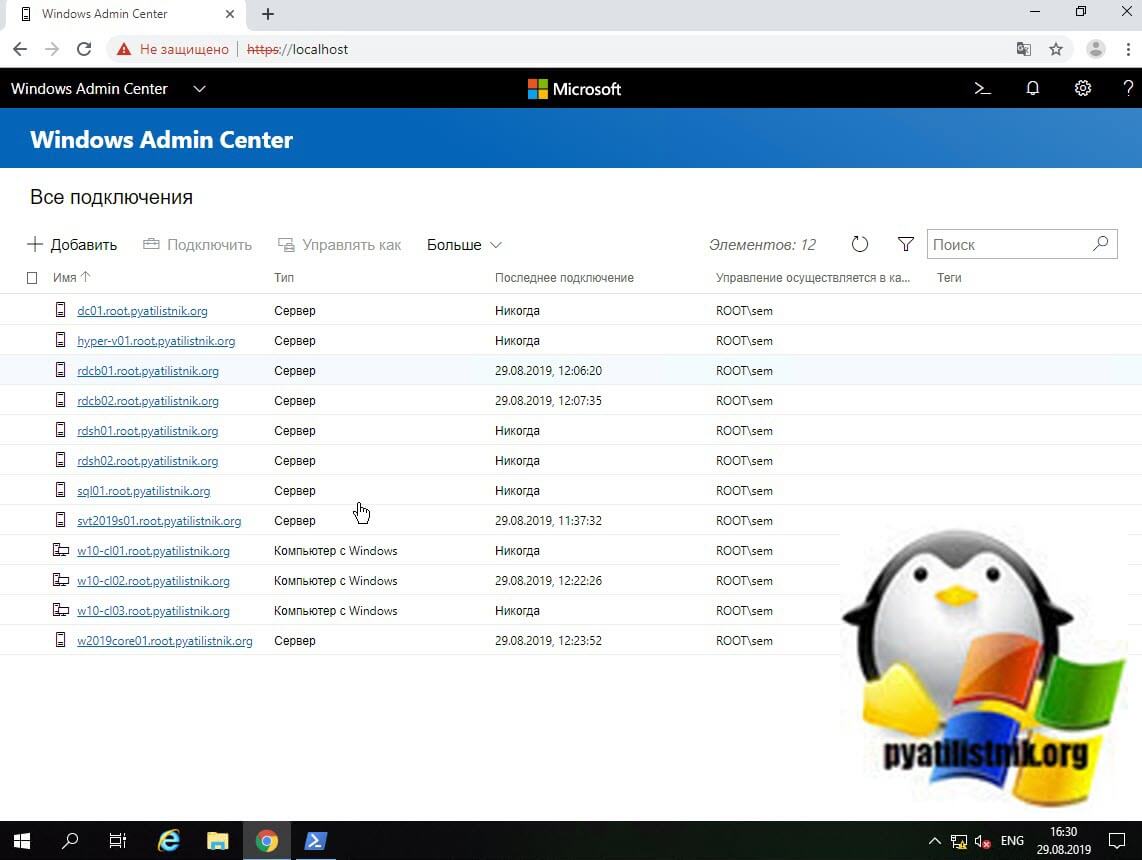
Далее находим раздел «Сеть«, тут у вас будет список всех ваших сетевых интерфейсов. Выбираем нужный, тут чем хорошо вы сразу видите много сводной информации в нижней части.
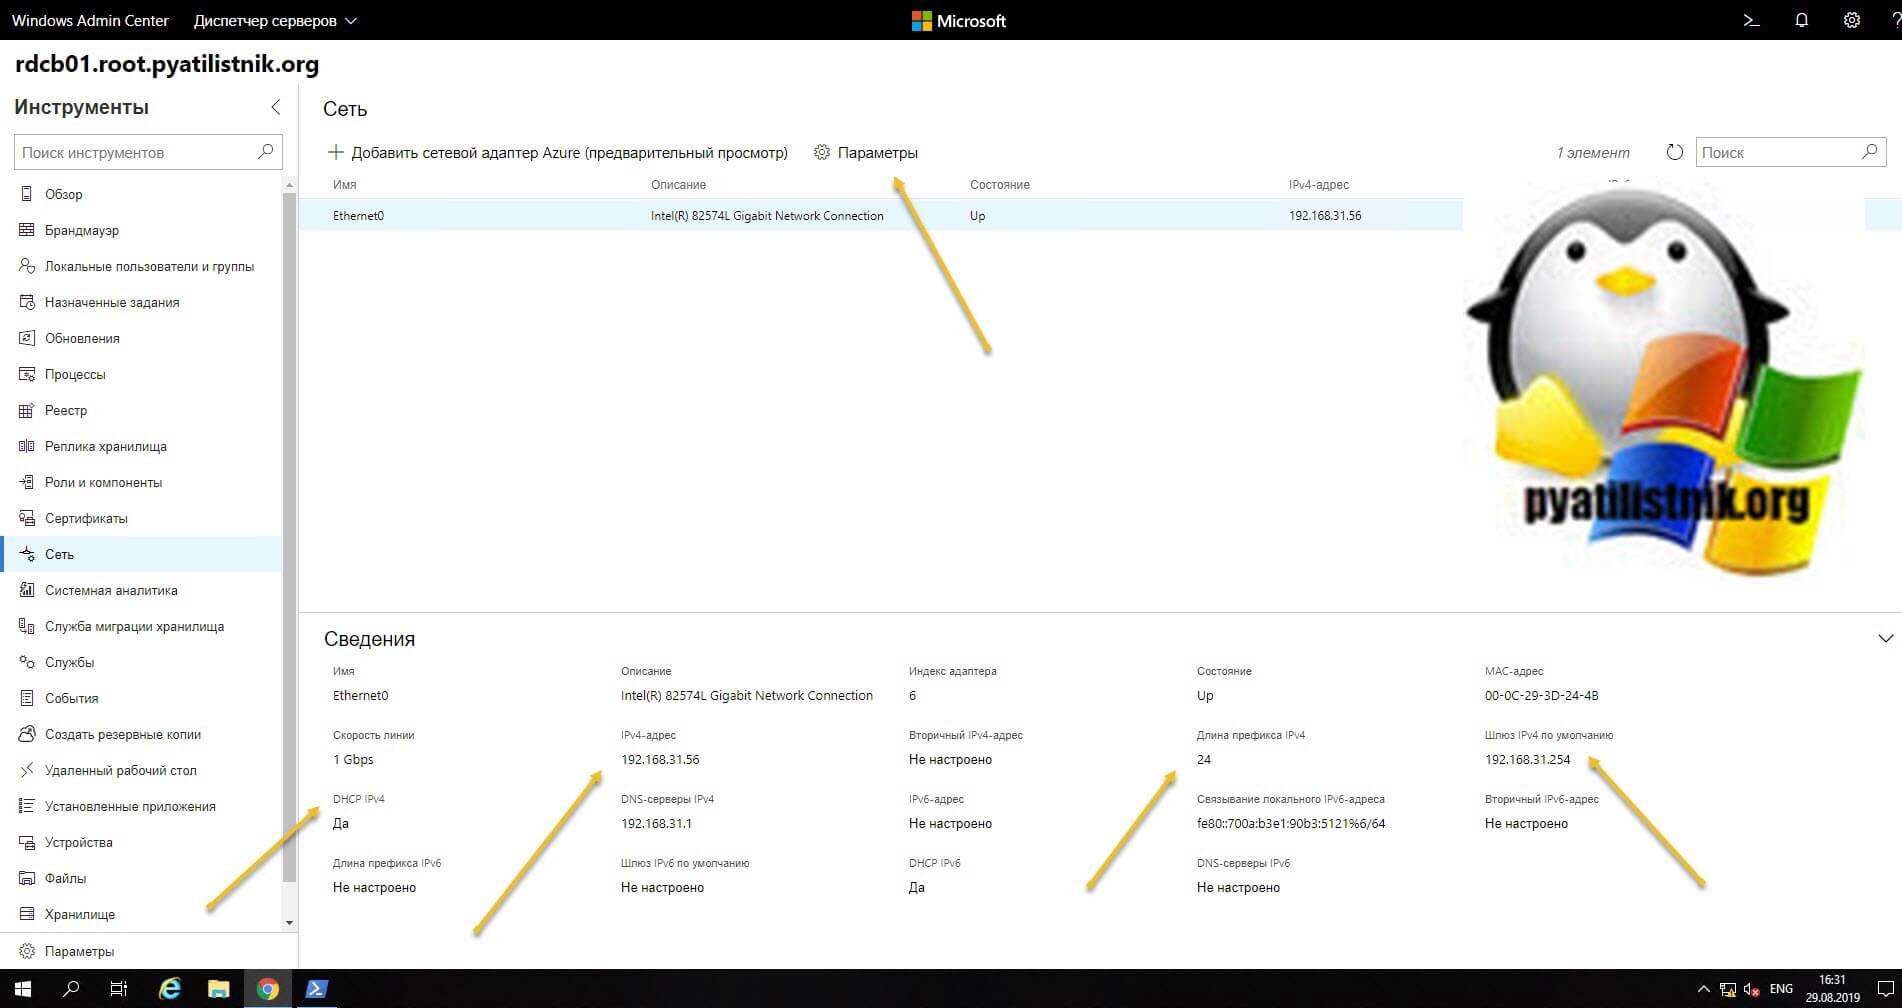
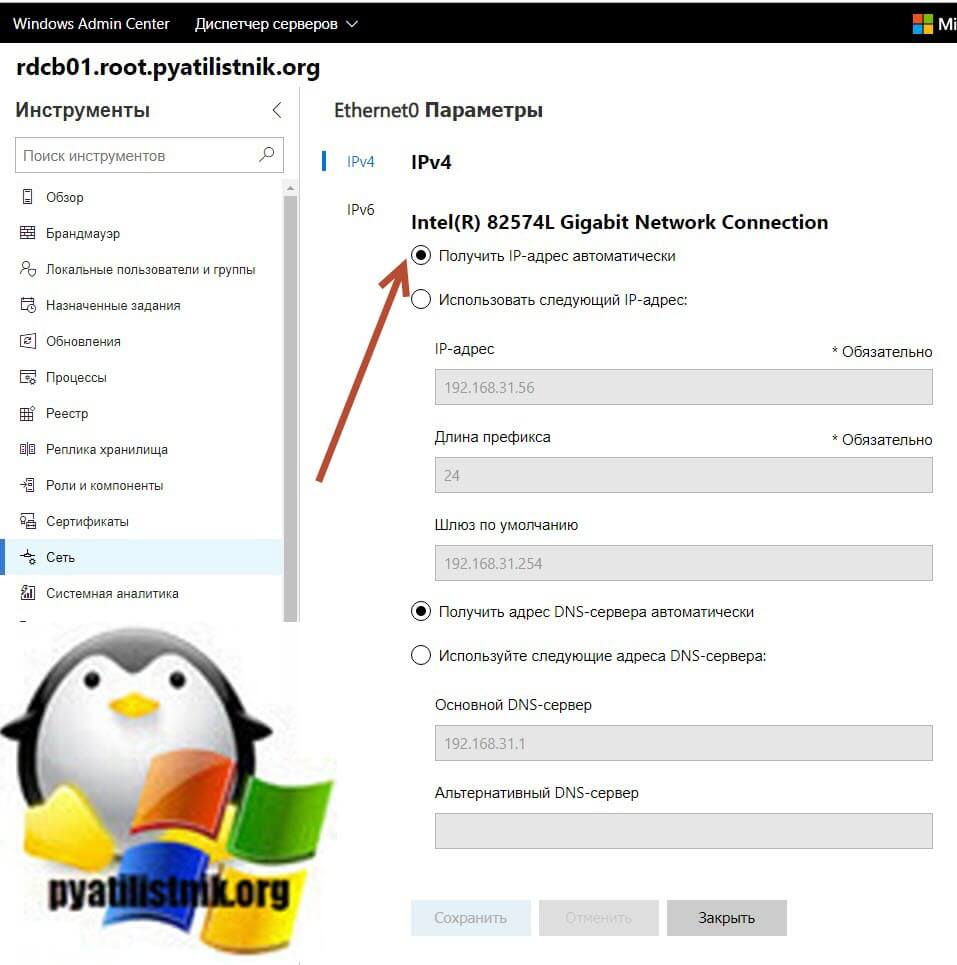
Для настройки сети нажмите кнопку «Параметры«. Как видим стоит автоматическое получение настроек.
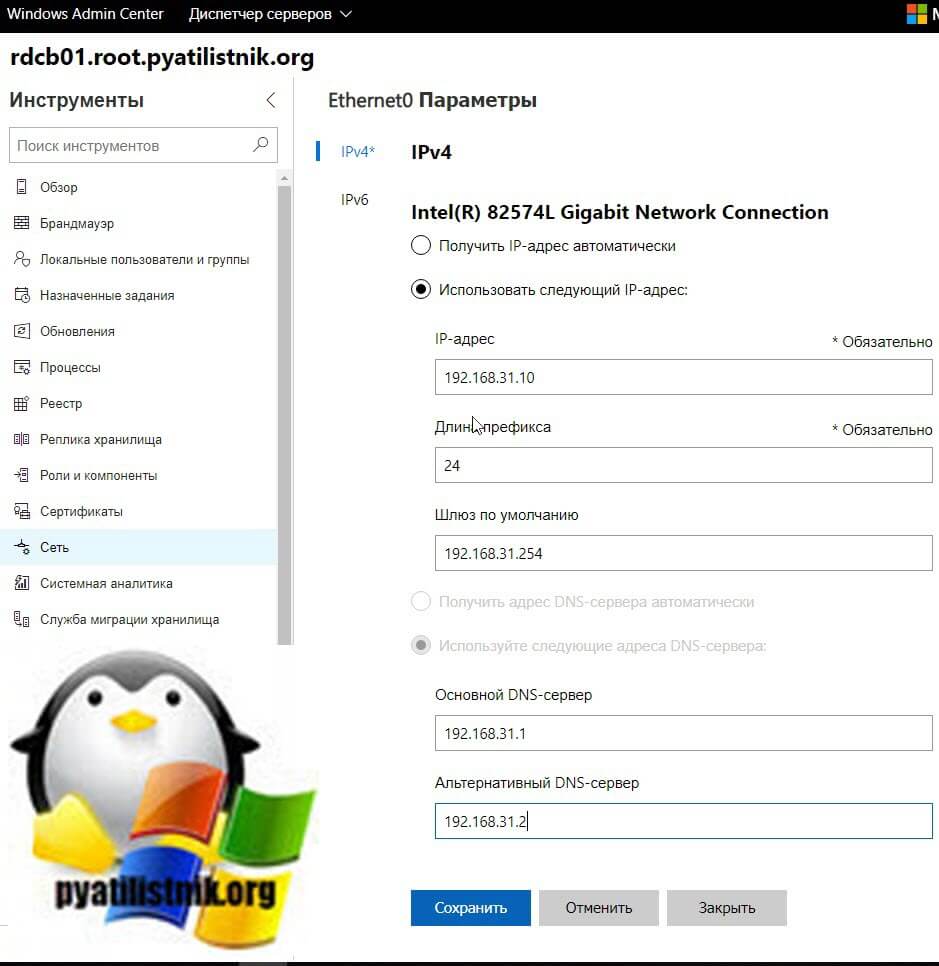
Активируем пункт «Использовать следующий IP-адрес» и задаем нужные сетевые настройки, после чего сохраняем изменения.
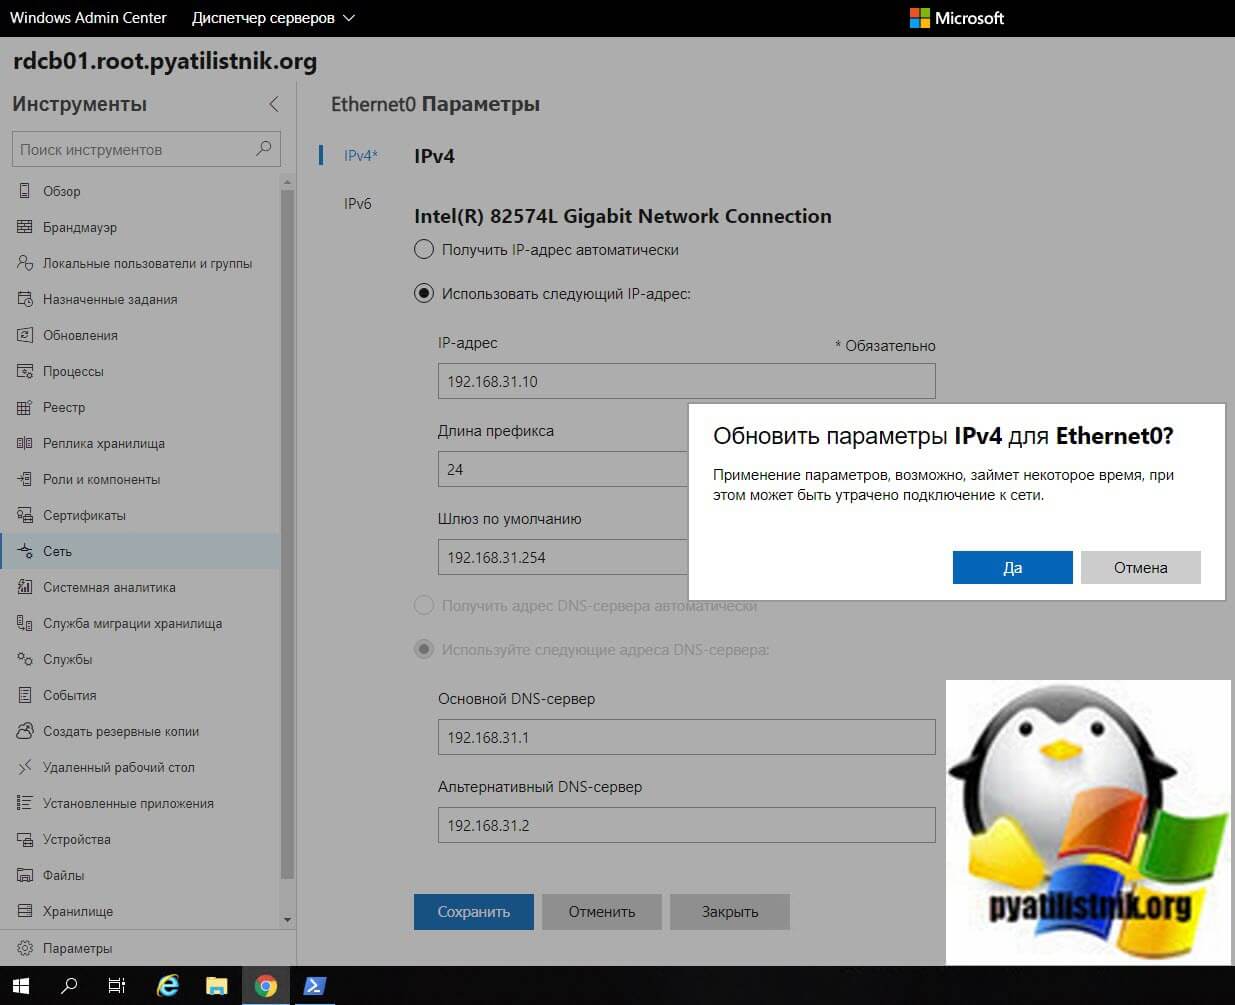
Подтверждаем применение настроек.
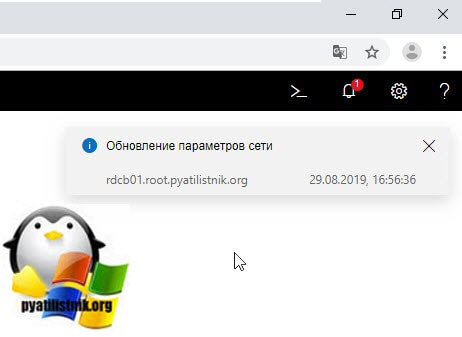
В правом верхнем углу вам покажут, что началось задание по обновлению.
Проверяем, перед этим единственное нужно очистить кэш-DNS. В итоге я вижу, что сервер пингуется по новому адресу.
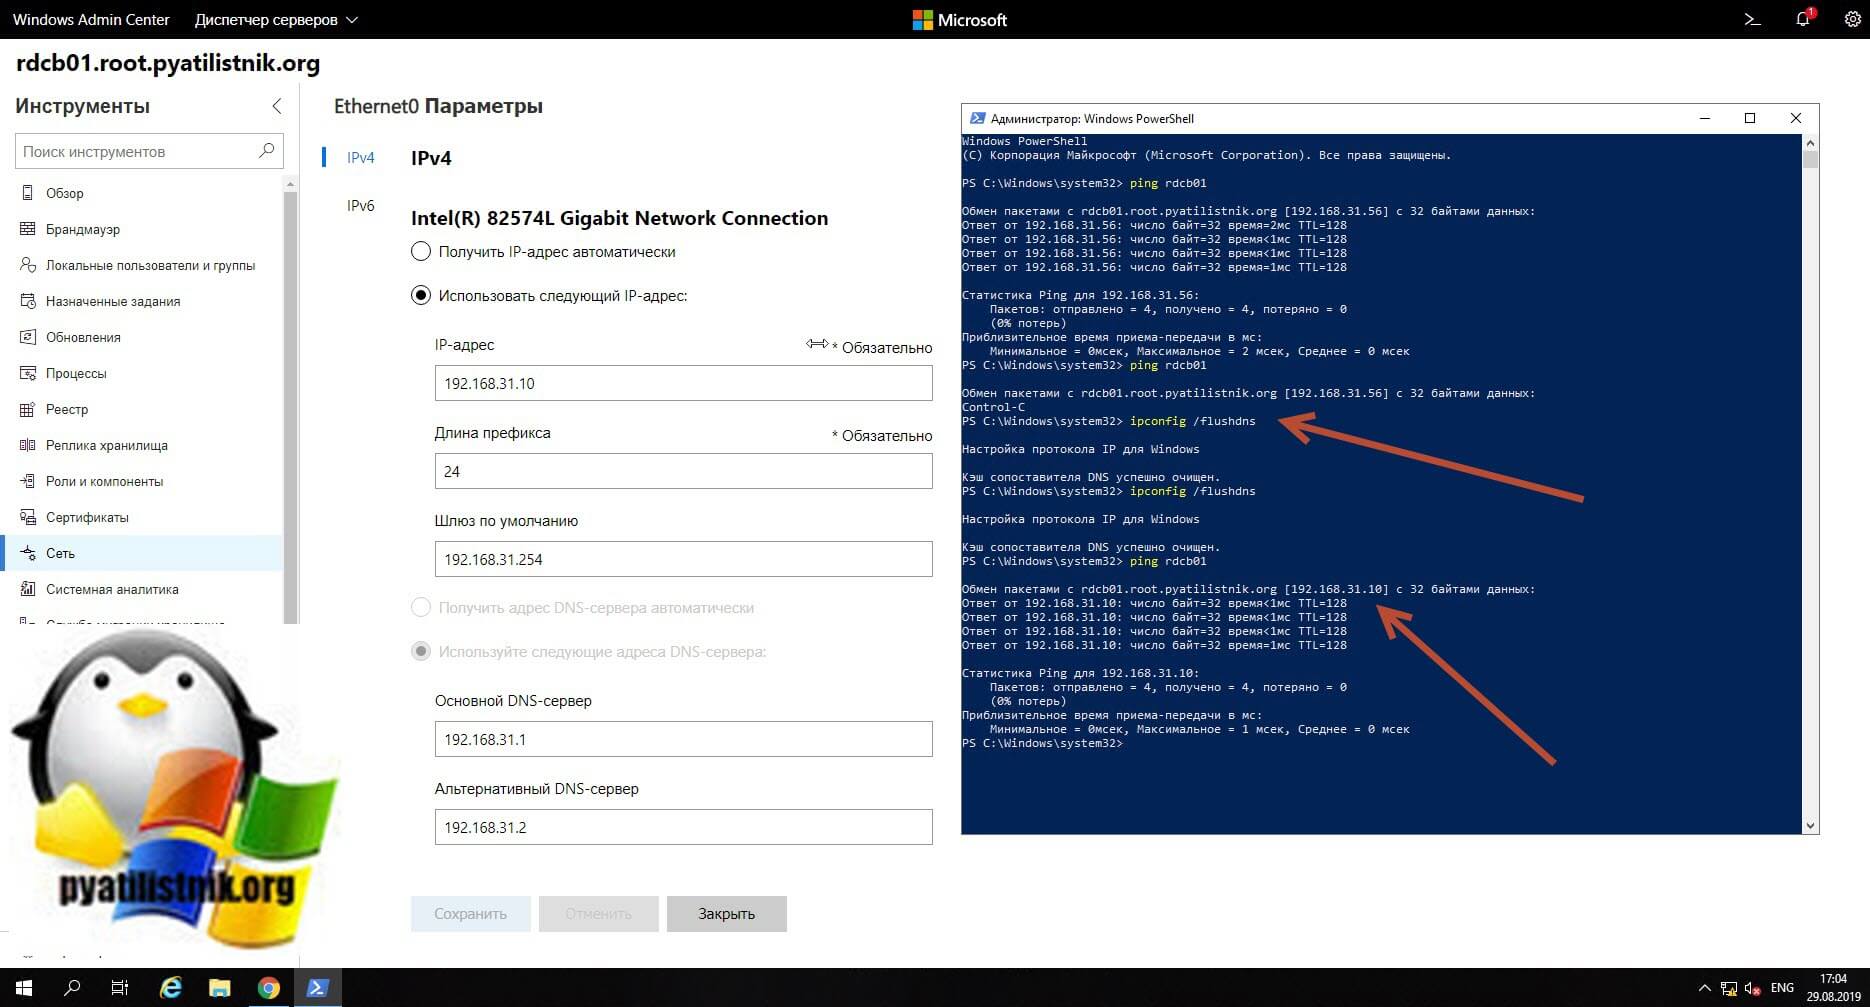
В итоге удаленная настройка сети на сервере Windows Server 2019 выполнена.
Настройка сети Windows Server 2019 через командную строку
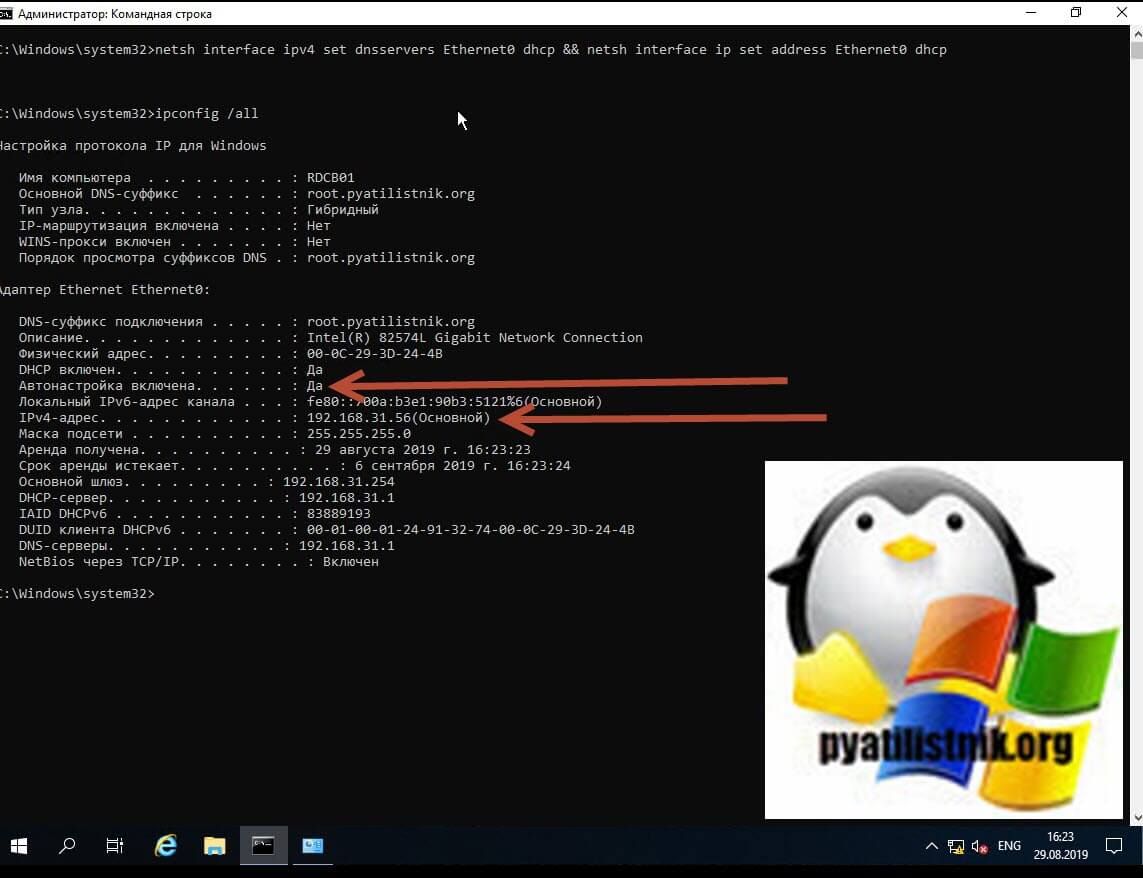
Второй метод заключается в использовании утилиты командной строки netsh. На практике, это используется в скриптах, или при настройке Windows Server в режиме Core. Я опять переведу свои настройки на получение адреса от DHCP сервера. DHCP присвоил мне адрес 192.168.31.56.
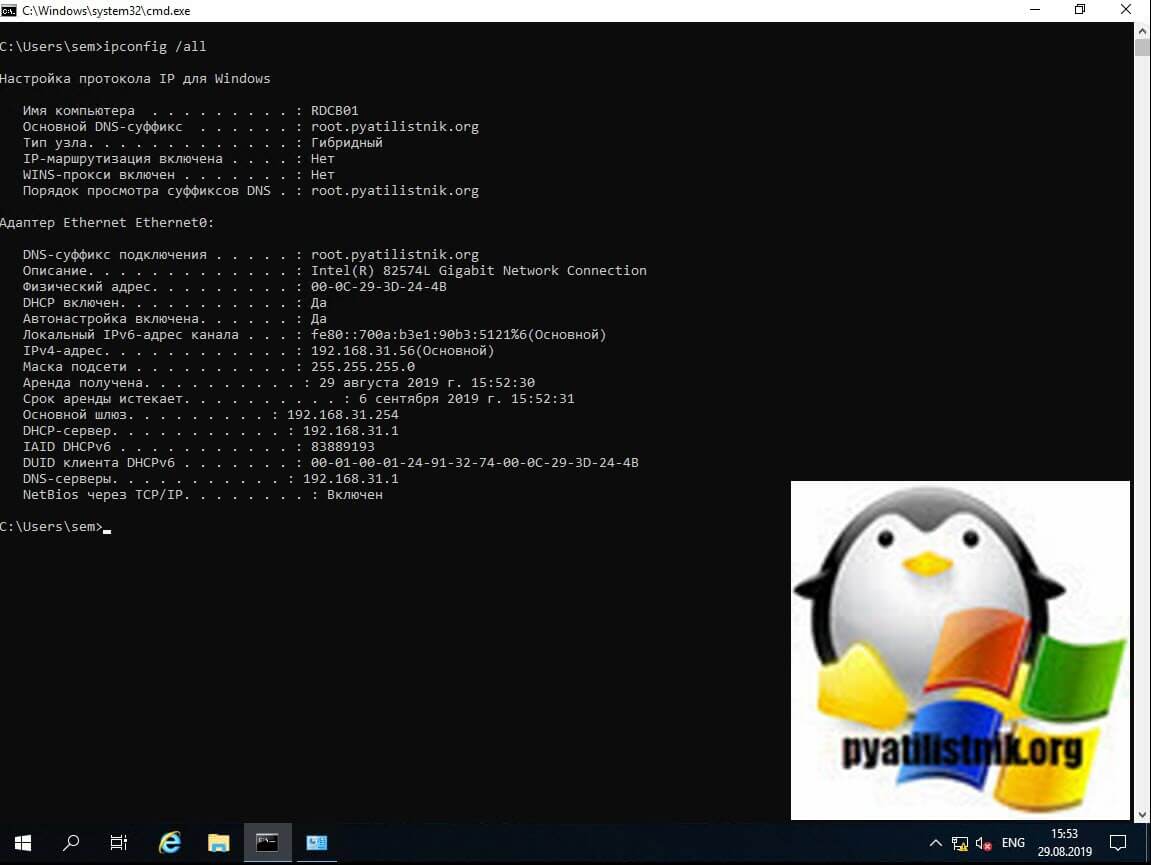
Для того, чтобы настроить статический IP-адрес через утилиту Netsh, вам нужно знать правильное имя сетевого адаптера, он легко смотрится при выводе команды Ipconfig /all. В моем примере, это Ethernet0.
- 192.168.31.10 — это мой статический Ip-адрес
- 255.255.255.0 — это моя маска подсети
- 192.168.31.254 — это мой основной шлюз
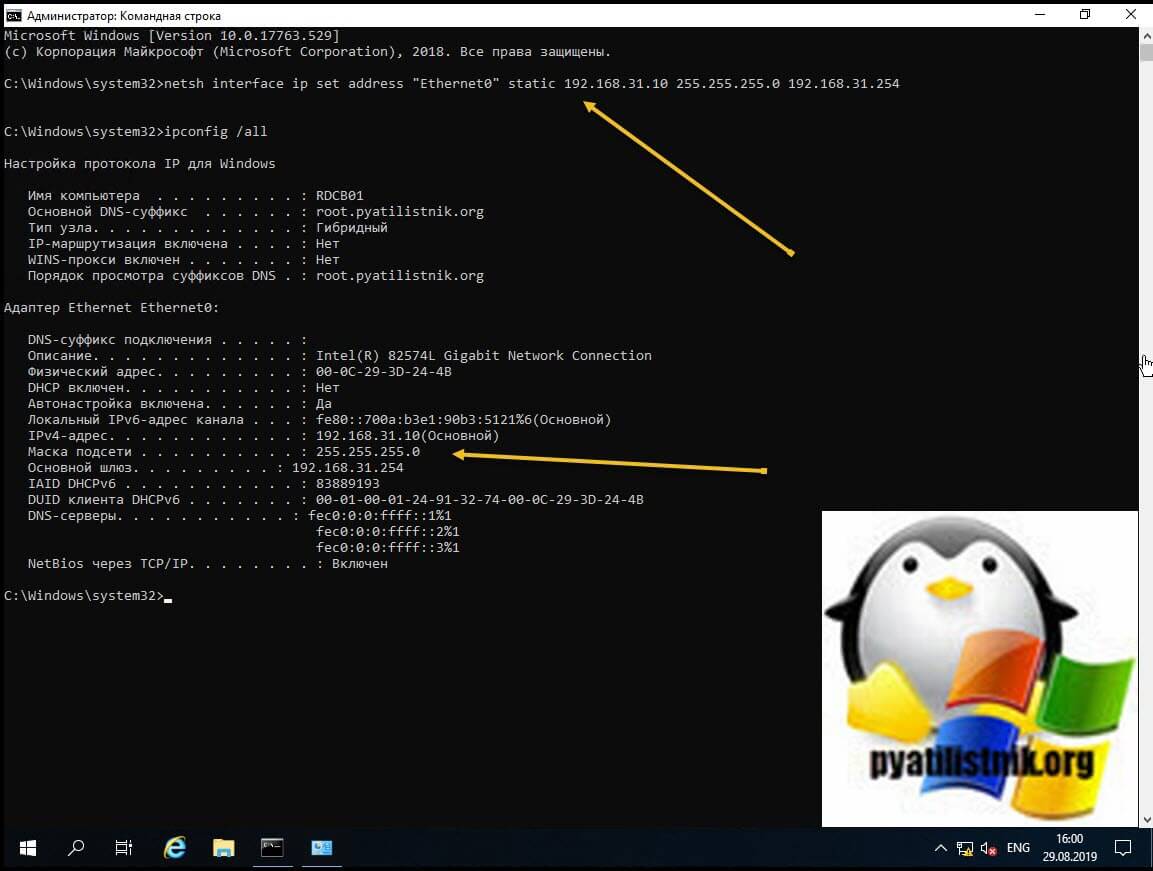
Видим, что команда успешно отработала, можно сразу проверить применение настроек сети через ipconfig. Теперь выполним настройку основного и альтернативного DNS.
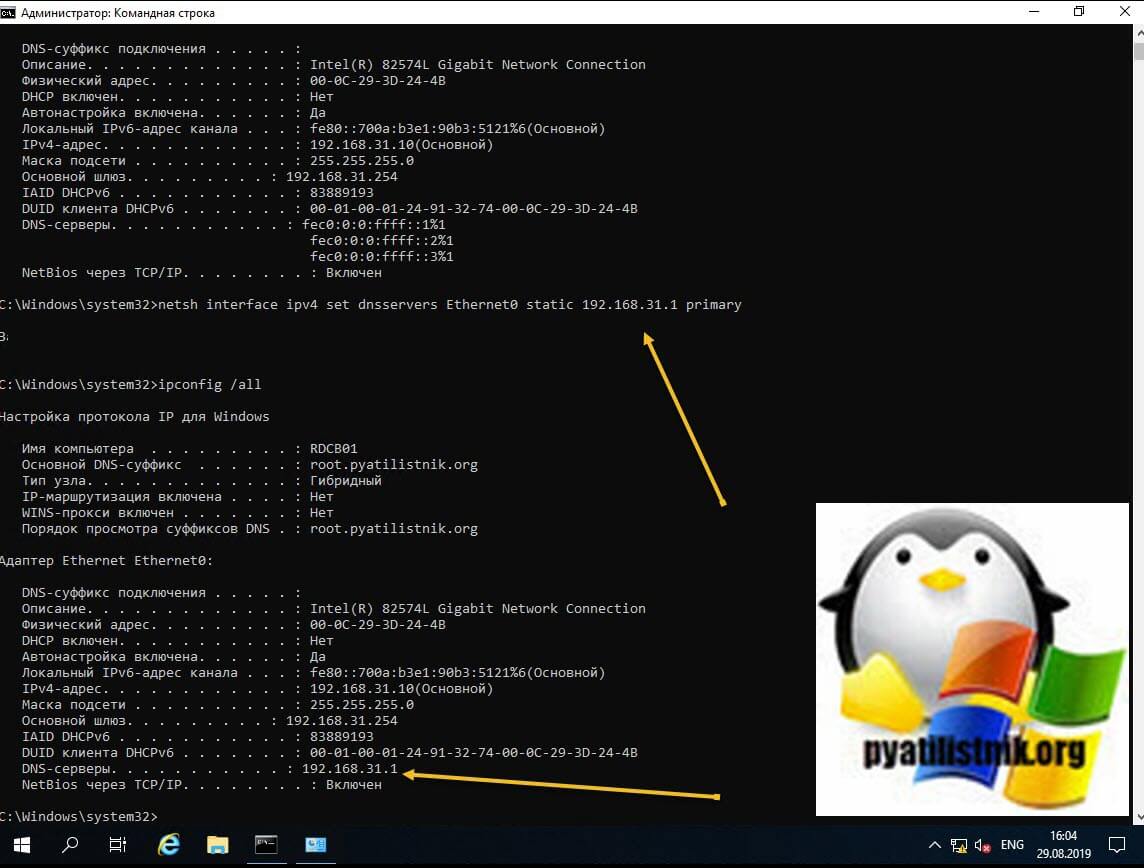
Прописываем альтернативный DNS адрес
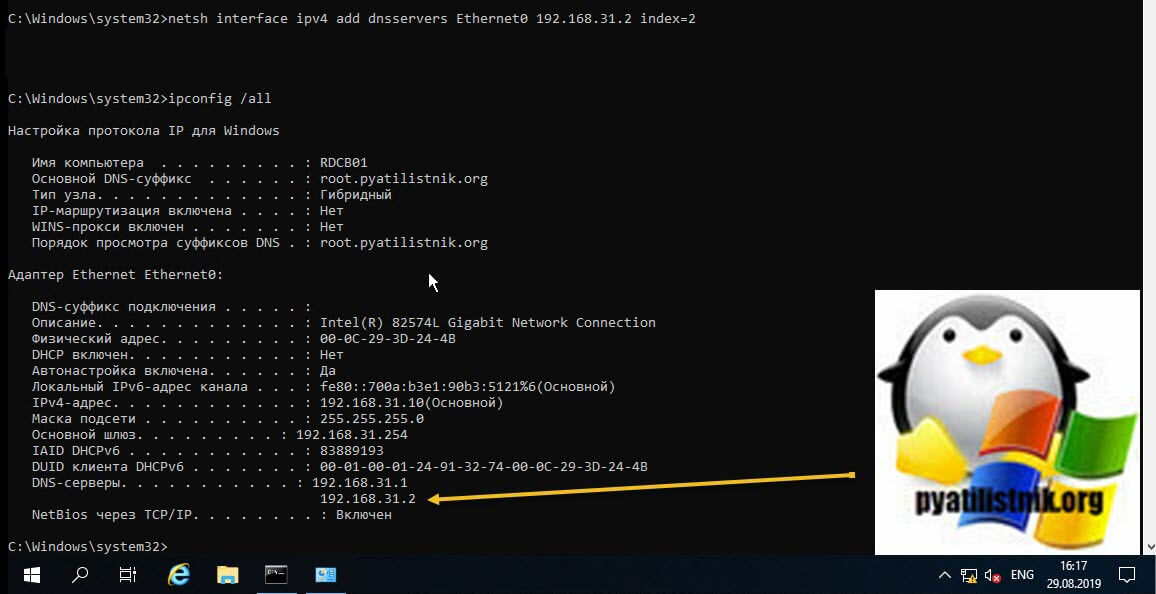
В итоге как видим у нас появился второй адрес DNS сервера на нашем сетевом интерфейсе. Настройка выполнена.
Если вам нужно вернуть сетевые настройки на получение адреса от DHCP сервера, то введите команду:
Настройка сети через PowerShell
Чтобы настроить статический адрес на сетевом интерфейсе с помощью командлетов, вам необходимо открыть от имени администратора оболочку PowerShell.
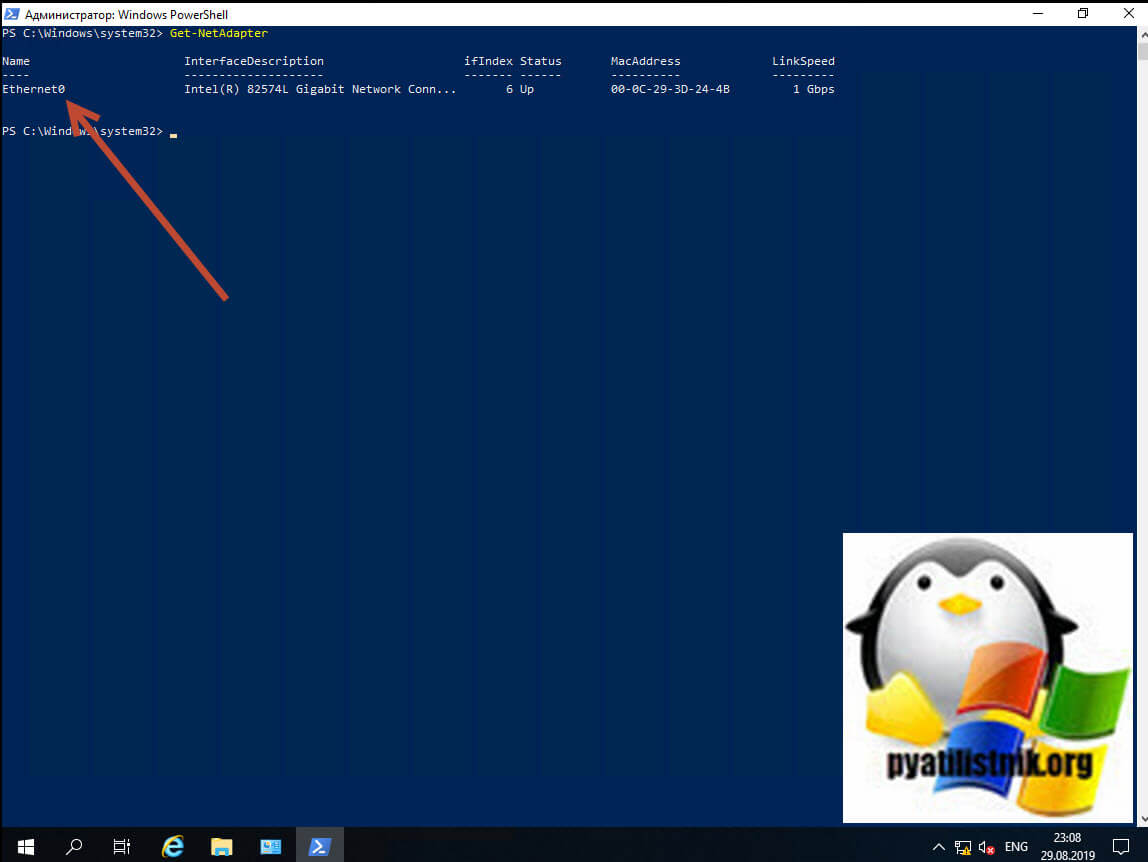
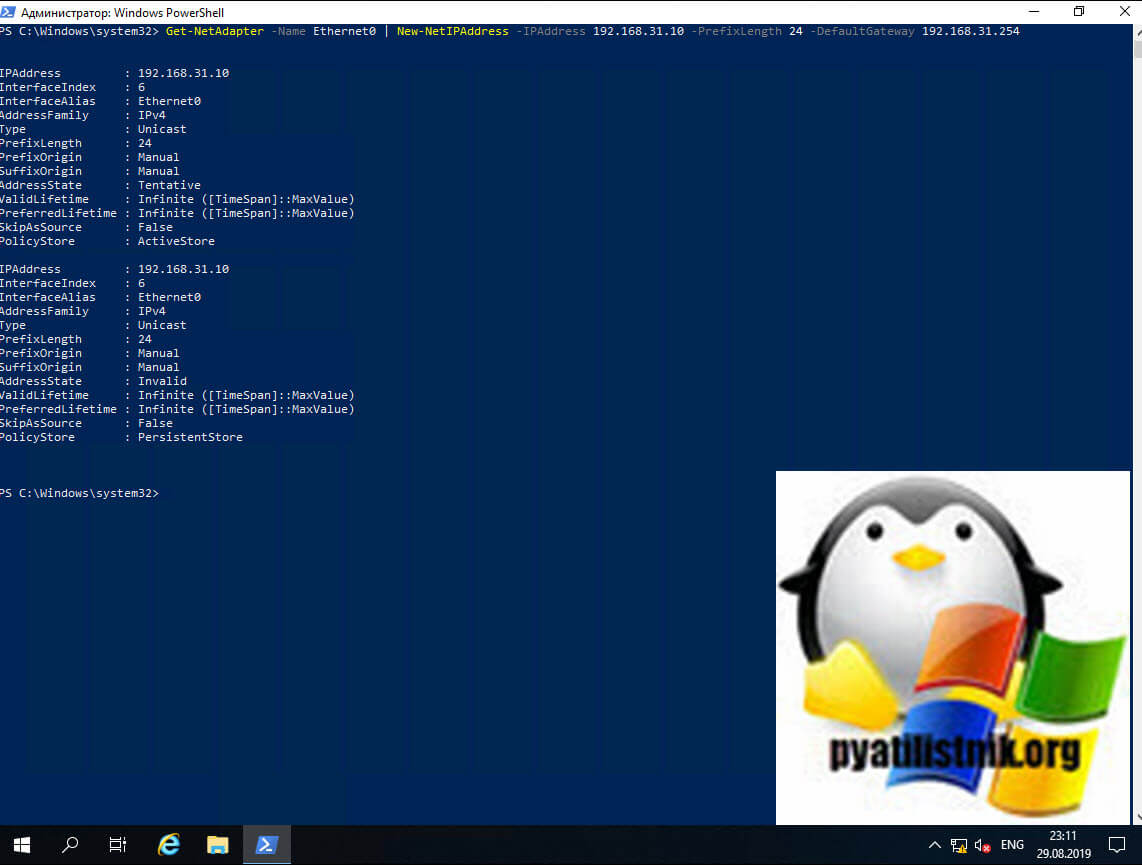
Прежде чем мы начнем настройку сети через PowerShell в нашей Windows Server 2019, нам как и в случае с netsh, нужно выяснить имя сетевого интерфейса. Для этого вводим команду:
В результате я вижу имя интерфейса Ethernet0.
Пишем команду, где обратите внимание префикс сети 255.255.255.0 задается в виде -PrefixLength 24. На выходе вы сразу увидите примененные настройки.
Зададим теперь оба DNS-сервера через команду
Посмотрим текущие сетевые настройки через команду:
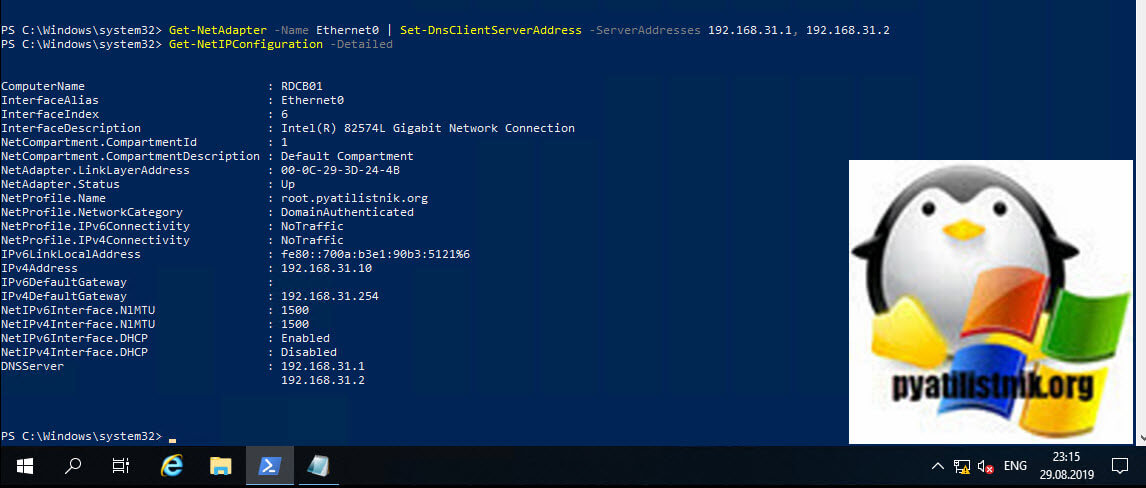
Как видите все сетевые настройки в моем Windows Server 2019 успешно применены.
Удаленная настройка сети
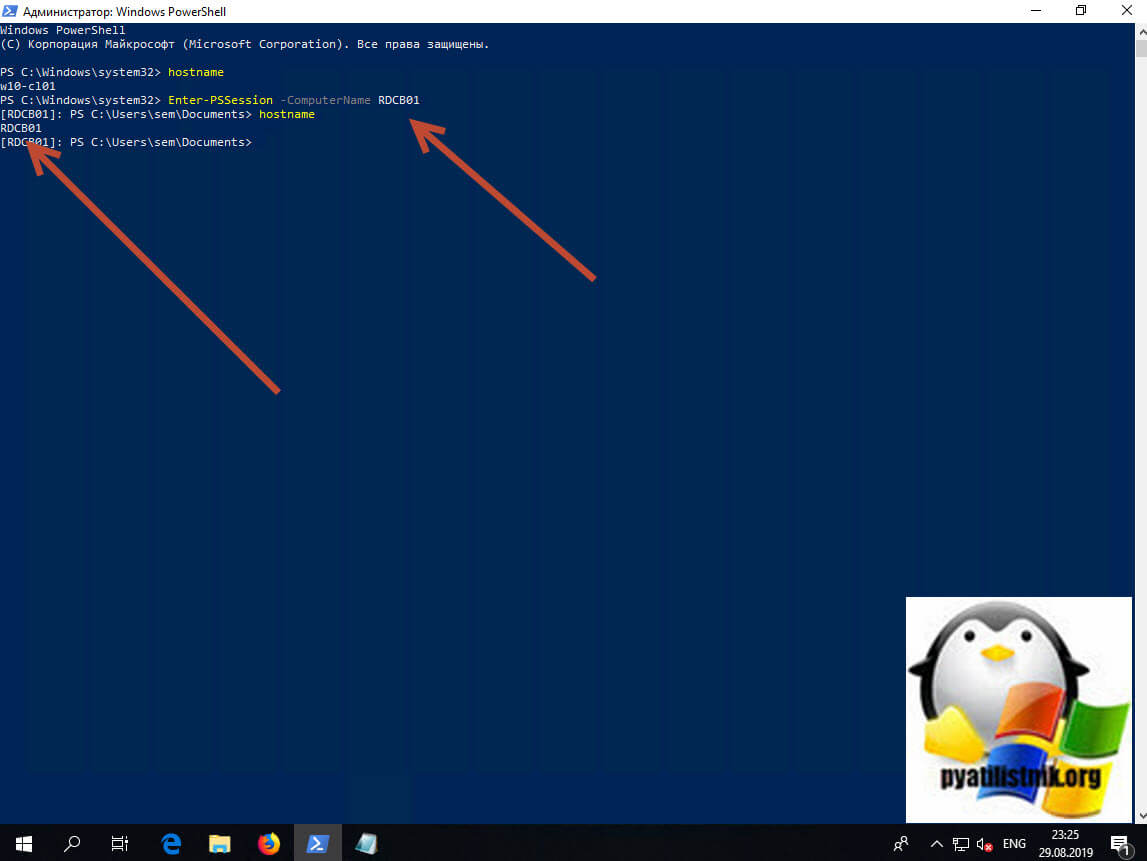
Выше я уже показал вам метод удаленной настройки сети через Windows Admin Center, но существует и еще несколько методов, которые мне были полезны в моей практике. Первое, это использование все того же PowerShell. И так у меня есть компьютер W10-cl01 с Windos 10 и предположим хочу с него настроить сеть на сервере RDCB01.
Открываем PowerShell, командой hostname я показываю, что сижу на компьютере W10-cl01. Далее для удаленного подключения вводим команду:
Я успешно подключился, теперь повторно введя команду hostname, я вижу, что сижу на компьютере RDCB01, и можно вводить команды описанные выше.
Второй метод удаленной настройки сети на Windows Server 2019, это использование утилиты PsExec.exe, я,о ее настройке и установке рассказывал в статье «Включить RDP Windows удаленно и локально».
Начнется запуск службы на удаленном сервере.

Введя все ту же команду hostname я вижу, что подключен к удаленному серверу RDCB01, при желании вы можете использовать для настройки сети netsh или PowerShell, что нравится больше.
Intel® Network Adapter Driver for Windows Server 2019*
Available Downloads
Wired_driver_26.2_x64.zip
Windows Server 2019*
Wired_PROSet_26.2_x64.zip
Windows Server 2019*
Other Versions
Detailed Description
What’s new
The Microsoft Windows* download package has been split into a driver package and an Intel® PROSet package. The driver package must be installed prior to installing the Intel® PROSet package.
Example Downloads:
Driver Package: Wired_driver_26.2_x64.zip
Intel® PROSet Package: Wired_PROSet_26.2_x64.zip
Note: Installation of Intel® PROSet is optional. Intel® PROSet software includes Intel® PROSet for Windows* Device Manager, Intel® PROSet Adapter Configuration Utility (Intel® PROSet ACU) , and Intel® PROSet for Windows PowerShell* software. For more information on Intel® PROSet, please review the “Microsoft* Windows* Driver and Software Installation and Configuration” section of the Intel® Ethernet Adapters and Devices User Guide.
See the release notes and the readme.txt file for installation instructions, supported hardware, what’s new, bug fixes, and known issues.
Overview
This download contains the Intel® Ethernet network drivers and software for Windows Server 2019*.
About Intel® drivers
The driver or software for your Intel® component might have been changed or replaced by the computer manufacturer. We recommend you work with your computer manufacturer before installing our driver so you don’t lose features or customizations.
Download Documentation
This download is valid for the product(s) listed below.
Intel Software License Agreement
The terms of the software license agreement included with any software you download will control your use of the software.
INTEL SOFTWARE LICENSE AGREEMENT
IMPORTANT — READ BEFORE COPYING, INSTALLING OR USING.
Do not use or load this software and any associated materials (collectively,
the «Software») until you have carefully read the following terms and
conditions. By loading or using the Software, you agree to the terms of this
Agreement. If you do not wish to so agree, do not install or use the Software.
LICENSES: Please Note:
— If you are a network administrator, the «Site License» below shall
— If you are an end user, the «Single User License» shall apply to you.
— If you are an original equipment manufacturer (OEM), the «OEM License»
shall apply to you.
SITE LICENSE. You may copy the Software onto your organization’s computers
for your organization’s use, and you may make a reasonable number of
back-up copies of the Software, subject to these conditions:
1. This Software is licensed for use only in conjunction with Intel
component products. Use of the Software in conjunction with non-Intel
component products is not licensed hereunder.
2. You may not copy, modify, rent, sell, distribute or transfer any part
of the Software except as provided in this Agreement, and you agree to
prevent unauthorized copying of the Software.
3. You may not reverse engineer, decompile, or disassemble the Software.
4. You may not sublicense or permit simultaneous use of the Software by
more than one user.
5. The Software may include portions offered on terms in addition to those
set out here, as set out in a license accompanying those portions.
SINGLE USER LICENSE. You may copy the Software onto a single computer for
your personal, noncommercial use, and you may make one back-up copy of the
Software, subject to these conditions:
1. This Software is licensed for use only in conjunction with Intel
component products. Use of the Software in conjunction with non-Intel
component products is not licensed hereunder.
2. You may not copy, modify, rent, sell, distribute or transfer any part
of the Software except as provided in this Agreement, and you agree to
prevent unauthorized copying of the Software.
3. You may not reverse engineer, decompile, or disassemble the Software.
4. You may not sublicense or permit simultaneous use of the Software by
more than one user.
5. The Software may include portions offered on terms in addition to those
set out here, as set out in a license accompanying those portions.
OEM LICENSE: You may reproduce and distribute the Software only as an
integral part of or incorporated in Your product or as a standalone
Software maintenance update for existing end users of Your products,
excluding any other standalone products, subject to these conditions:
1. This Software is licensed for use only in conjunction with Intel
component products. Use of the Software in conjunction with non-Intel
component products is not licensed hereunder.
2. You may not copy, modify, rent, sell, distribute or transfer any part
of the Software except as provided in this Agreement, and you agree to
prevent unauthorized copying of the Software.
3. You may not reverse engineer, decompile, or disassemble the Software.
4. You may only distribute the Software to your customers pursuant to a
written license agreement. Such license agreement may be a «break-the-
seal» license agreement. At a minimum such license shall safeguard
Intel’s ownership rights to the Software.
5. The Software may include portions offered on terms in addition to those
set out here, as set out in a license accompanying those portions.
NO OTHER RIGHTS. No rights or licenses are granted by Intel to You, expressly
or by implication, with respect to any proprietary information or patent,
copyright, mask work, trademark, trade secret, or other intellectual property
right owned or controlled by Intel, except as expressly provided in this
OWNERSHIP OF SOFTWARE AND COPYRIGHTS. Title to all copies of the Software
remains with Intel or its suppliers. The Software is copyrighted and
protected by the laws of the United States and other countries, and
international treaty provisions. You may not remove any copyright notices
from the Software. Intel may make changes to the Software, or to items
referenced therein, at any time without notice, but is not obligated to
support or update the Software. Except as otherwise expressly provided, Intel
grants no express or implied right under Intel patents, copyrights,
trademarks, or other intellectual property rights. You may transfer the
Software only if the recipient agrees to be fully bound by these terms and if
you retain no copies of the Software.
LIMITED MEDIA WARRANTY. If the Software has been delivered by Intel on
physical media, Intel warrants the media to be free from material physical
defects for a period of ninety days after delivery by Intel. If such a defect
is found, return the media to Intel for replacement or alternate delivery of
the Software as Intel may select.
EXCLUSION OF OTHER WARRANTIES. EXCEPT AS PROVIDED ABOVE, THE SOFTWARE IS
PROVIDED «AS IS» WITHOUT ANY EXPRESS OR IMPLIED WARRANTY OF ANY KIND
INCLUDING WARRANTIES OF MERCHANTABILITY, NONINFRINGEMENT, OR FITNESS FOR A
PARTICULAR PURPOSE. Intel does not warrant or assume responsibility for the
accuracy or completeness of any information, text, graphics, links or other
items contained within the Software.
LIMITATION OF LIABILITY. IN NO EVENT SHALL INTEL OR ITS SUPPLIERS BE LIABLE
FOR ANY DAMAGES WHATSOEVER (INCLUDING, WITHOUT LIMITATION, LOST PROFITS,
BUSINESS INTERRUPTION, OR LOST INFORMATION) ARISING OUT OF THE USE OF OR
INABILITY TO USE THE SOFTWARE, EVEN IF INTEL HAS BEEN ADVISED OF THE
POSSIBILITY OF SUCH DAMAGES. SOME JURISDICTIONS PROHIBIT EXCLUSION OR
LIMITATION OF LIABILITY FOR IMPLIED WARRANTIES OR CONSEQUENTIAL OR INCIDENTAL
DAMAGES, SO THE ABOVE LIMITATION MAY NOT APPLY TO YOU. YOU MAY ALSO HAVE
OTHER LEGAL RIGHTS THAT VARY FROM JURISDICTION TO JURISDICTION.
TERMINATION OF THIS AGREEMENT. Intel may terminate this Agreement at any time
if you violate its terms. Upon termination, you will immediately destroy the
Software or return all copies of the Software to Intel.
APPLICABLE LAWS. Claims arising under this Agreement shall be governed by the
laws of California, excluding its principles of conflict of laws and the
United Nations Convention on Contracts for the Sale of Goods. You may not
export the Software in violation of applicable export laws and regulations.
Intel is not obligated under any other agreements unless they are in writing
and signed by an authorized representative of Intel.
GOVERNMENT RESTRICTED RIGHTS. The Software is provided with «RESTRICTED
RIGHTS.» Use, duplication, or disclosure by the Government is subject to
restrictions as set forth in FAR52.227-14 and DFAR252.227-7013 et seq. or its
successor. Use of the Software by the Government constitutes acknowledgment
of Intel’s proprietary rights therein. Contractor or Manufacturer is Intel
2200 Mission College Blvd., Santa Clara, CA 95052.
Your file download has started. If your download did not start, please click here to initiate again.


